


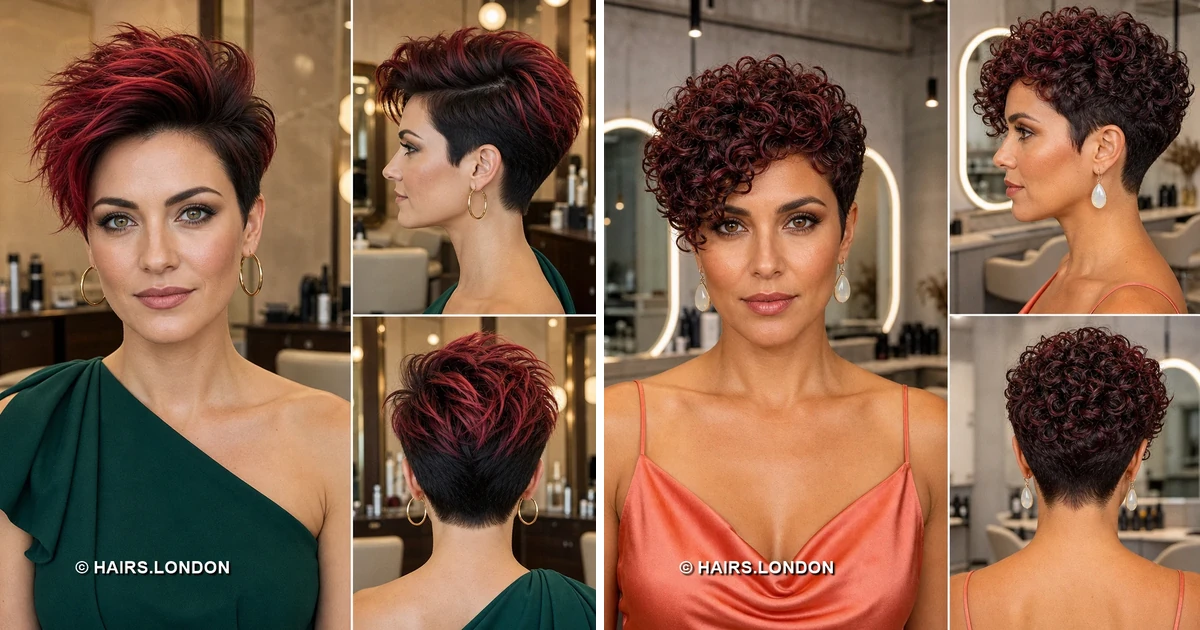
11. Garnet Soft-Fringe Pixie
Garnet-colored layers form a soft fringe swept across the forehead. The top sits close but retains lightly feathered movement. Compact sides curve neatly around the ears. Behind, separated crown layers lead into a narrow nape. The darker base remains visible beneath the red surface. Request light layering rather than removing too much crown weight. Dry the fringe toward its natural side with fingers. Use a pea-sized amount of cream for gentle definition. Book trims when the fringe starts losing its clear direction. Discuss whether you prefer an exposed or softened temple. Keep the temples soft if sharp edges feel severe.
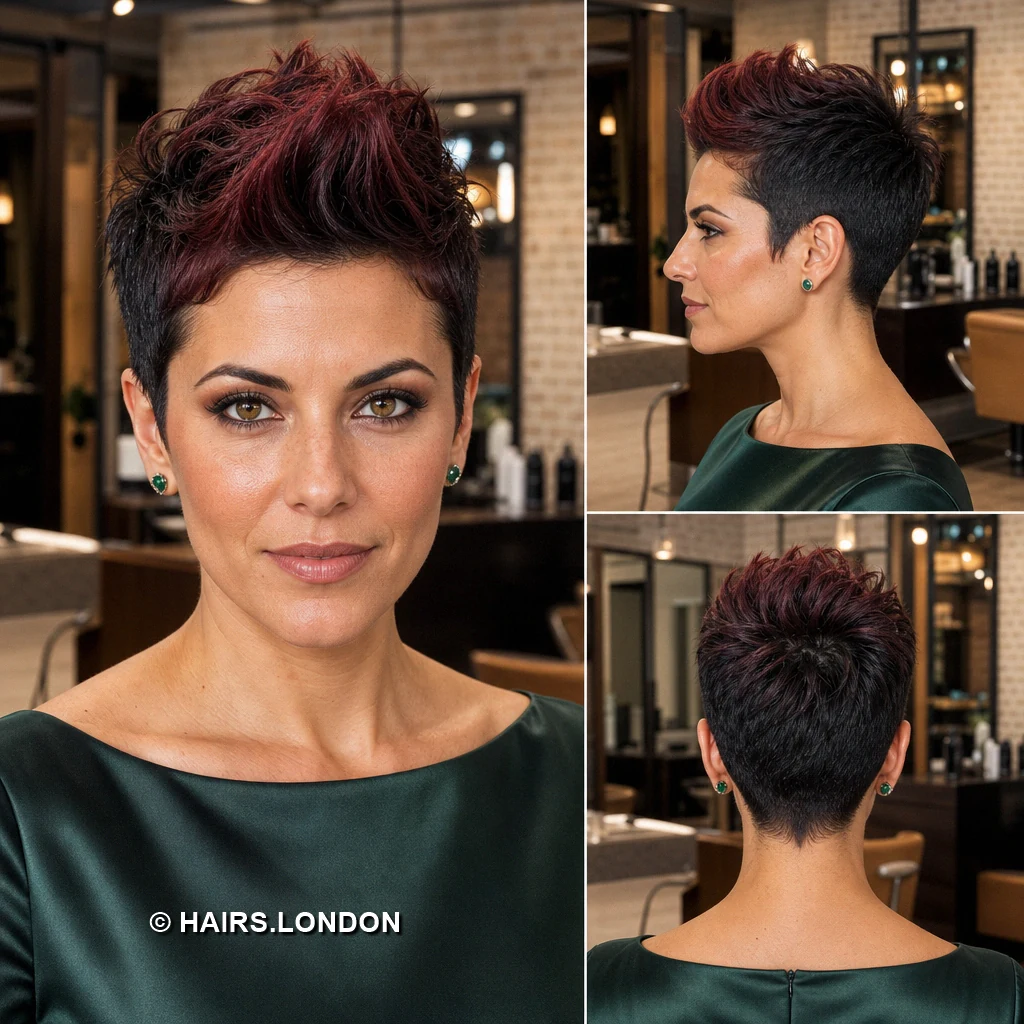
12. Black-Cherry Rounded Crop
Black-cherry hair gives this rounded pixie a deeper finish. Its substantial top sweeps into a short side fringe. Lightly tousled crown layers prevent the silhouette from appearing flat. The sides stay snug, while the back narrows softly. Piecey ends remain visible around the neckline. Ask for internal texture while preserving the rounded outer shape. Blow-dry from roots toward the fringe to control fullness. Add a little paste only where separation looks useful. Check the back between cuts for uneven growth. Bring photos showing both the fuller top and narrower nape. A side view helps establish how fullness remains above ears.
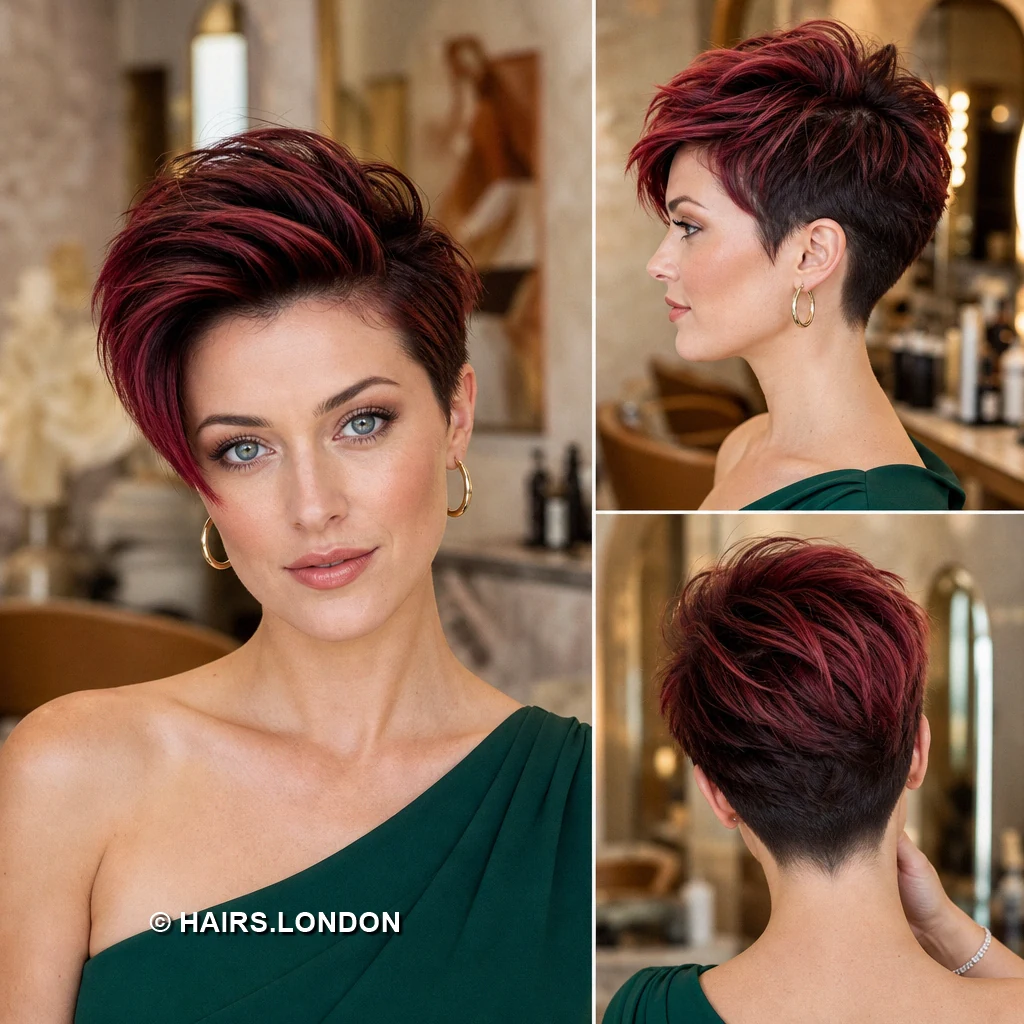
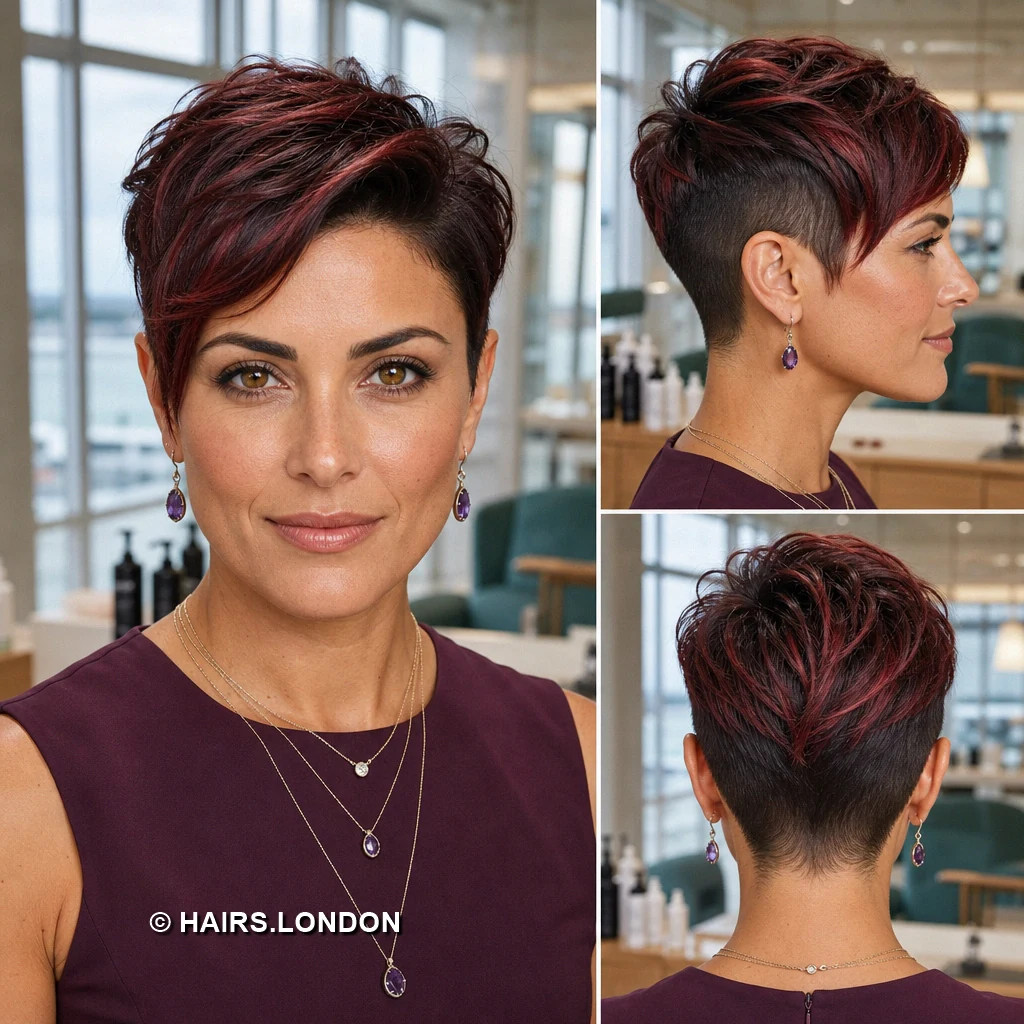
13. Mahogany-Wine Undercut Sweep
Mahogany-wine streaks follow a long sweep across the top. The front angles down beside the face in pointed pieces. A visibly shorter side creates contrast beneath the layered crown. The back transitions from fuller color into a tight taper. Ask how high the short side should rise. Direct the longer section across with a brush and dryer. Separate its ends using a small amount of paste. Keep the shorter area trimmed to maintain that contrast. Consider root growth when placing bright color near the part. Show your stylist which side you normally wear forward. Check how it sits when dry.
14. Mulberry Lifted Quiff
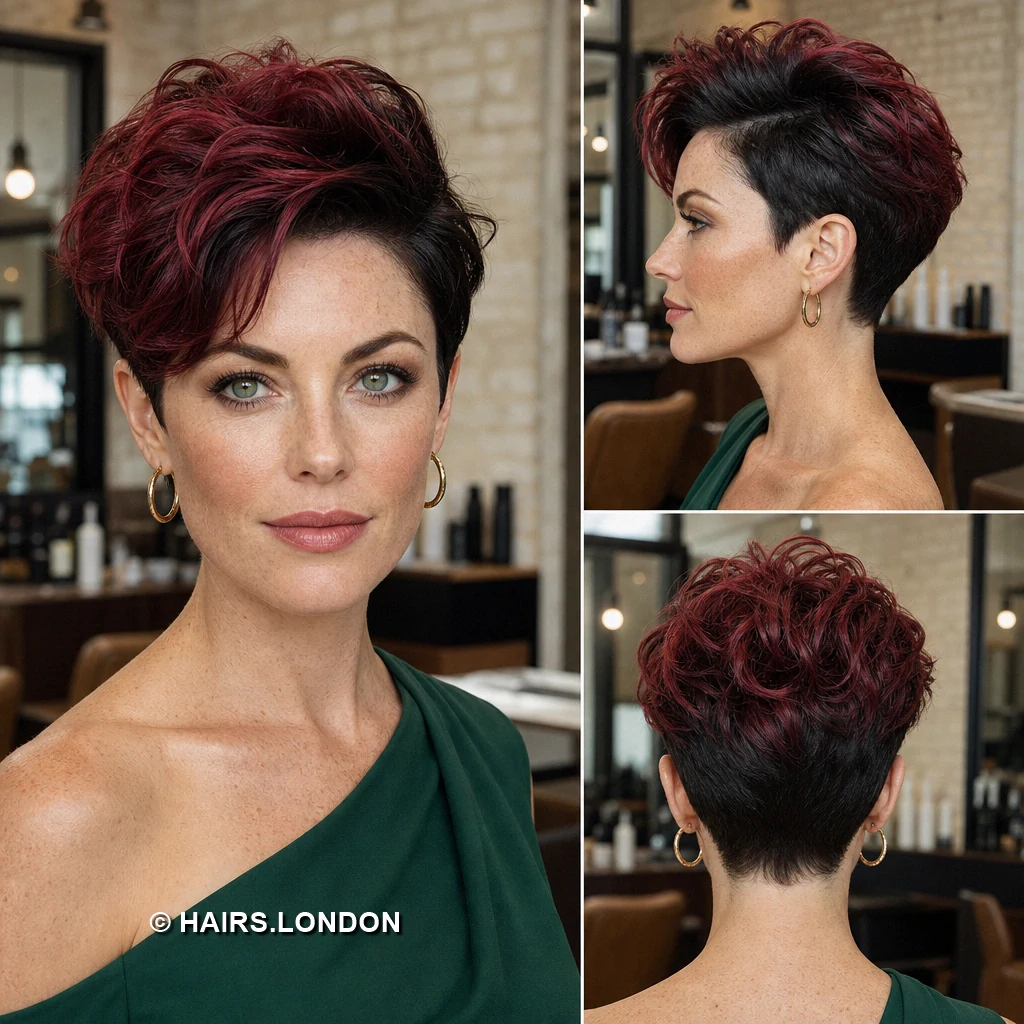
Mulberry and red tones accent the lifted front section. The top bends backward before falling into tousled crown layers. Shorter sides keep the shape open around the ears. At the back, textured fullness tapers to a pointed finish. The fringe stays off the forehead without looking rigid. Request length through the front for an easy backward bend. Dry roots upward, then guide ends toward the crown. Finish with flexible paste worked through selected pieces. Tidy the nape when its point begins spreading. Discuss whether your roots naturally favor this backward direction. Avoid overworking the front once the bend has formed.
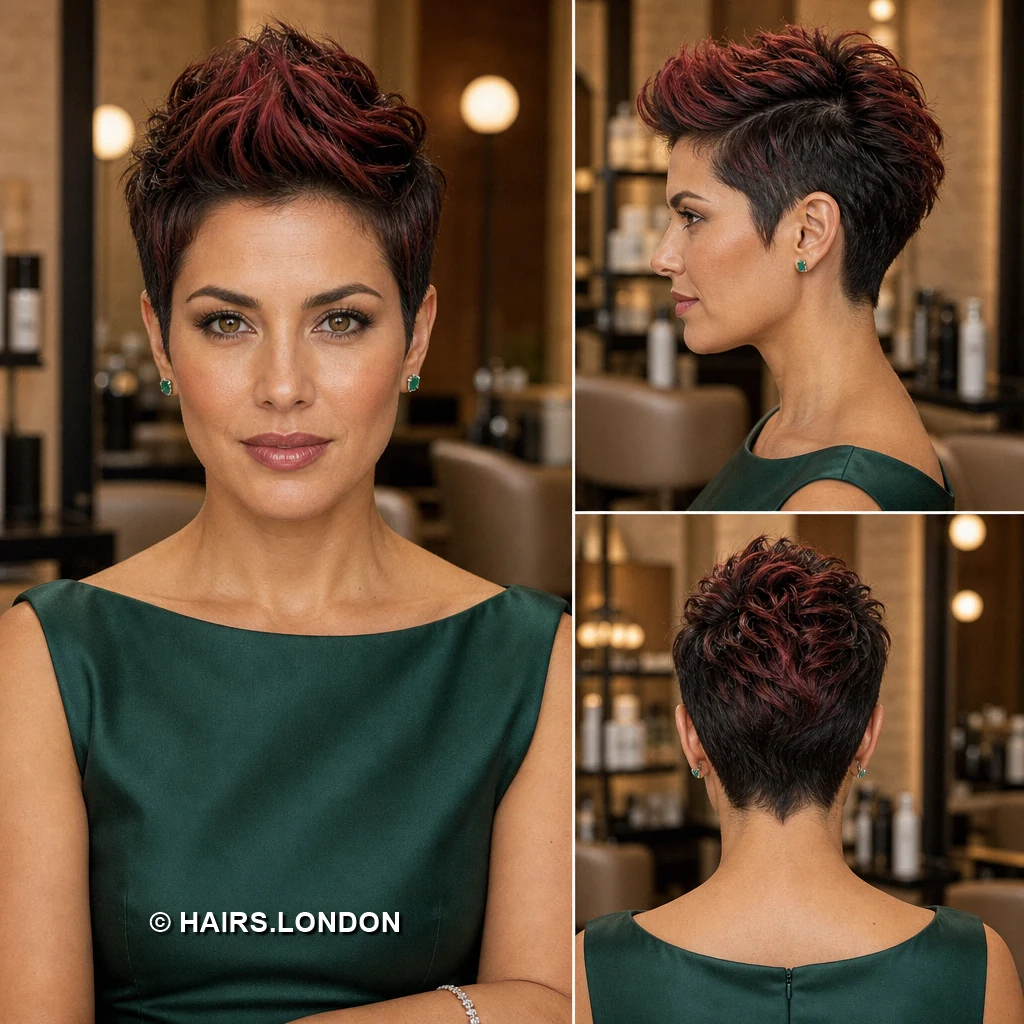
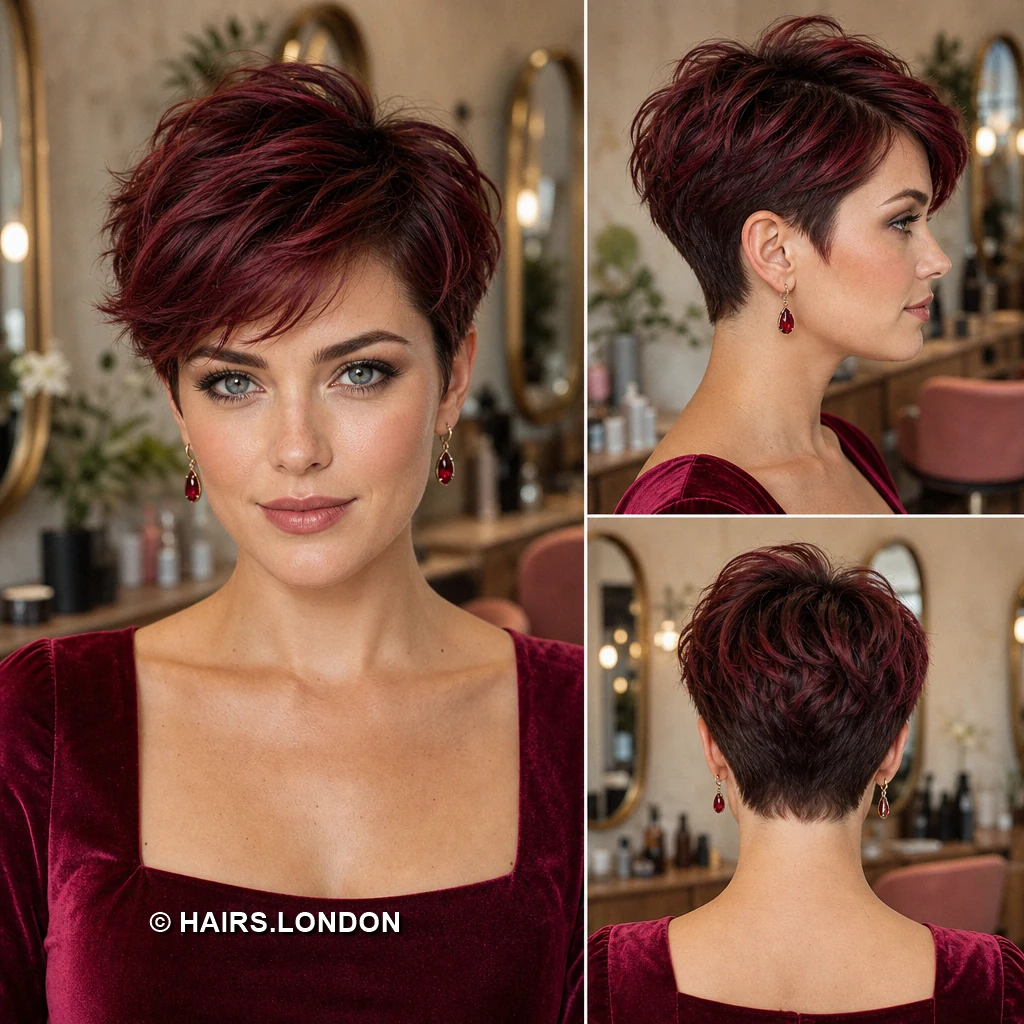
15. Berry Choppy Pixie
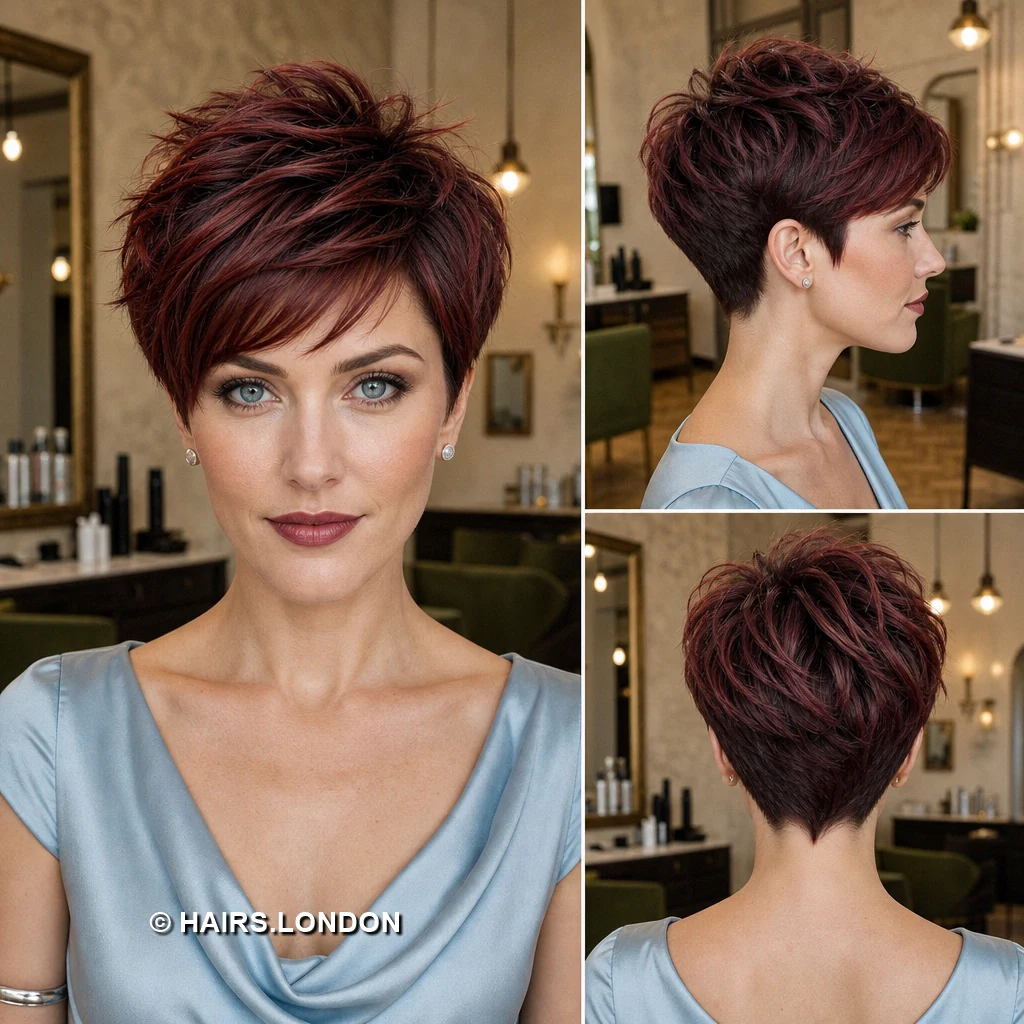
Berry-red pieces brighten this short, deliberately choppy upper shape. A wispy fringe brushes across the upper forehead. Uneven crown lengths create height and airy separation. Dark sides remain close around the ears and temples. The back tapers sharply beneath the textured crown. Ask for point-cut texture while retaining enough manageable fringe. Blow-dry forward first, lifting the crown with fingertips. Pinch selected ends with matte paste for visible definition. Avoid loading the short sides with styling product. Check how the crown behaves before requesting additional thinning. The cropped outline needs regular attention, but the airy top can retain length between appointments.
16. Damson Piecey Crop
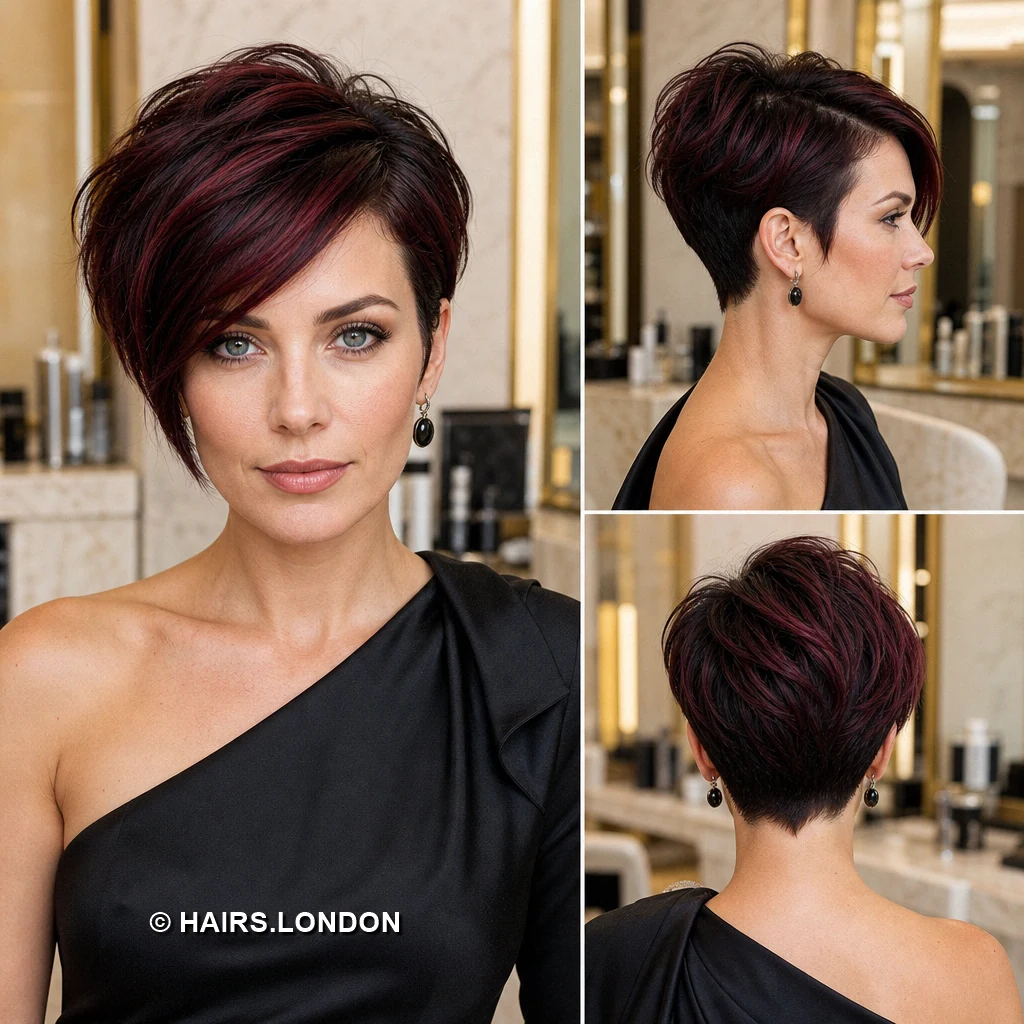
Damson-purple highlights trace the piecey layers across the crown. A short diagonal fringe leaves most of the forehead open. The compact sides blend into a softly shaped back. Fine tips lift slightly, giving the crop relaxed texture. Its nape ends in a narrow, pointed taper. Ask for movement without cutting the fringe excessively short. Dry the hair in its intended direction using fingertips. Apply light wax to ends instead of coating every strand. Refresh the outline when the back loses its point. Discuss how much texture your hair can hold naturally. Consider finger styling when the short fringe resists brushes.
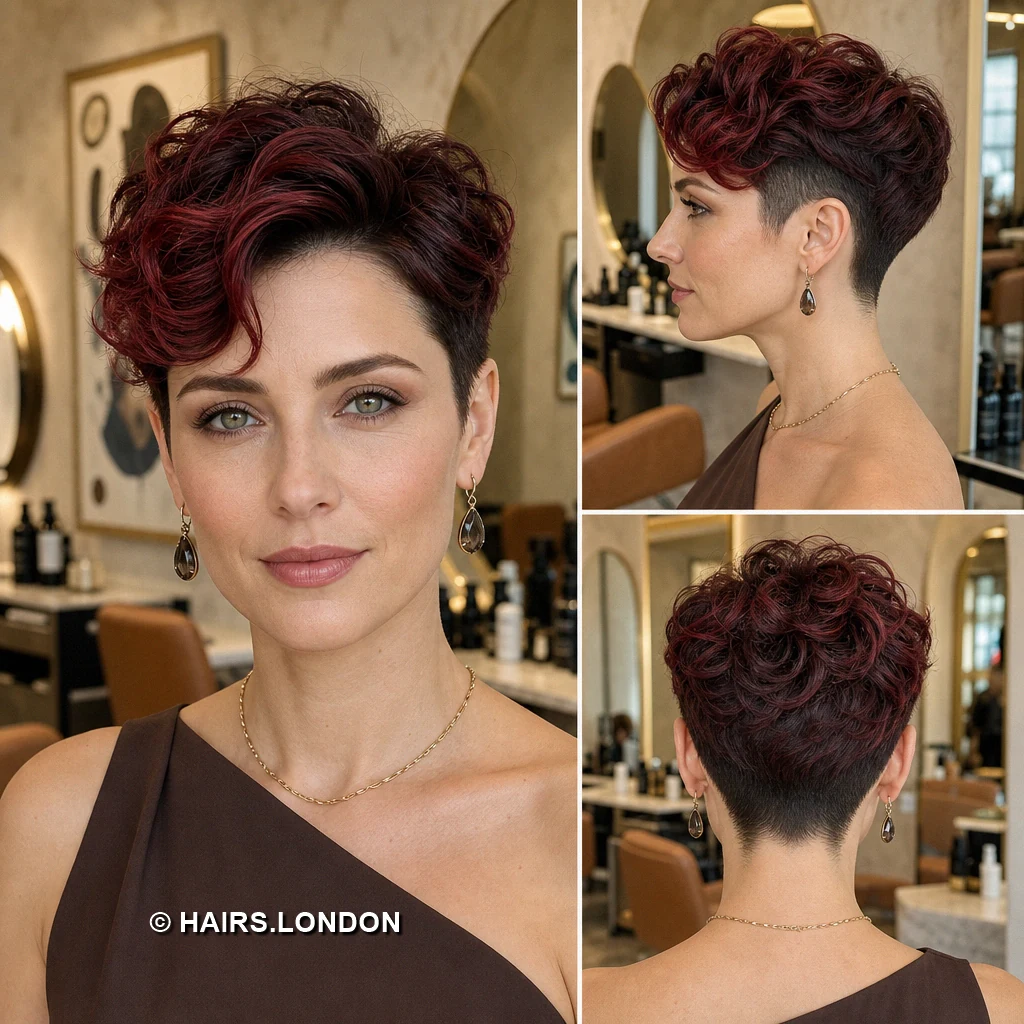
17. Oxblood Curly Pixie
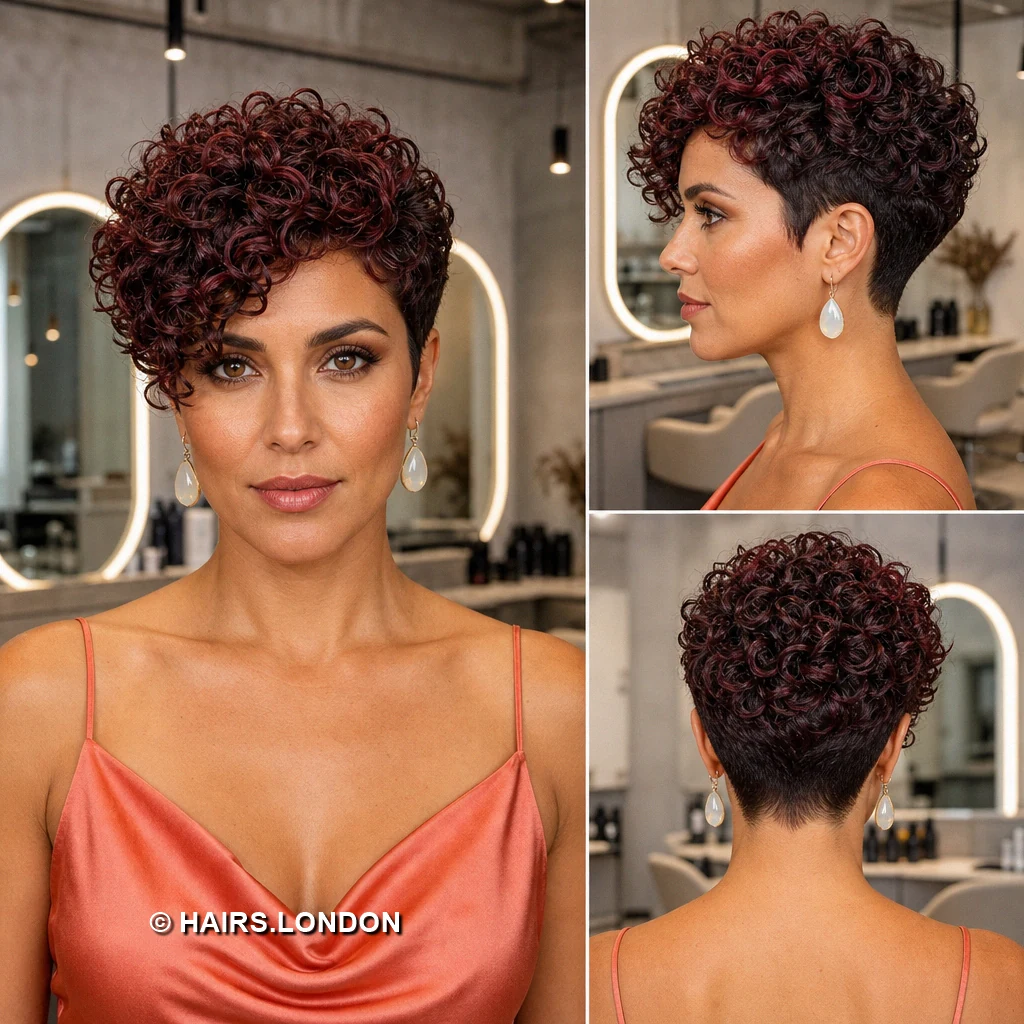
Oxblood curls form a rounded, generously textured upper silhouette. Several front ringlets bend toward the forehead. Shorter sides reveal the ears beneath the curl volume. Dense crown curls continue backward before narrowing at the nape. The dark red appears throughout the visible curled surface. Ask for shaping that respects each curl’s spring. Distribute curl cream through damp lengths with gentle hands. Diffuse at low airflow to limit unwanted separation. Trim only after discussing your preferred dried curl shape. Keep the neckline neat without cutting into upper fullness. Leave room around the ears for the curls to settle without crowding sides.
18. Claret Brushed-Up Pixie
Claret-red streaks follow the brushed-up front and crown. The lifted fringe opens the forehead without forming spikes. Shorter sides stay close beneath the fuller upper layers. The back narrows smoothly into a fine tapered nape. Visible strands give the polished shape some movement. Ask for top length that supports a backward sweep. Lift damp roots with a dryer and your fingers. Smooth the surface lightly, leaving individual strands visible. Recut the side outline before it becomes too bulky. Discuss where the front should bend around your hairline. When styling, follow the growth direction to avoid forcing a front section flat.
19. Wine-Black Sculpted Pixie
Wine-red ribbons run through a dark, carefully directed top. The front rises and rolls backward rather than crossing forward. Smooth, overlapping layers give the crown a sculpted appearance. The sides sit close, with a narrow, tidy nape. Red remains most noticeable where light catches lifted strands. Request sufficient front length to create that rounded lift. Blow-dry backward with a brush, following your preferred part. Use flexible hold to support movement without hardening strands. Maintain the taper as the upper layers grow. Ask for color placement that follows the styling direction. Keep the finish pliable so the lifted front still moves.
20. Burgundy Angled Fringe Pixie
Burgundy highlights sweep across this softly rounded pixie top. The longest fringe angles beside one eye. Shorter hair at the opposite temple balances its weight. Textured crown layers add lift above the close sides. The back descends into a small, pointed nape. Ask your stylist to tailor the fringe around visibility. Blow-dry it diagonally while lifting the crown lightly. Apply cream to define ends without flattening the shape. Trim the neckline sooner if its point becomes untidy. Confirm where the fringe falls after your hair dries. If the fringe shifts across your face, adjust the part before shortening its pieces.
How to Choose Your Pixie Shape
Start with the part of the cut you will notice most: a clear forehead, a side-swept fringe, or curls that frame the face. Then compare the side and back views. Some of these cuts keep a rounded crown; others depend on a much closer side and nape. Consider how your hair grows at the crown and hairline, and choose a reference with a similar natural texture. If you want fewer styling steps, favor a shape that works with your usual part and growth direction.
Styling Straight, Wavy, and Curly Textures
For a lifted straight-hair top, dry the roots upward before directing the fringe back or across. Fine hair often needs only a small amount of light cream or paste; too much product can flatten it. Let natural waves guide a piecey sweep, scrunching rather than brushing out their bends. For curls, apply curl cream while damp, then air-dry or diffuse with low airflow. Judge fringe length and overall balance when curls are fully dry, since they may spring up considerably.
Keeping Burgundy Color Fresh
These looks range from subtle wine warmth to brighter red pieces over dark sides. Ask which result your starting color can achieve and whether the brighter sections need lightening. Wash with lukewarm water and color-safe products, limit unnecessary heat, and use heat protection when blow-drying. Reds can lose their initial intensity, so agree on a refresh plan with your colorist. Placement matters on short hair: highlights near the fringe or crown can look different after the next trim.
Maintaining the Tapered Shape
A pixie can change noticeably as its sides and nape grow, even when the top still looks good. Arrange trims according to how crisp you want the outline; closely tapered versions generally need attention sooner than softer, layered crops. Ask whether the fringe, neckline, or short side can be tidied between full cuts. At home, avoid cutting into curls or crown layers simply because one piece sits differently before styling.
What to Discuss with Your Stylist
Bring the front, side, and back views of your chosen cut. Point out the exact fringe position, amount of crown height, ear exposure, and nape finish you want. Discuss density, curl shrinkage, cowlicks, daily styling time, and how often you can return for trims. For color, identify whether you prefer discreet burgundy on a dark base or brighter red throughout the top. Ask your stylist to explain both the initial service and the upkeep before cutting or coloring.
Frequently Asked Questions
What is the difference between a rounded pixie and a tapered pixie?
A rounded pixie emphasizes fullness through the top and crown. A tapered pixie narrows more visibly toward the sides or nape; one cut can have both features.
Can I keep a long fringe with short sides?
Yes. Several pictured cuts pair a longer diagonal fringe with closely cut sides. Ask your stylist to balance the fringe against the crown and your usual part.
Which pictured shapes keep hair off the forehead?
The brushed-back, lifted-quiff, and sculpted styles direct the front upward or backward. Their hold depends on your growth pattern and styling routine.
Will a curly pixie look shorter after it dries?
It may. Curl shrinkage varies, so discuss your desired dry fringe and crown length before cutting.
How can I style a piecey pixie without making it stiff?
Start with a small amount of flexible paste or cream, apply it mainly to the ends, and add more only where definition is needed.
Do these burgundy looks require all-over color?
Not necessarily. Many images show red or wine-toned pieces over a darker base, particularly on the top and fringe.
Will brighter burgundy pieces require lightening?
That depends on your starting color and the brightness you want. A colorist can assess whether lightening is needed for your chosen reference.
How often should I trim a pixie?
Trim timing depends on growth and how crisp you want the sides and nape. Closely tapered outlines usually show changes sooner than softer ones.
Can I grow out the fringe without losing the pixie shape?
Yes. Ask for side and nape maintenance while leaving the front longer, then adjust the crown layers as the fringe grows.
What if my crown has a cowlick?
Show your stylist where it sits and how your hair falls when dry. They can plan the crown length and styling direction around it.
Which products suit fine hair in a lifted pixie?
Begin with lightweight styling cream or a small amount of paste. Root-focused blow-drying often provides lift without a heavy product finish.
What should I bring to a salon consultation?
Bring front, side, and back references, plus notes on fringe length, color brightness, styling time, and how frequently you want trims.
Conclusion
The strongest reference is the one that shows the shape you want from every angle, not just the fringe. Compare how each cut handles the crown, sides, and neckline, then discuss what your own texture will do when dry. With a realistic trim schedule and color plan, you can choose a burgundy pixie that fits both the look and the upkeep you want.