


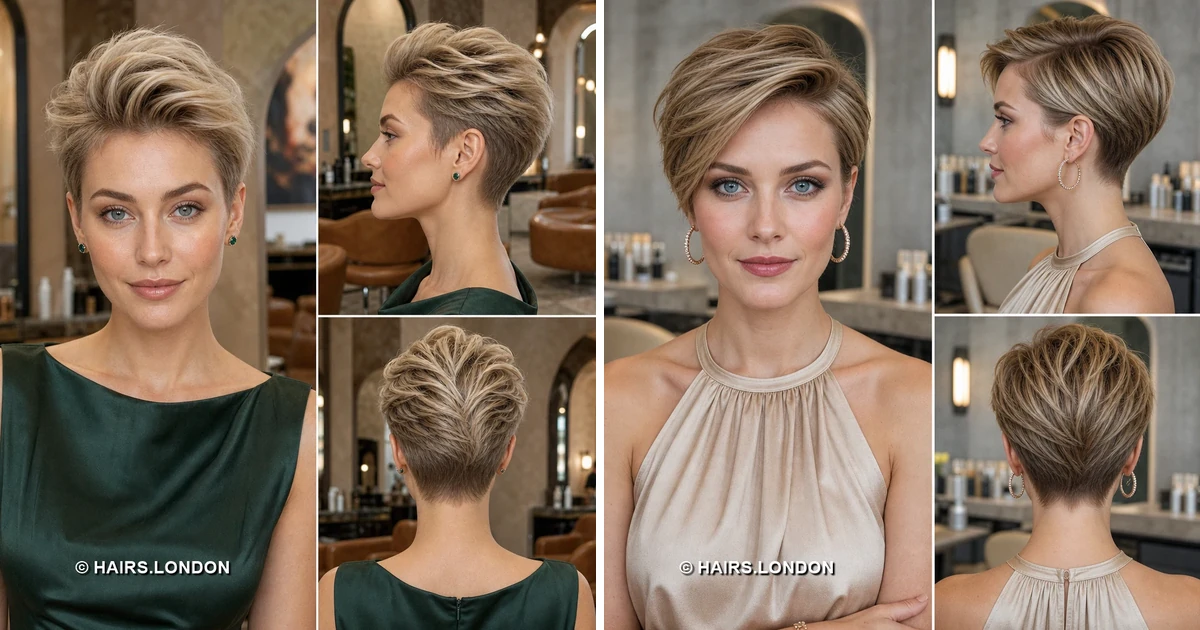
11. Rounded Pixie with Sweeping Pale Highlights
Pale blonde strands arc through this softly rounded pixie cut. The longer front sweeps sideways while leaving the eyes clear. Darker roots and lower layers give the highlights visible contrast. Its crown carries gentle fullness rather than pronounced, upright height. A close side transitions smoothly into the short tapered nape. Ask for layers that follow the curve of your head. Dry the fringe sideways, lifting lightly at its starting point. Use minimal paste to keep the pale strands softly defined. Review the rear shape with your stylist before leaving salon. Trim regularly if you prefer its compact finish around ears.
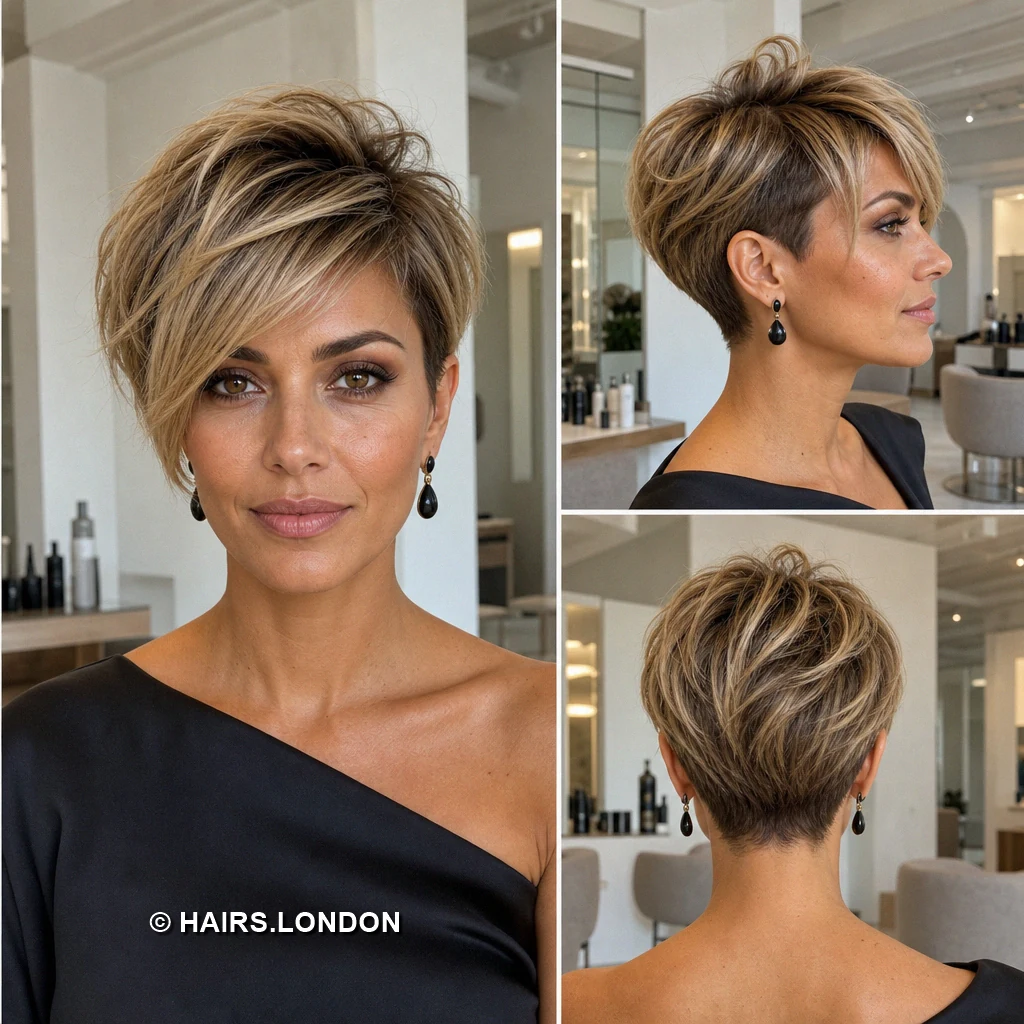
12. Airy Highlighted Pixie with a Wispy Fringe
An airy crown distinguishes this blonde and brunette pixie cut. Loose highlighted strands lift above the darker, shorter lower layers. The wispy fringe falls sideways in soft, uneven little pieces. Fullness continues around the back before reaching a tapered nape. Sides stay relatively close, but they are not tightly shaved. Ask for textured ends while retaining enough hair for lift. Rough dry with fingers, encouraging movement instead of perfect smoothness. Touch a little paste onto selected tips after drying completely. Leave some natural gaps between strands for this open finish. Book a trim when the fringe stops separating so easily.
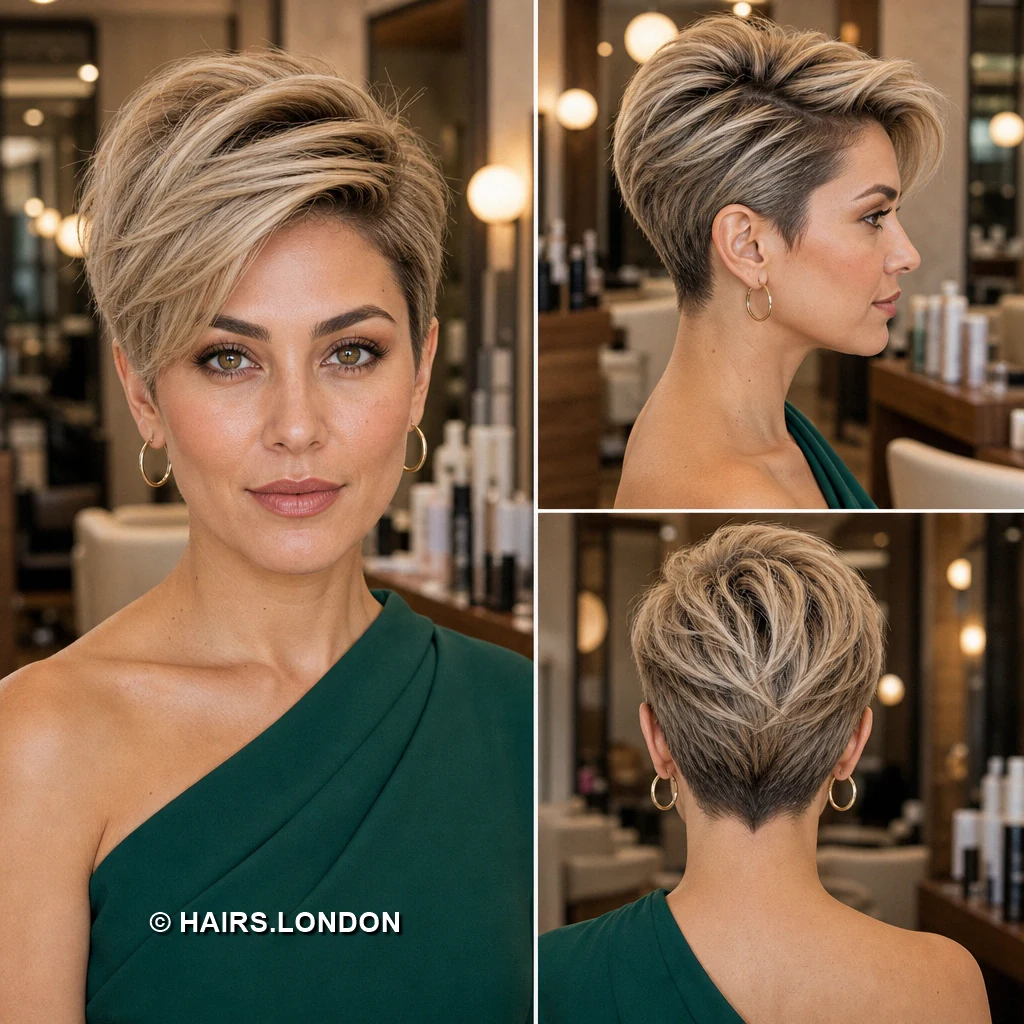
13. Warm Brown Pixie with Choppy Crown Layers
Warm chestnut brown hair gains dimension from scattered caramel toned pieces. Short, irregular fringe sections soften the front of this pixie. The crown looks tousled, with visible strands pointing different directions. Sides sit close around the ears without appearing severely clipped. At the back, shorter layers narrow toward the nape. Ask for choppy texture that still leaves the crown substantial. Rough dry while lifting sections away from the scalp gently. Rub a little matte paste between fingers before separating ends. Keep the fringe short enough to remain off your eyes. Show your stylist the back view to explain its taper.
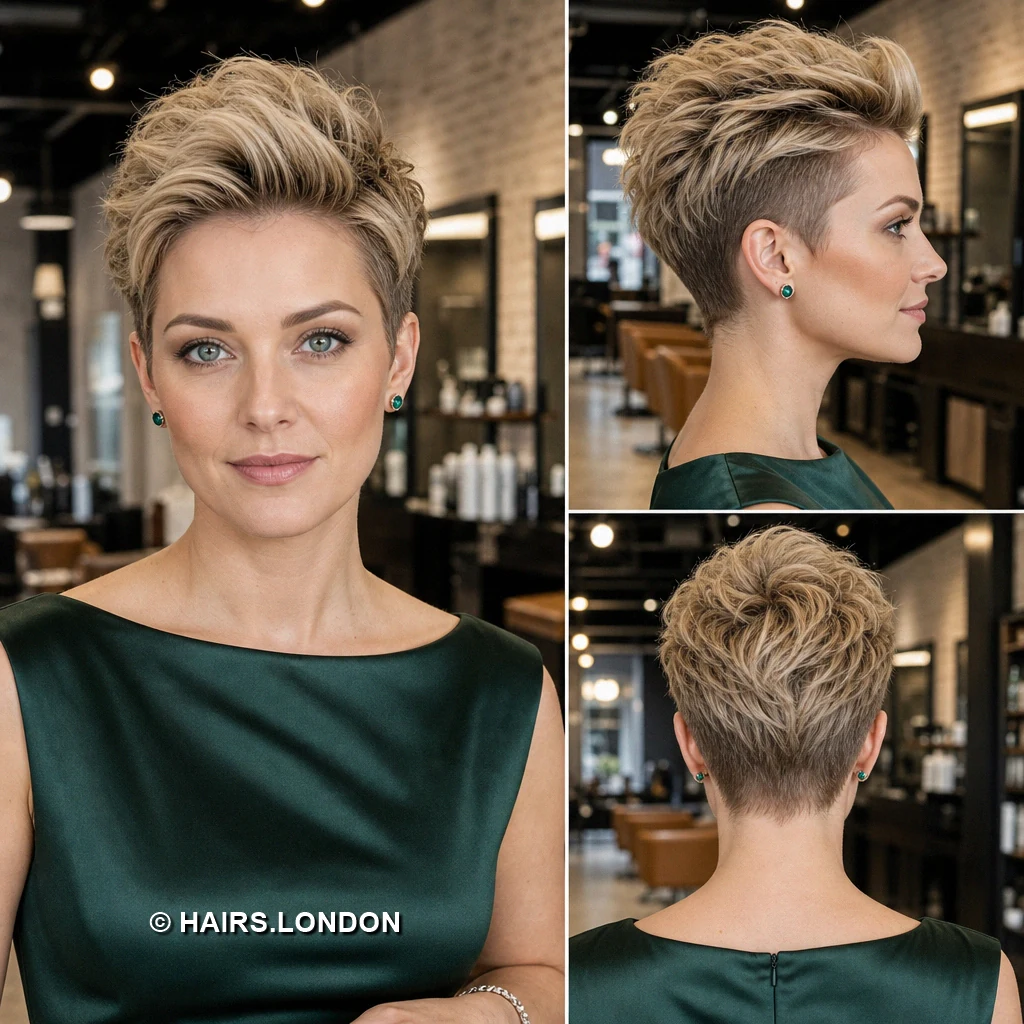
14. Soft Brunette Pixie with Caramel Face-Framing Pieces
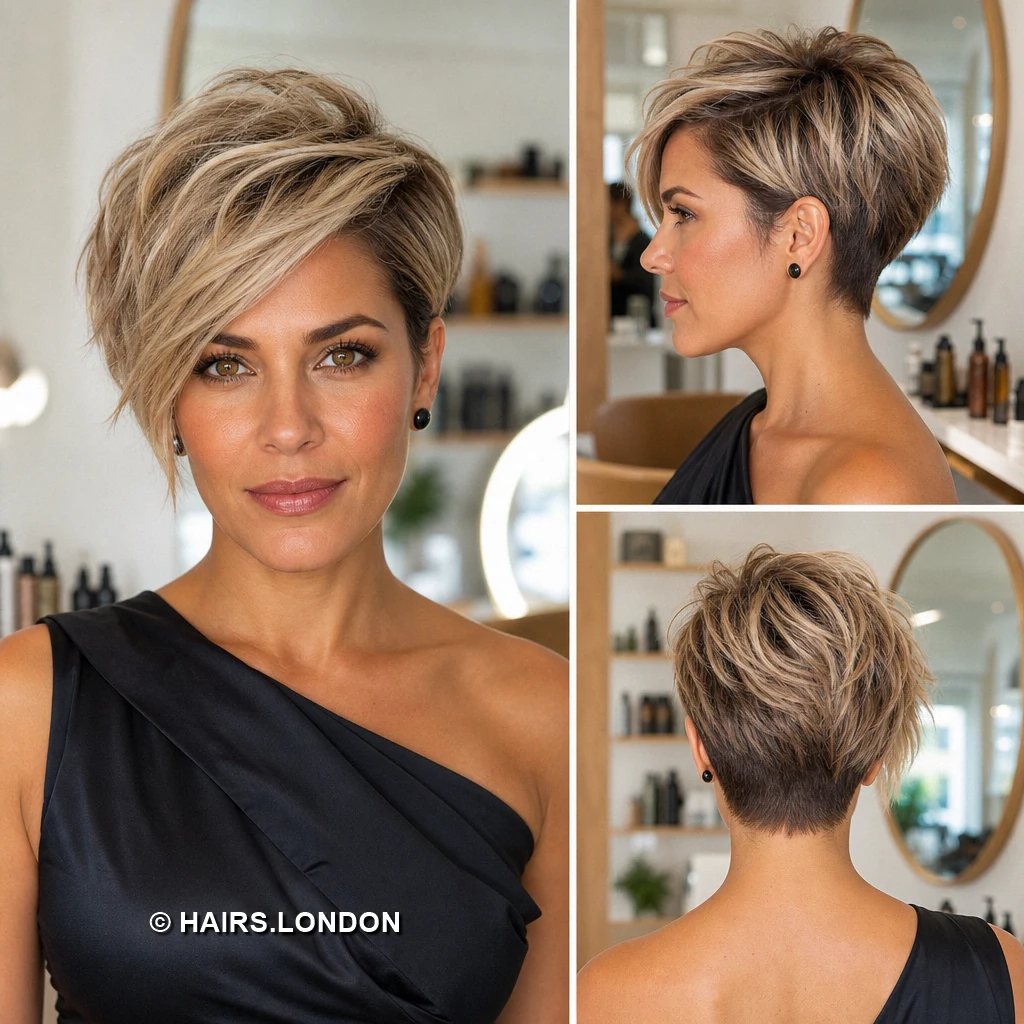
Soft caramel pieces lighten the front of this brunette pixie. The fine fringe falls forward and slightly across the forehead. Longer crown layers overlap, creating height with a relaxed finish. Darker sides sit neatly beside the ears and temples here. The rounded back tapers down to a slim, tidy nape. Ask for point cut ends if you prefer wispy movement. Blow dry the fringe forward, then shift it gently sideways. Scrunch remaining layers with light cream for flexible surface texture. Avoid overworking the top if its natural bends look good. Maintain the neckline so the fuller crown remains visually balanced.
How to Choose a Highlighted Pixie Cut
Start with the feature you want to maintain: a long fringe, height at the crown, or a close outline around the ears. A sweeping front needs enough length to lie across the forehead, while a lifted front needs support at the roots. Compare the side and back views as carefully as the front. The closer tapers shown here will become noticeable as they grow, whereas softer sides offer a less abrupt change between appointments.
Styling Different Hair Textures
On straight hair, lift damp roots with a small amount of mousse and direct the fringe with a brush before adding texture to the ends. Hair with a natural wave can often be finger dried, then lightly scrunched to emphasize the bends already there. For thicker hair, ask your stylist to remove bulk selectively rather than thinning the whole crown; for finer hair, keep enough weight in the top to support the shape. Start with very little finishing product on any texture.
Keeping Highlighted Pixie Color Fresh
These images show lighter pieces against deeper roots, so discuss whether you want pronounced contrast or a softer blend as the color grows. Ask your colorist where highlights will remain visible after the next trim, especially on the fringe and crown. Use color-safe shampoo, limit unnecessary heat, and ask whether a toner would help maintain your chosen blonde shade. The appropriate refresh schedule depends on the contrast you choose and how often you cut the highlighted sections.
Maintaining the Pixie Shape
Short sides and napes lose their definition sooner than longer crown layers. Check the outline around your ears, the neckline, and the point where the fringe reaches your eyes; those areas tell you when a trim is due. If you like the current top length, ask for a tidy-up rather than automatically taking the same amount off everywhere. Bring front, profile, and back references so the taper remains consistent.
What to Discuss with Your Stylist
Show the exact image whose fringe and side profile you prefer, then explain whether you normally air dry or blow dry. Agree on where the fringe should sit when dry, how close the sides should be, and whether you want a rounded or deliberately broken-up crown. Discuss your hair’s growth patterns at the temples and nape, the amount of daily styling you will do, and which highlighted sections you want to keep visible.
Frequently Asked Questions
What distinguishes these highlighted pixie cuts?
They combine shorter sides and napes with longer, layered tops. Changes in fringe length, crown height, taper, and highlight placement give each cut a different shape.
Can I keep a long fringe with a short pixie?
Yes. Several cuts shown here leave substantial length at the front while keeping the sides and nape short. Agree on the fringe’s dry length before cutting.
Which option gives the most visible crown height?
The lifted beige-blonde pixie and high-crown pixie have the most pronounced upward shape. Both need enough length on top for root lift.
Is a smooth pixie easier to style than a tousled one?
That depends on your natural texture. A smooth sweep may need directed blow drying, while a tousled finish may suit hair that already has bends.
How can I keep a side-swept fringe from falling flat?
Lift its roots while drying, then guide the lengths sideways. Use a small amount of product at the ends rather than weighing down the roots.
Will these cuts work without highlights?
Yes. The layers, fringe, and taper create the shape; highlights make particular pieces and changes in direction easier to see.
Where should highlights go on a pixie?
That depends on what you want to emphasize. In these images, lighter pieces are especially visible through the fringe and crown.
How often will the nape need trimming?
Trim it when the outline no longer looks as neat as you prefer. A close taper will generally show growth sooner than a softer neckline.
Can thicker hair have an airy pixie crown?
Yes, but ask your stylist to reduce bulk selectively while preserving enough length and weight for the intended silhouette.
What should I ask for if I dislike a shaved look?
Request short, scissor-cut or softly tapered sides and point to the images with visible hair around the ears rather than the closest side panels.
How do I avoid making a textured pixie stiff?
Begin with a small amount of lightweight product, work it through selected sections, and add more only if the shape needs it.
What reference photos should I bring to the salon?
Bring front, side, and back views. Identify the fringe length, crown volume, side closeness, nape shape, and color placement you want.
Conclusion
The strongest choice is the pixie whose shape still appeals to you from the side and back, not just the front. Decide how much fringe you want to manage, how close you like the taper, and whether you prefer polished or separated texture. Those details will help your stylist adapt a highlighted pixie to your hair and your routine.