


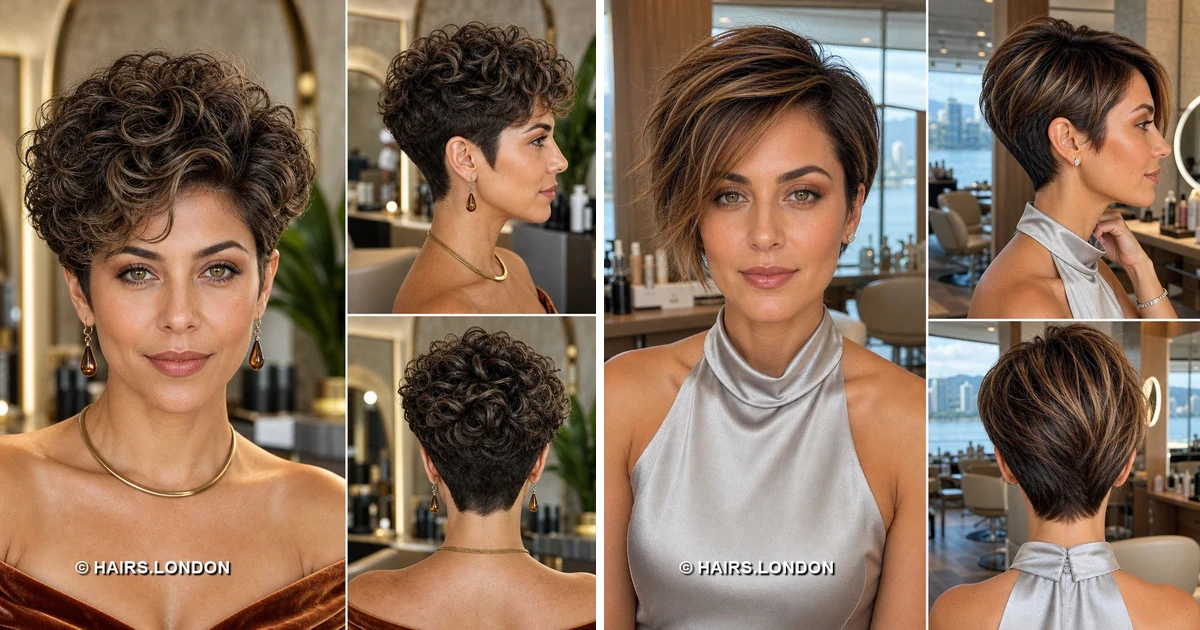
11. Springy Curly Pixie with Lighter Curls
Naturally springy curls fill the crown of this compact brunette pixie. Lighter brown highlights define loops across the front and top. A few curls bend forward into a short, irregular fringe. Cropped sides sit beneath the volume and taper toward the nape. Ask for curl by curl shaping if your pattern varies. Keep enough length overhead to avoid an overly tight silhouette. Scrunch in curl cream while the hair is damp. Diffuse gently or allow the curls to dry undisturbed. Separate selected coils once dry to adjust the overall width. Neaten the lower perimeter without cutting away the rounded crown.
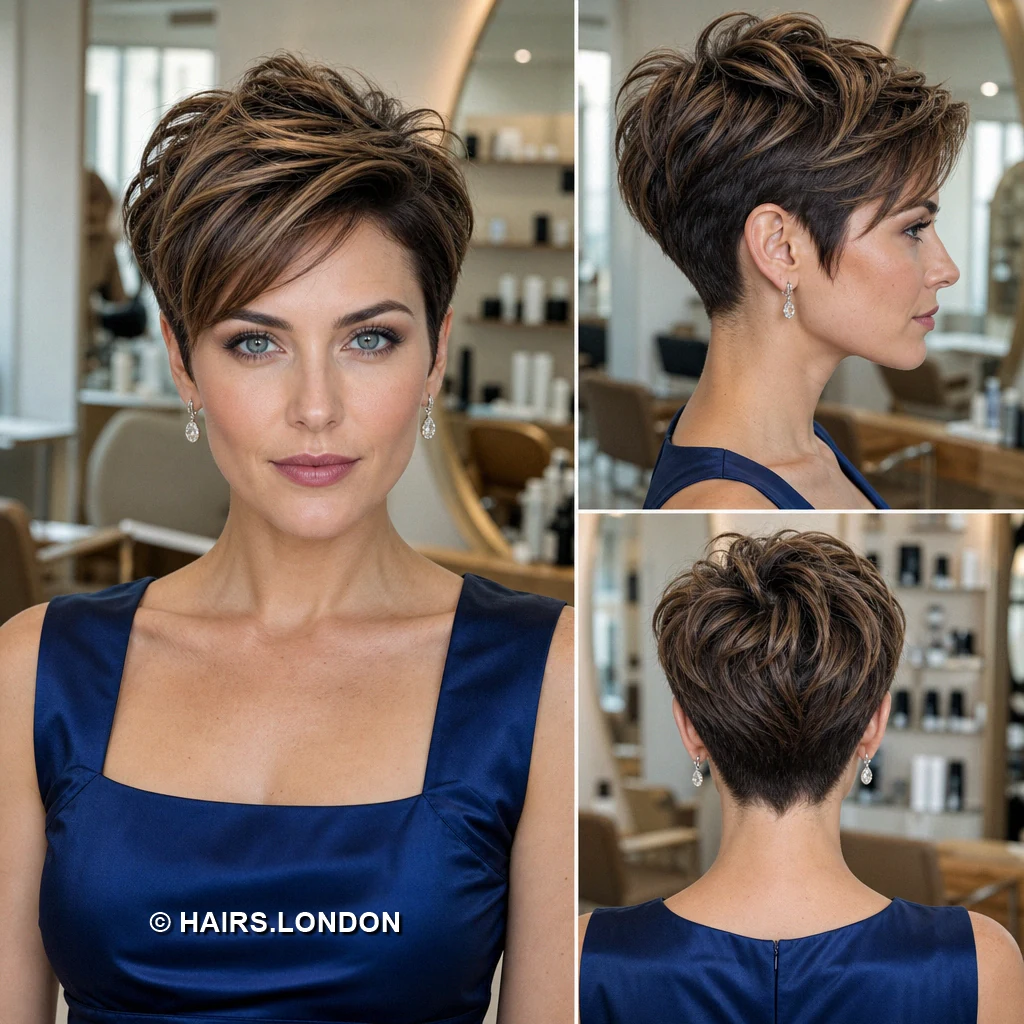
12. Neat Tapered Pixie with a Swept Fringe
A side fringe skims the forehead of this brunette pixie. Narrow caramel highlights follow its sweep into the textured top. The crown has lift, with little width at the sides. Hair fits closely behind the ears and tapers into a point. Ask for a blended transition from longer front to shorter back. Keep the fringe substantial enough to lie in one direction. Blow dry it sideways before tousling the crown with fingers. A small amount of styling cream adds flexible, tidy separation. Avoid loading the short sides with product or heavy shine. Schedule trims to keep the pointed neckline defined.
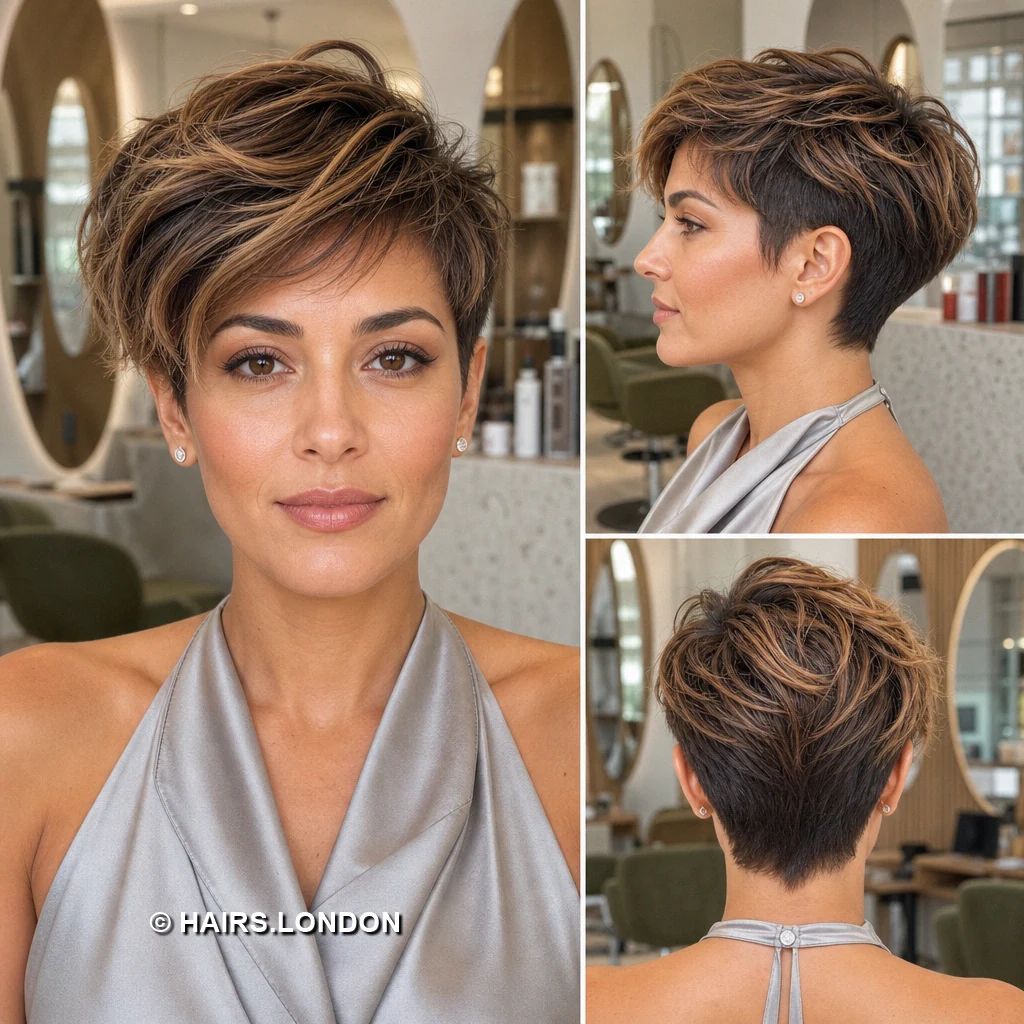
13. Asymmetric Pixie with a Long Highlighted Front
An extended fringe gives this brunette pixie its asymmetric outline. Warm caramel highlights brighten the longer side beside the face. The opposite side stays close, exposing the ear and temple. Fuller crown layers sweep forward above a tapered back. Ask your stylist where the longest front pieces should finish. Have weight removed internally while preserving the fringe perimeter. Blow dry from the roots toward the longer side. Smooth the face framing section with a brush at home if desired. Use a little paste to separate ends without stiffening them. Recheck the fringe length frequently whenever it begins crossing your eye.
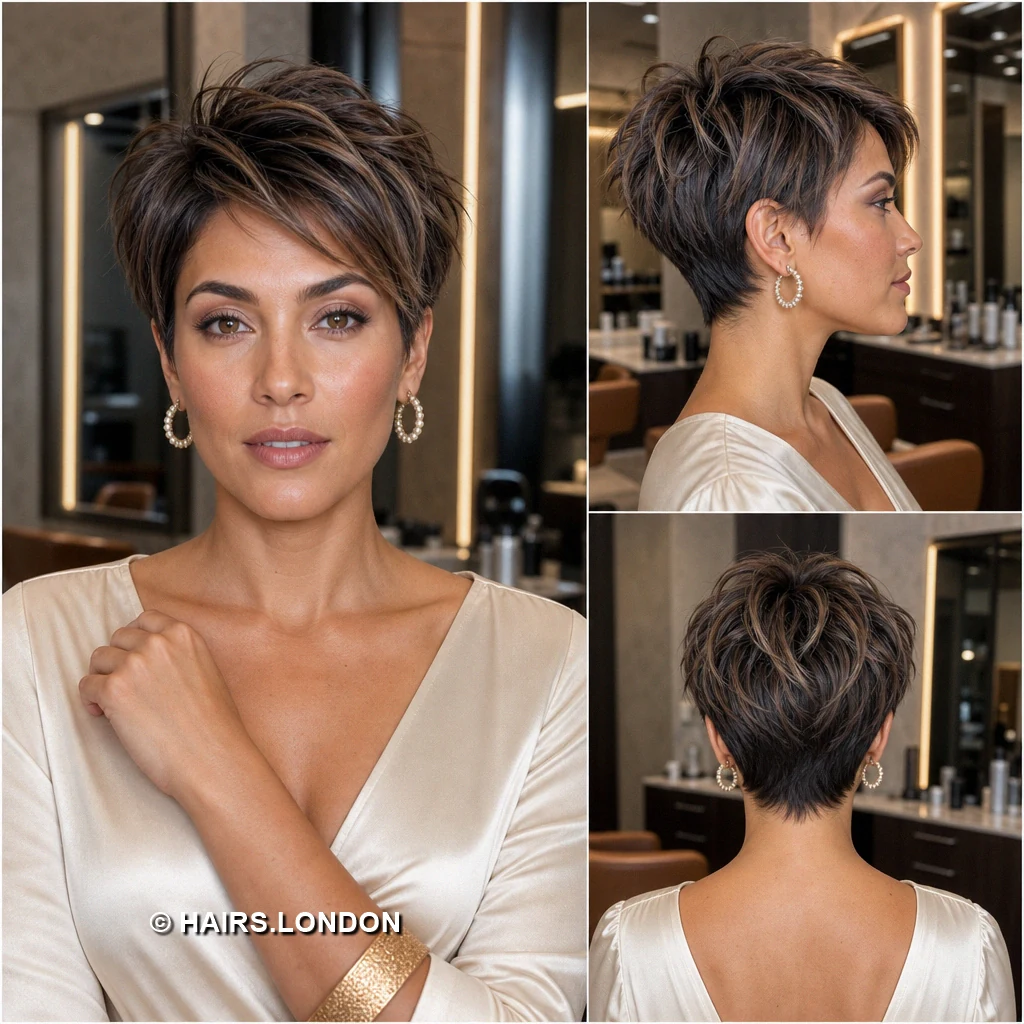
14. Spiky Textured Pixie with Fine Highlights
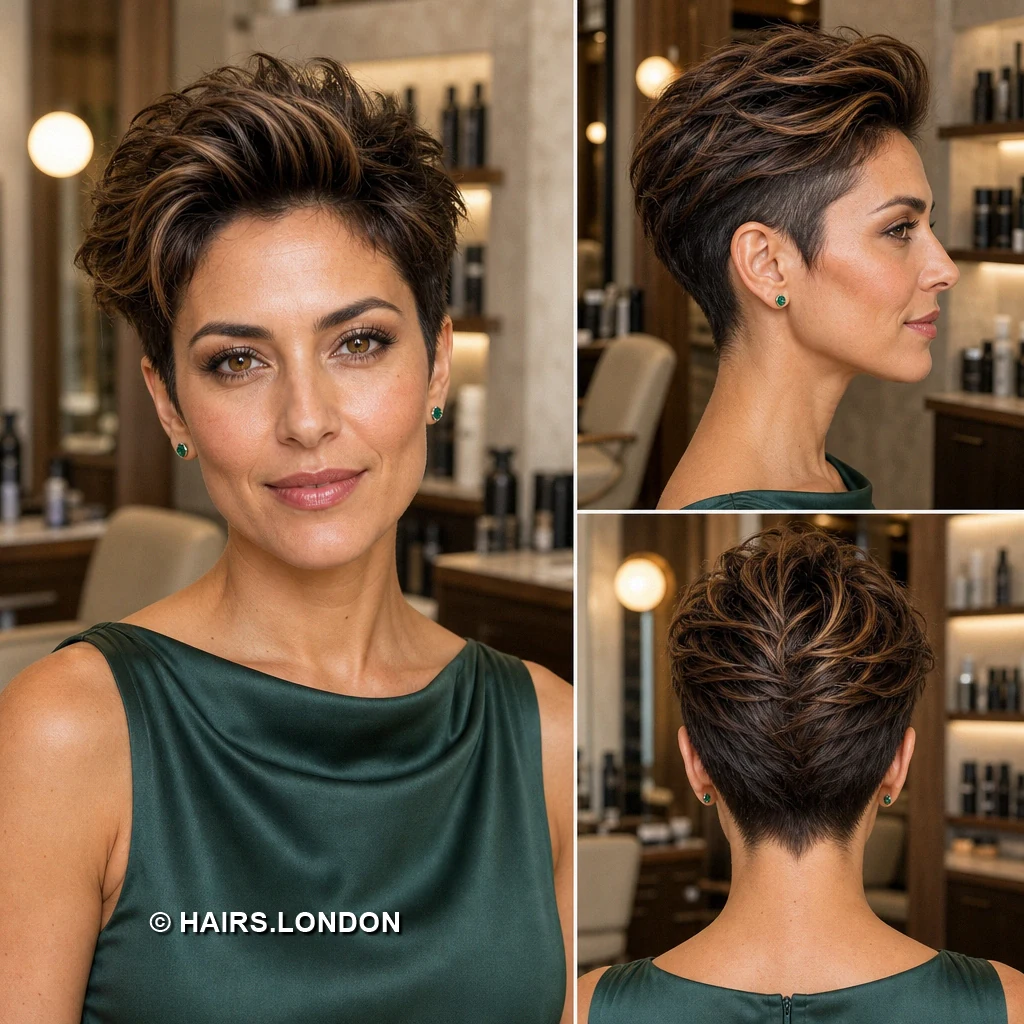
Fine, lifted pieces give this brunette pixie a spiky finish. Subtle pale brown highlights emphasize the movement through its crown. The short fringe points forward in loose, uneven sections. Close cut sides sit above a slim, tapered nape. Ask for short layers that still leave enough styling length. Point cutting can create separation without making the outline patchy. For added height, blow dry against the growth direction for additional root lift. Work matte paste through the top using only your fingertips. Keep product away from the scalp to preserve lightness. Trim the perimeter when the short sides begin losing definition.
15. Brushed-Up Pixie with Warm Highlighted Layers
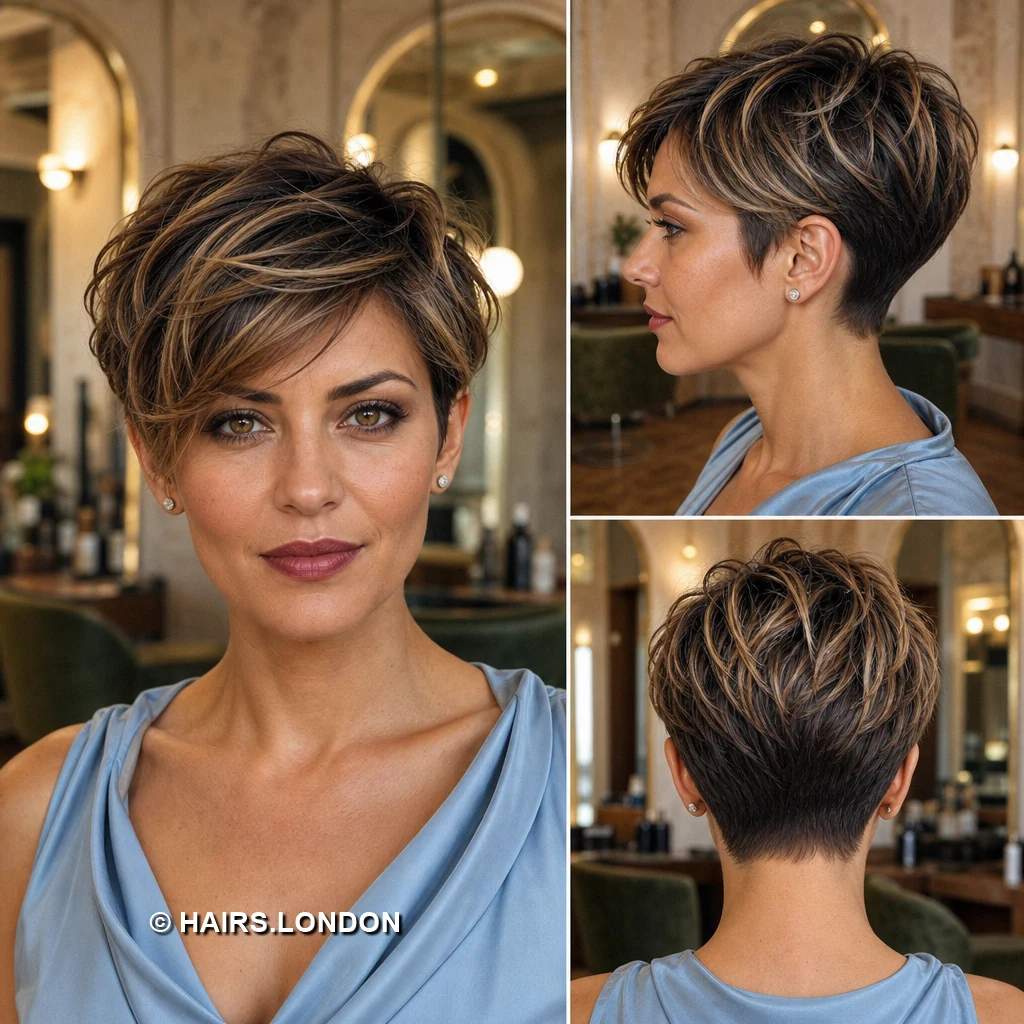
A brushed up front creates height above this close sided pixie. Caramel highlights follow the lifted brunette layers across the crown. The fringe folds backward rather than resting on the forehead. Short sides hug the temples and narrow toward the nape. Ask for enough length up front to form that curve. Keep the crown layered so it lifts without excessive bulk. Direct warm air upward while guiding roots with a brush. Finish with flexible paste to hold the raised front. Brush stray ends back instead of flattening the whole top. Maintain close sides so the higher crown remains visually balanced.
16. Flowing Side Fringe with a Compact Nape
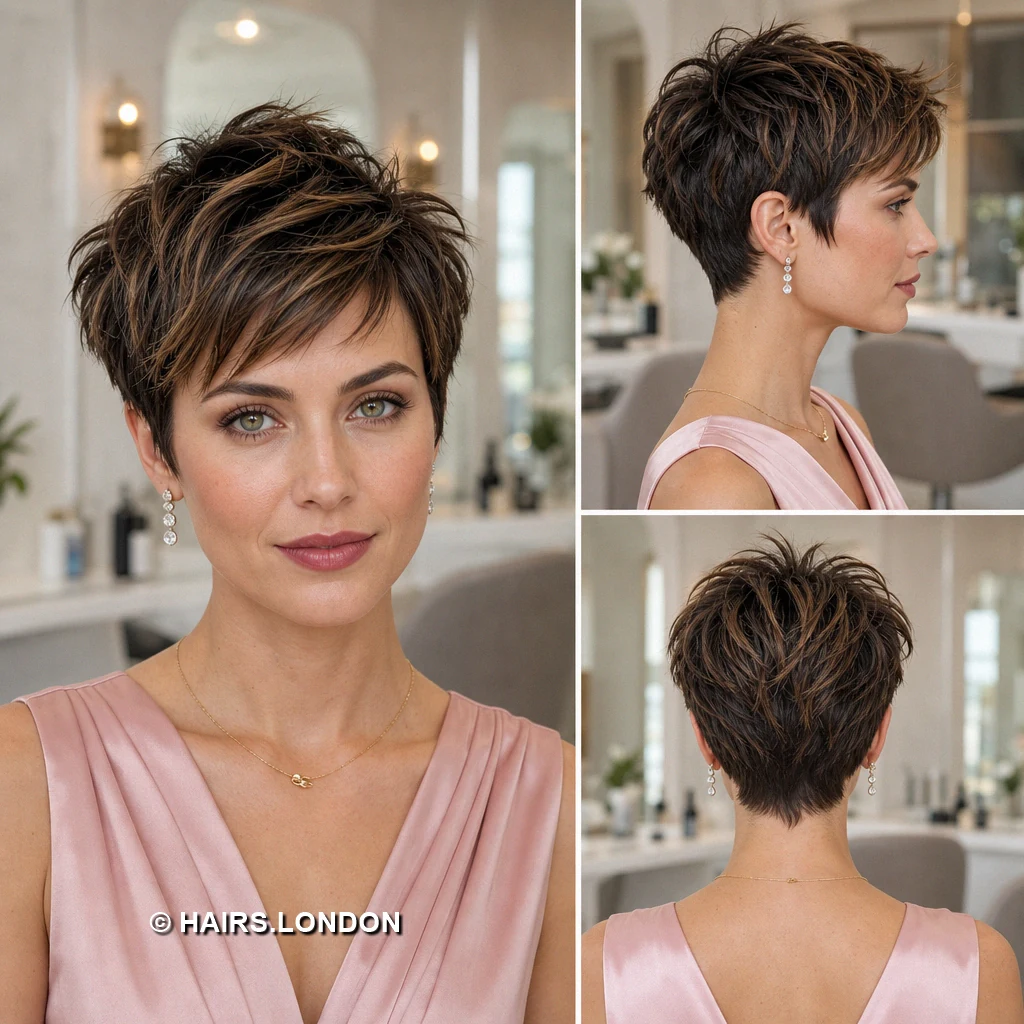
Long brunette layers flow sideways into a soft, sweeping fringe. Fine caramel ribbons bring definition to the overlapping front sections. The crown stays full, contrasting with the closely cropped side. A compact, tapered nape keeps the back within pixie length. Ask for a fringe that moves without falling too heavily. Blend the top into the sides rather than leaving a ledge. Blow dry across the parting to encourage natural looking lift. Smooth the fringe ends with a small amount of cream. Keep the shorter side uncovered to show the cut contrast. Rebalance the fringe and nape together at each trim.
17. Softly Layered Pixie with an Angled Fringe
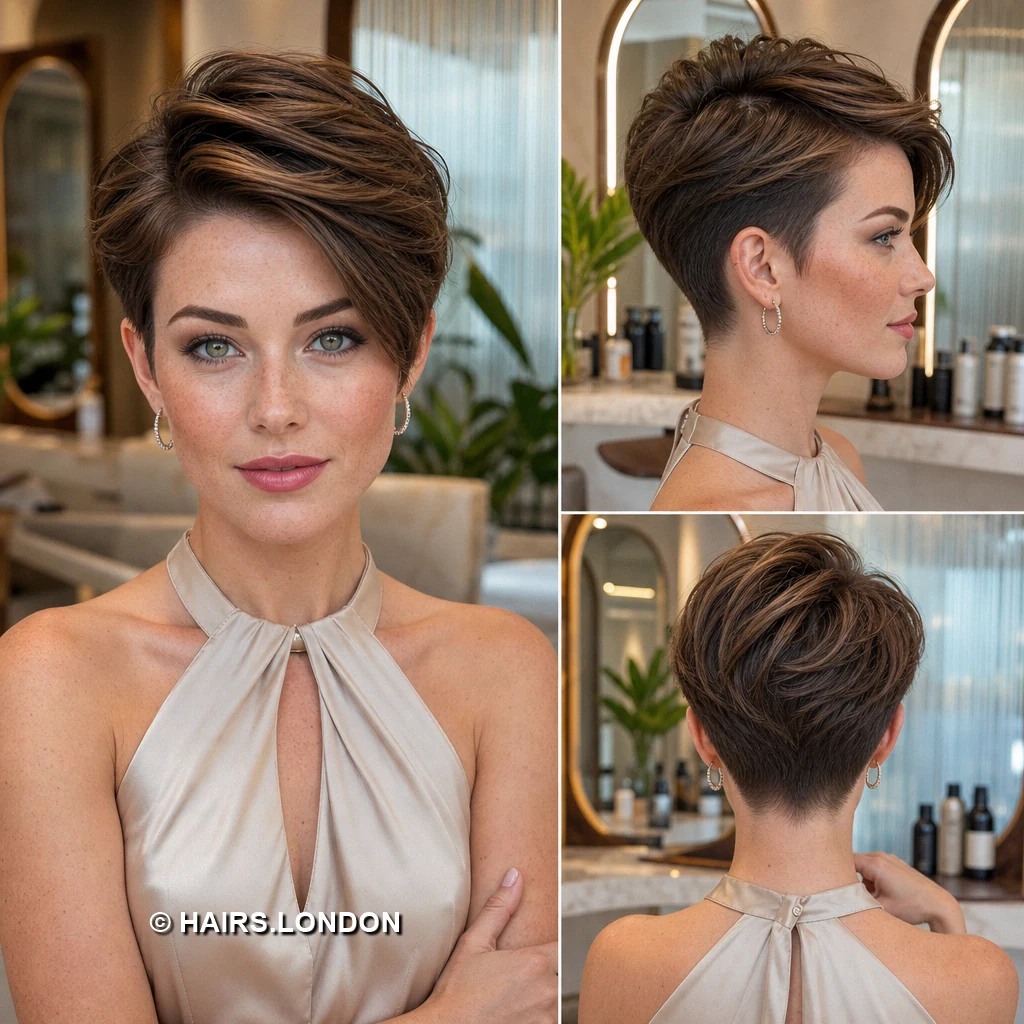
Soft brunette layers build height behind an angled, side swept fringe. Caramel highlights run from the front through the textured crown. The fringe crosses the forehead but leaves the eyes clear. Short sides blend into a neat, gently tapered nape. Ask for movement around the part without an overly thin top. Keep the front long enough to redirect between styling days. Blow dry the roots upward, then guide ends across. Use light texture spray for separation rather than firm hold. Brush the surface lightly if the highlighted strands look scattered. Trim the lower shape when it begins covering the ears.
18. Voluminous Pixie with a Swept-Up Front
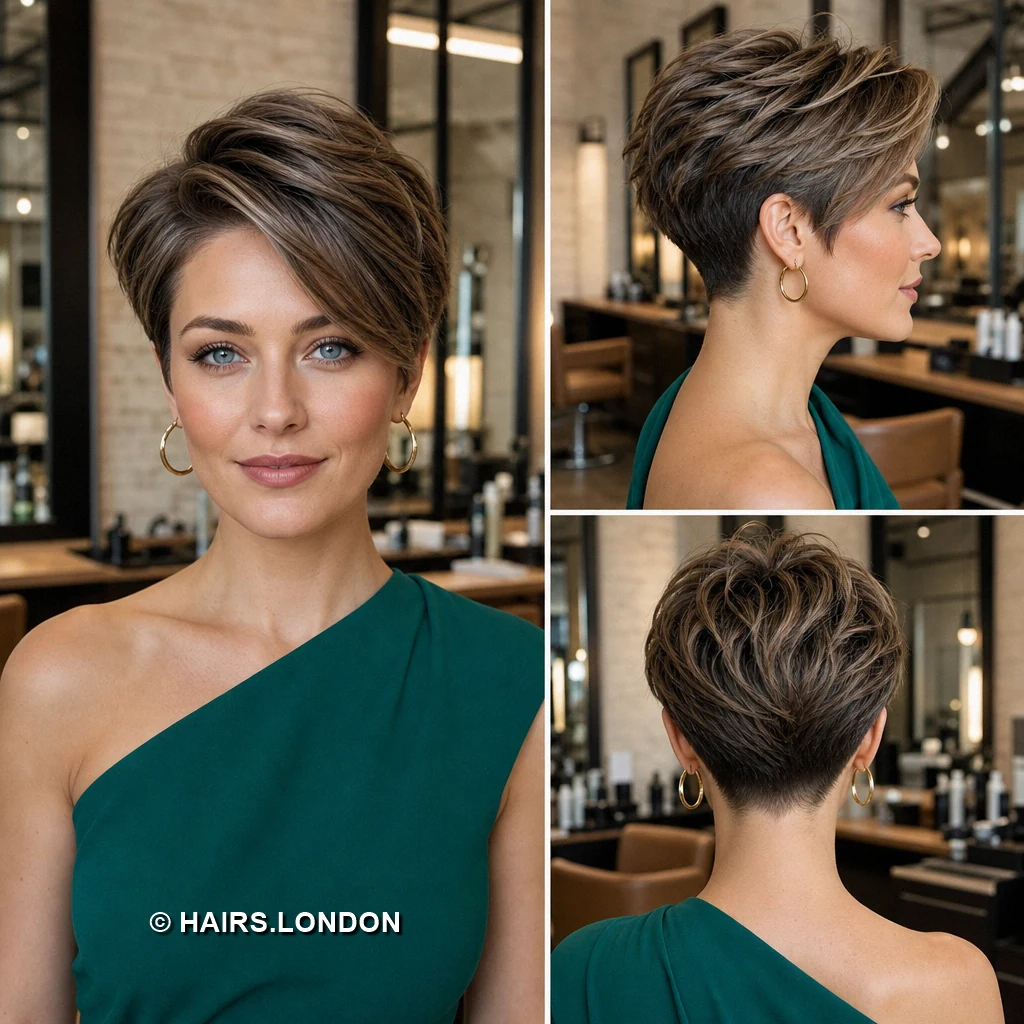
A swept up front gives this brunette pixie pronounced height. Pale caramel highlights accent the crest and upper layered sections. One side sits closely cropped beneath the fuller top. The back retains texture before tapering into a narrow nape. Ask for sufficient front length to create a curved lift. Avoid cutting the crown uniformly short if you want movement. Blow dry upward using a brush and moderate heat. For extra control, support the raised section with flexible hairspray, applied lightly. Keep the sides smooth to emphasize the shape above. Revisit the salon regularly when side growth starts softening that contrast.
19. Choppy Pixie with Short Forward Fringe
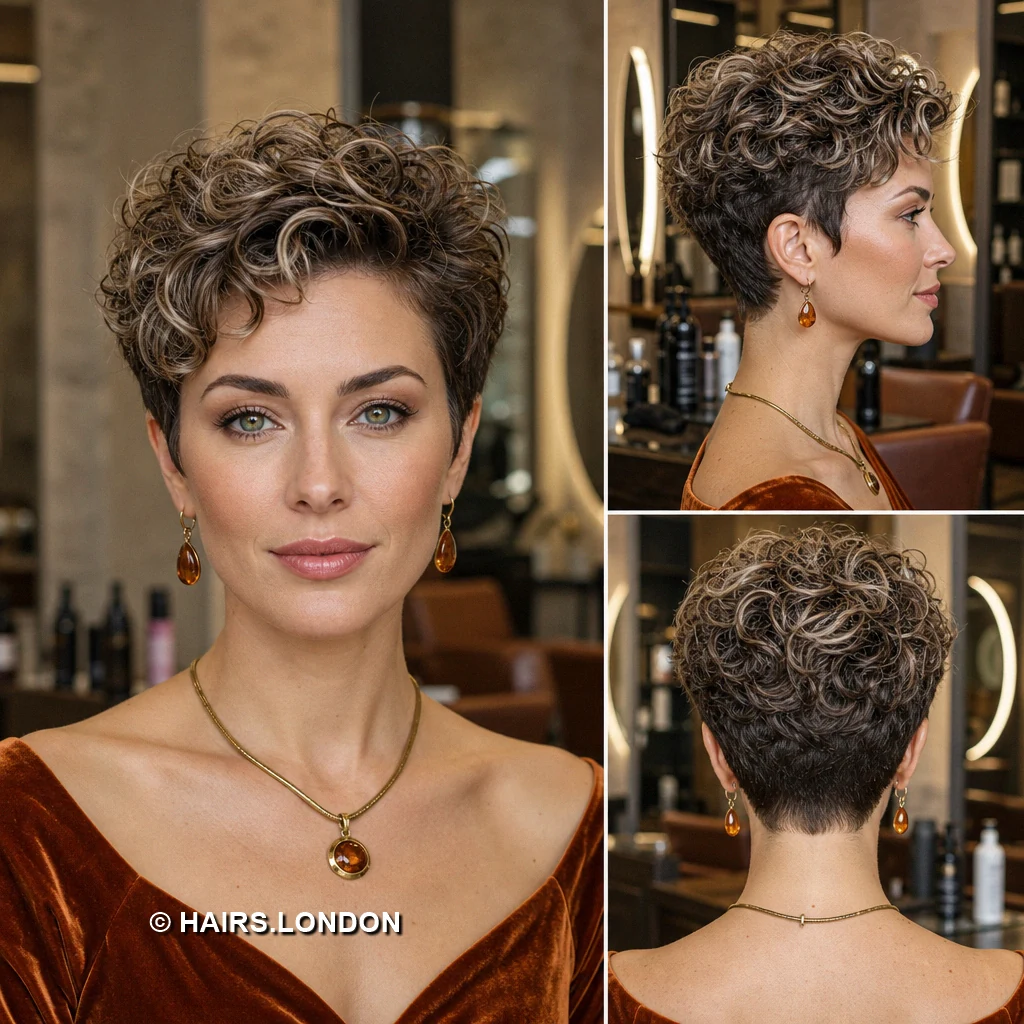
Short, choppy brunette pieces create a lively, compact crown. Caramel highlights pick out the irregular tips on top without overwhelming them. A broken fringe sits high above the eyebrows. Close sides outline the ears and taper into the nape. Ask for textured cutting that leaves the ends visibly separated. Keep enough density underneath to prevent a sparse looking crown. Dry with fingers while lifting different sections at their roots. Dab matte paste onto selected tips for a restrained finish. Avoid combing every piece into the same forward direction. Maintain frequent perimeter trims as needed if you prefer its sharp outline.
20. Sculpted Pixie with a Deep Side Sweep
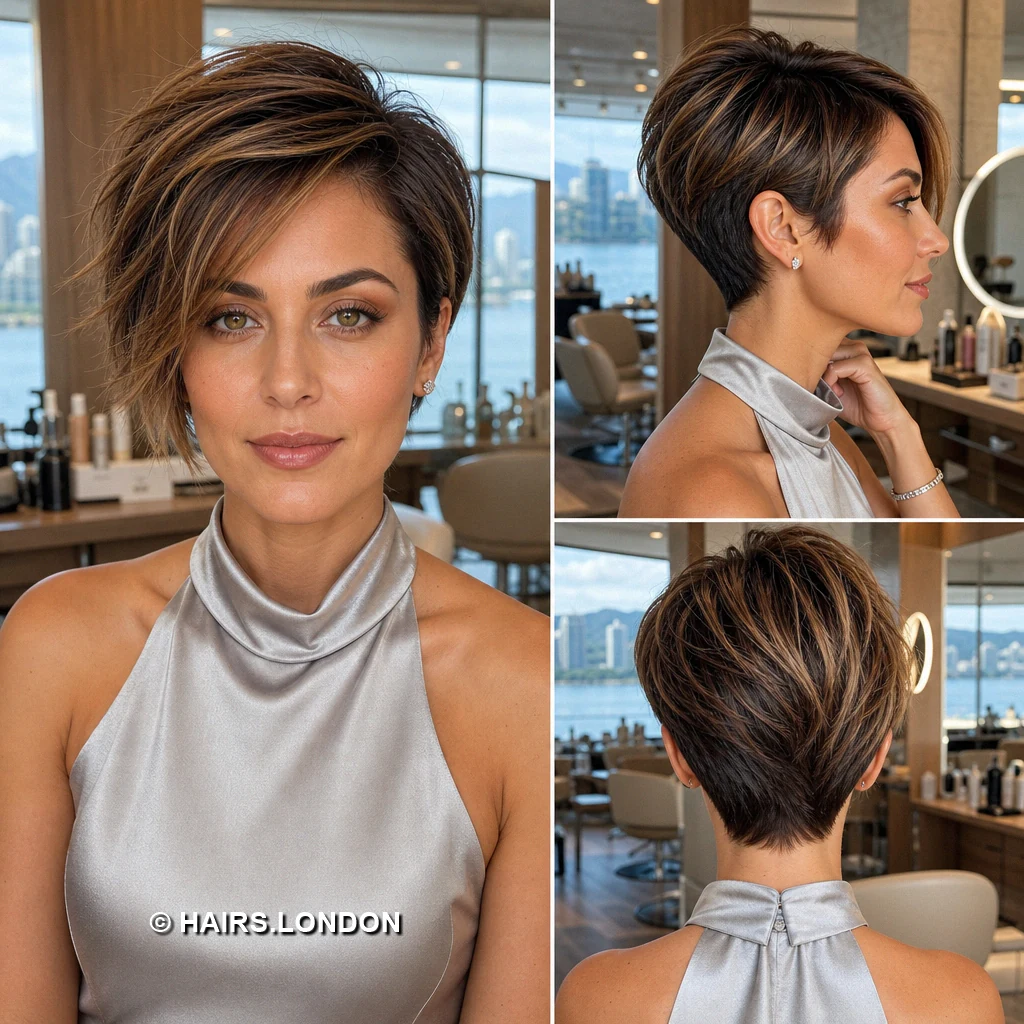
A deep side sweep forms a smooth curve above the forehead. Warm caramel highlights follow that curve through the brunette top. The crown holds gentle volume while the opposite side stays close. Behind the ear, the cut tapers cleanly toward the neckline. Ask for enough length to maintain the front bend. Keep the shorter side blended rather than cutting a stark line. Blow dry the fringe around a brush for controlled shape. Loosen the finished sweep with fingers to avoid stiffness. Use lightweight cream only where the longer sections need control. Trim both sides before growth obscures their different proportions.
How to Choose a Highlighted Pixie Cut
Start with the amount of hair you want near your face: a short, broken fringe feels different from the long sweeps in images 13 and 16. Then compare the profiles. Rounded curls need room above the sides, while the lifted cuts depend on shorter sides for contrast. Consider your natural growth pattern at the crown and nape, how often you will style your hair, and whether you are comfortable having the fringe trimmed between full appointments.
Styling Straight, Wavy, and Curly Textures
For straighter hair, apply a small amount of mousse at damp roots and blow dry in the direction the fringe should fall. A brush can shape a smooth sweep; fingers and matte paste create separated tips. On naturally wavy hair, scrunch in lightweight cream and avoid brushing once dry. For curls like those in images 2 and 11, distribute curl cream through damp hair and diffuse gently. Use product sparingly on the close sides so the crown remains the focus.
Keeping Caramel and Beige Highlights Fresh
The images show narrow caramel, honey, and beige-toned highlights over darker brown bases. To preserve their contrast, use a color-safe cleanser, condition the lightened sections, and protect hair when heat styling. Ask your colorist whether the highlights can be refreshed through the longer top rather than repeatedly lightening the short sides. A gloss may help adjust tone between highlight appointments; your colorist can recommend one suited to the result you want.
Maintaining the Pixie Shape
Short sides and napes show growth quickly, particularly on the close, tapered cuts. Many pixies benefit from a shape check roughly every four to six weeks, although curls and longer fringes may allow a different schedule. At each visit, assess the view from behind as well as the front: a crown can still look good while the neckline has lost its outline. Fringe-only or neckline appointments can help between full cuts.
What to Discuss with Your Stylist
Bring the front, side, and back views of your preferred image. Point out the exact fringe length, the amount of crown height, how closely the hair sits around the ears, and the nape shape you want. Discuss how your texture behaves when dry and whether you usually air dry or blow dry. For color, identify which highlighted sections you like and ask what placement and upkeep would work on your current hair.
Frequently Asked Questions
What makes a highlighted pixie different from a plain pixie?
The haircut can have the same shape, but lighter strands make its layers, curls, or sweeping fringe more visible.
Which of these cuts has the shortest fringe?
Images 14 and 19 show short, broken fringe pieces; image 15 brushes its front upward instead.
Which cuts leave more length around the face?
Images 7, 13, and 16 have noticeably longer side-swept front sections.
Can naturally curly hair work with this shape?
Yes. Images 2 and 11 show fuller curls above shorter sides and napes. Ask for shaping that accounts for how your curls sit when dry.
How can I add crown volume to a pixie?
Start with a suitable layered cut, then apply lightweight mousse at damp roots and direct the hair upward while drying.
Will a long side fringe need regular attention?
Usually. Arrange a fringe trim once it falls into your eyes or no longer sweeps comfortably.
How often should I trim a tapered nape?
A shape check every four to six weeks is a useful starting point, but your preferred neckline and growth rate determine the timing.
Can the highlights be limited to the top?
Yes. The longer upper layers in these images provide visible space for highlights while the shorter sides can remain darker.
What product gives separated pieces without a wet finish?
A small amount of matte paste, worked onto the ends rather than the roots, can provide definition.
How do I keep highlighted curls defined?
Apply curl cream to damp hair, diffuse with low airflow, and separate only a few curls after they dry.
What should I show my stylist at the appointment?
Show the front, side, and back of the cut you like, then specify the fringe length, side coverage, crown volume, and nape shape.
Can I style the same pixie smooth and tousled?
Many of the longer layered cuts can be styled both ways. Ask your stylist to retain enough top length, then vary your drying direction and finishing product.
Conclusion
The most useful reference is the one whose side and back views appeal to you as much as its front. Choose the fringe and crown you can comfortably style, decide how close you want the sides and nape, and bring those details to your stylist before committing to a cut or color placement.