


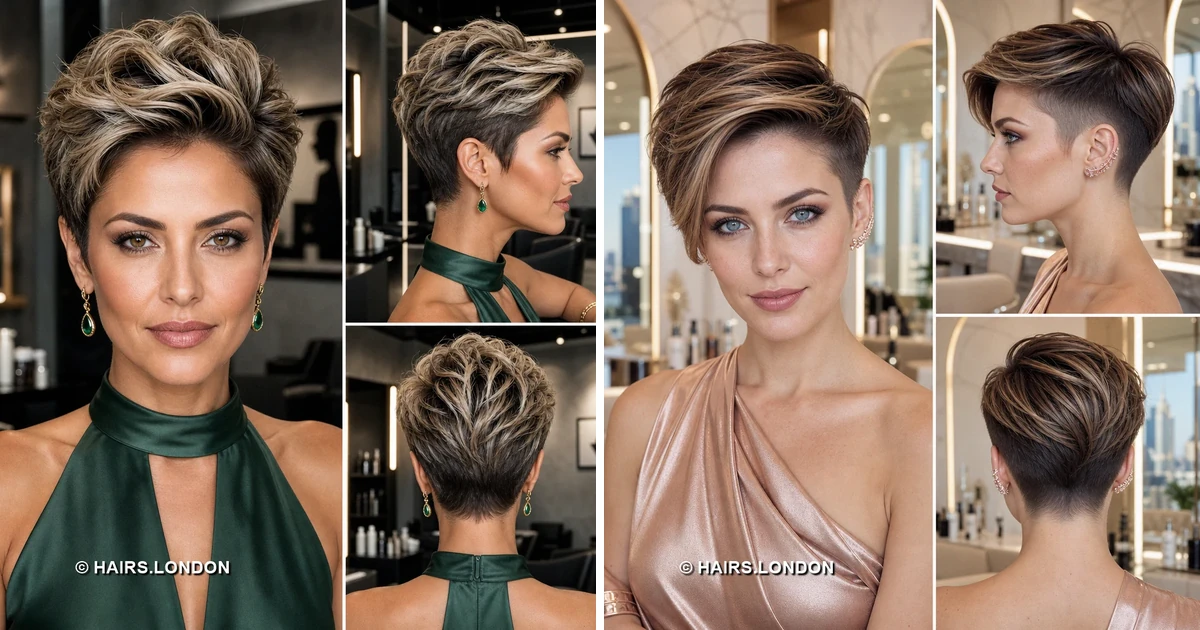
11. Honey-Beige Pixie with a Rolled Side Sweep
Honey beige highlights curve through a long, side swept front. That front section rolls upward slightly before falling across the forehead. One side is neatly combed back, exposing the ear. The rounded crown keeps fullness behind the softly sculpted fringe. At the back, layered strands taper closely into the nape. Ask to keep enough length for the front’s curved movement. Use a small brush to lift roots while drying sideways. Finish with light spray if the rolled section needs hold. Separate a few highlighted ends to show their layered direction. Trim the sides before they lose their close, tidy profile.
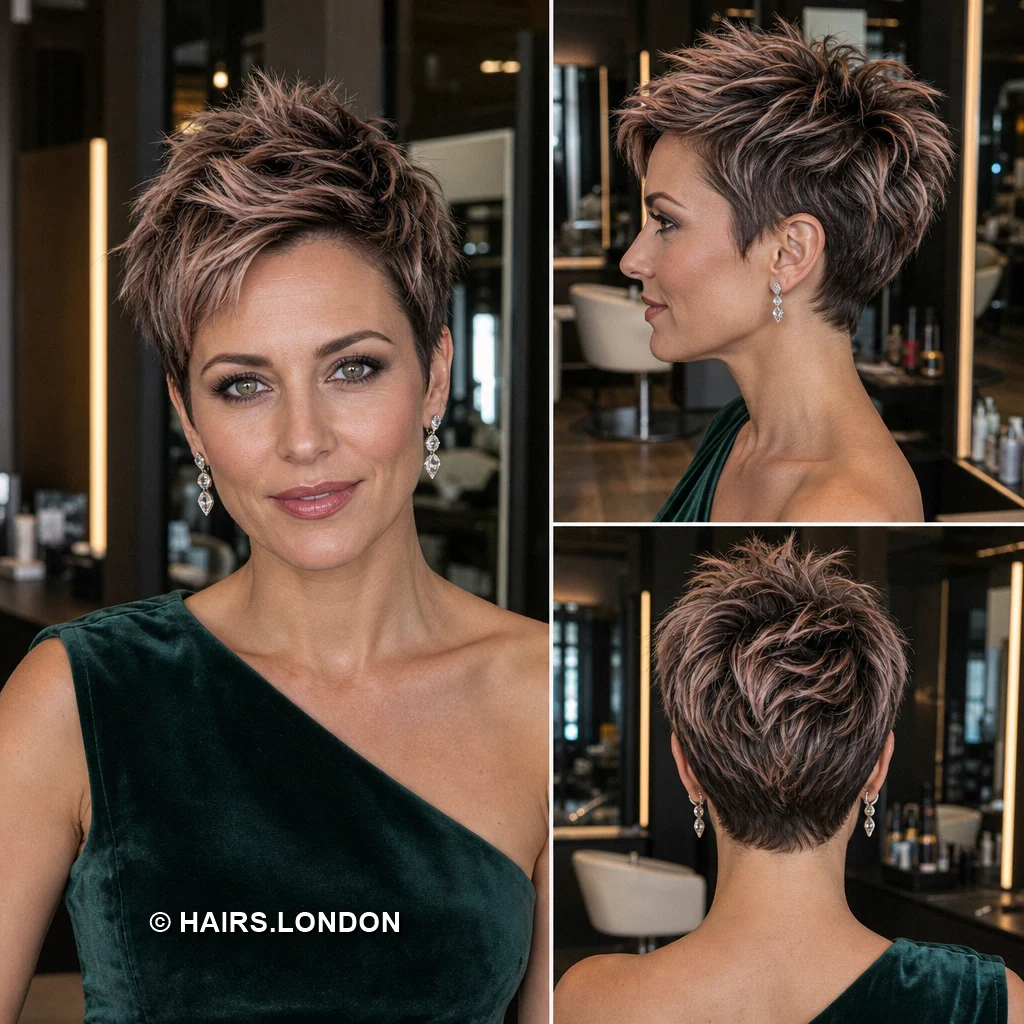
12. Cool-Beige Pixie with an Extended Fringe
Cool beige highlights brighten a long, tousled side fringe. The fringe sweeps low across one side of the forehead. Opposite sides are closely tapered, making the length difference clear. Lifted crown layers blend into a softly rounded upper back. The nape stays short and narrow beneath that fullness. Discuss the longest point before cutting, especially near your eyes. Gently dry the fringe across with your fingers for a relaxed finish. Use a tiny amount of paste to define feathery ends. Avoid heavy oils that could pull this airy section downward. Maintain the shorter side regularly to protect the asymmetric outline.
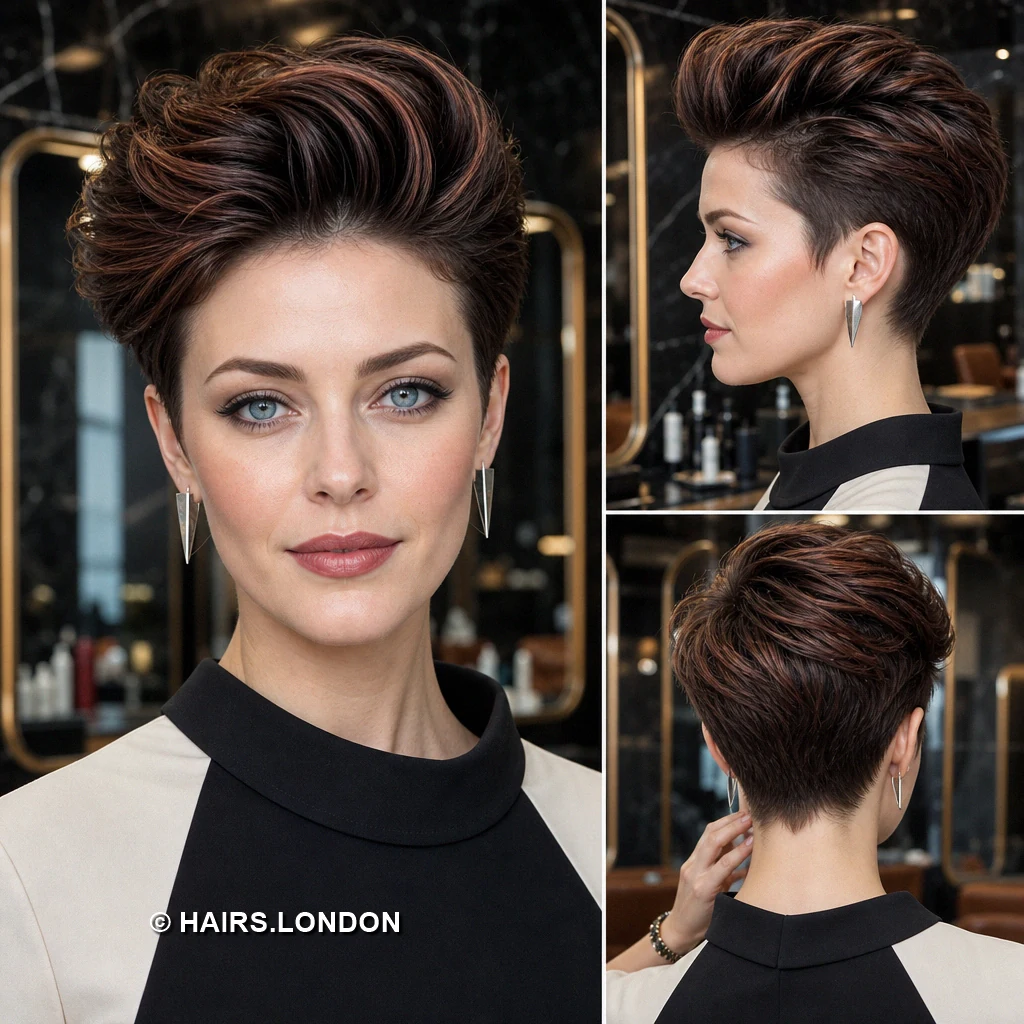
13. Rose-Copper Pixie with a Spiky Crest
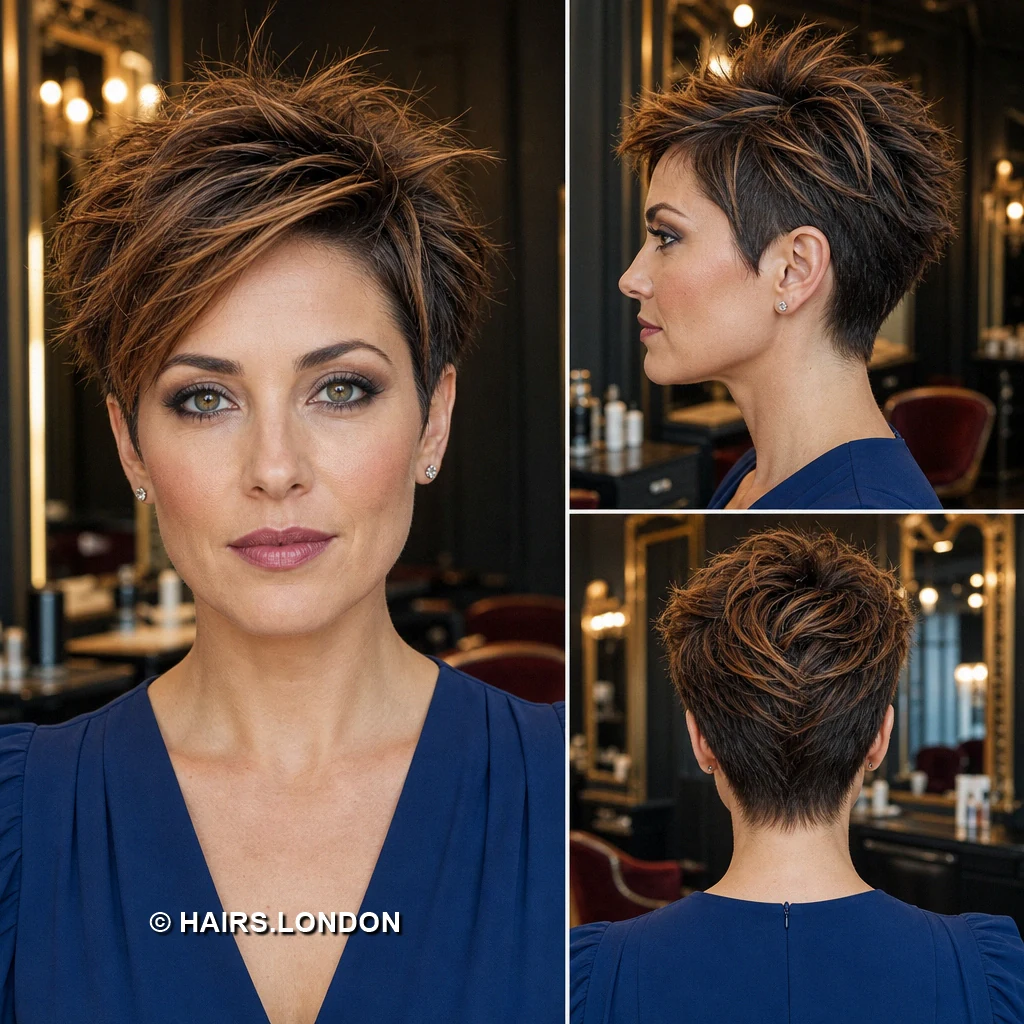
Rose copper accents run through the lifted, dark upper layers. The front forms a softly curved wave before rising into points. Close sides expose the ears and sharpen the tall profile. Textured strands continue over the crown toward the back. A tight, tapered nape keeps the lower outline clean. Ask for enough upper length to shape rather than clip. Blow dry the front upward, then carefully direct selected ends backward. Pinch small sections with flexible paste for individual definition. Keep the shorter sides smooth to emphasize the raised crest. Regularly refresh the taper when regrowth starts widening the lower silhouette.
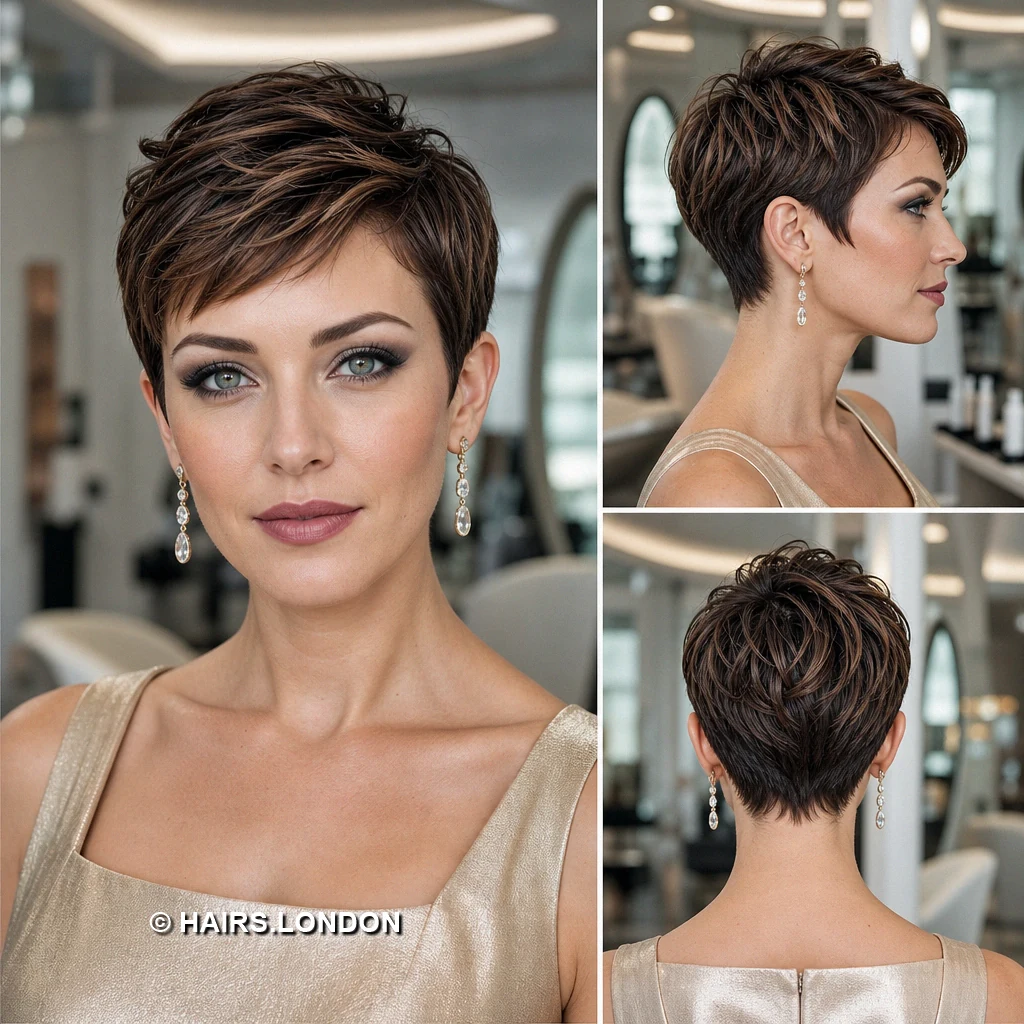
14. Auburn Pixie with Sculpted Waves
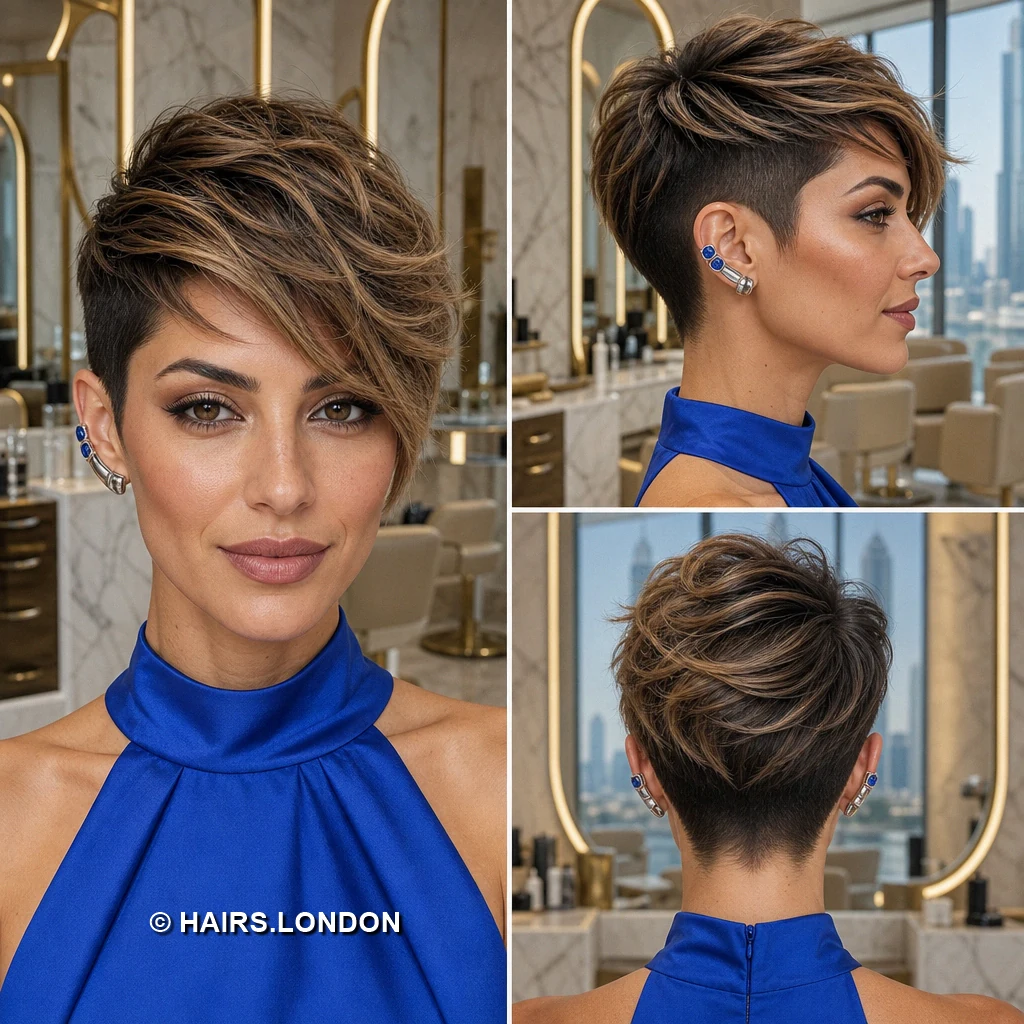
Auburn highlights follow broad waves through the longer top. The front curls upward, leaving the forehead mostly open here. Short sides sit close beneath the soft, swirling crown. From behind, curved layers settle into a neat tapered nape. Defined bends provide texture without the sharply separated, spiky finish. Ask your stylist to retain length for these loose curves. Dry with a brush, gently turning the front away from your face. Shape individual waves using a small amount of pliable cream. Avoid flattening the crown while smoothing its shorter side panels. Trim the nape as needed to preserve the rounded profile.
15. Taupe-Brown Pixie with Fine Spikes
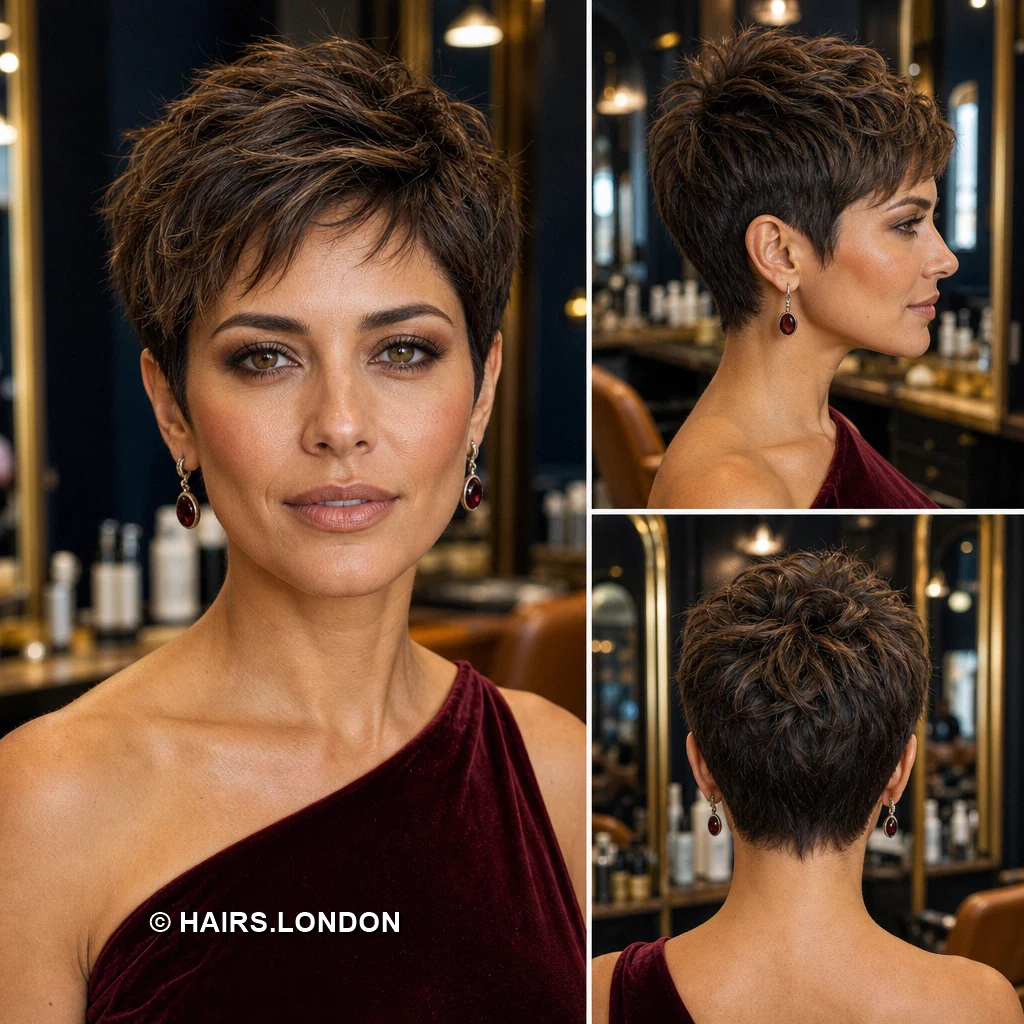
Taupe brown highlights lighten the tips of this spiky crop. Short, fine fringe pieces point toward the forehead without covering it. Upright strands spread across the crown in varied directions. The sides remain closely cut, revealing most of each ear. At the back, pointed layers narrow toward a tidy nape. Ask for piecey top texture while keeping the outline compact. Dry upward with fingers rather than brushing the strands flat. Rub matte paste between fingertips before lifting individual small sections. Leave some darker roots visible to maintain depth and separation. Book trims when the spikes begin losing their distinct shape.
16. Toffee Pixie with a Soft Curved Fringe
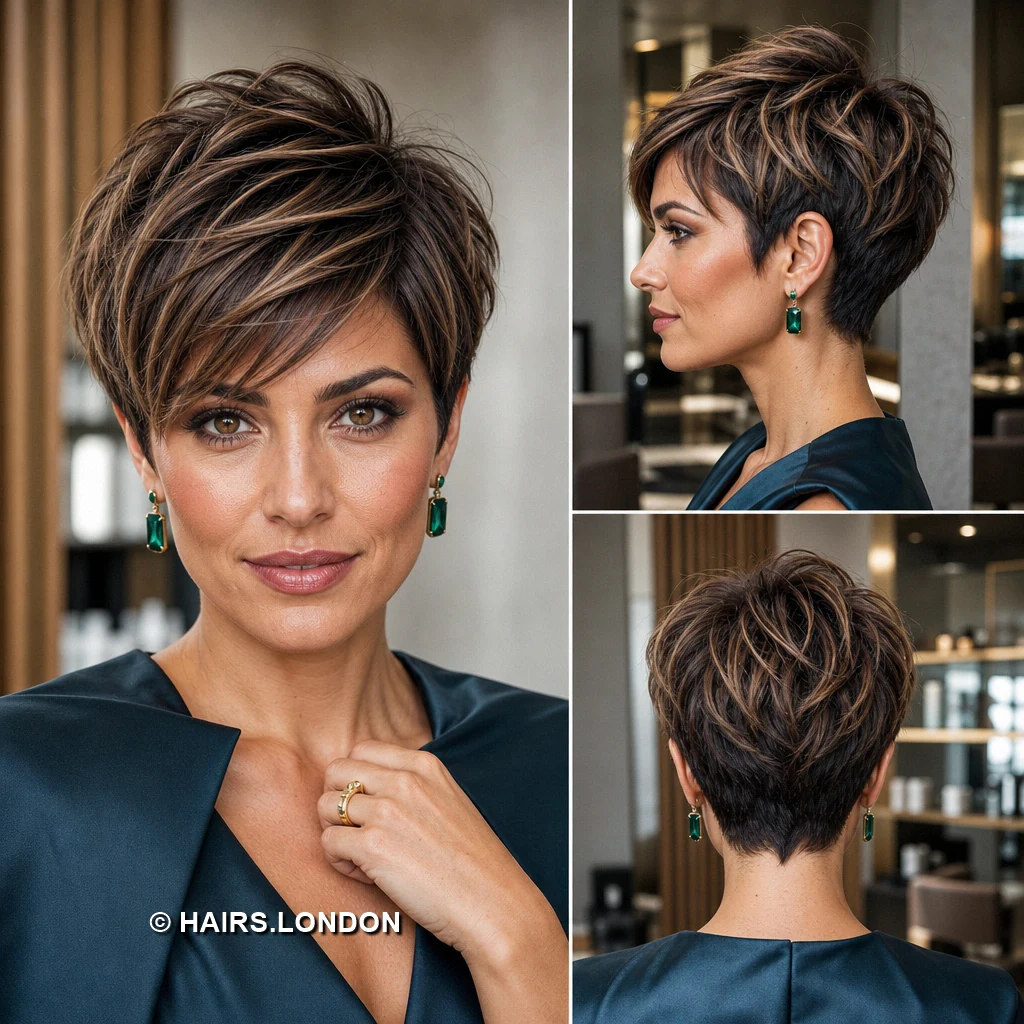
Toffee highlights thread through the softly rumpled brown top. The fringe curves forward, then breaks into light, separate ends. Rounded crown layers add fullness without rising into tall spikes. Close sides frame the ears, while longer pieces soften them. At the back, overlapping layers taper to a narrow nape. Ask for movable layers rather than a uniformly short crown. Dry the fringe forward and lift the roots slightly afterward. Add a little flexible cream to emphasize the curved pieces. Avoid heavy wax if you want the lighter strands especially airy. Refresh the neckline when its tapered finish starts growing out.
17. Deep Brown Pixie with a Raised Front
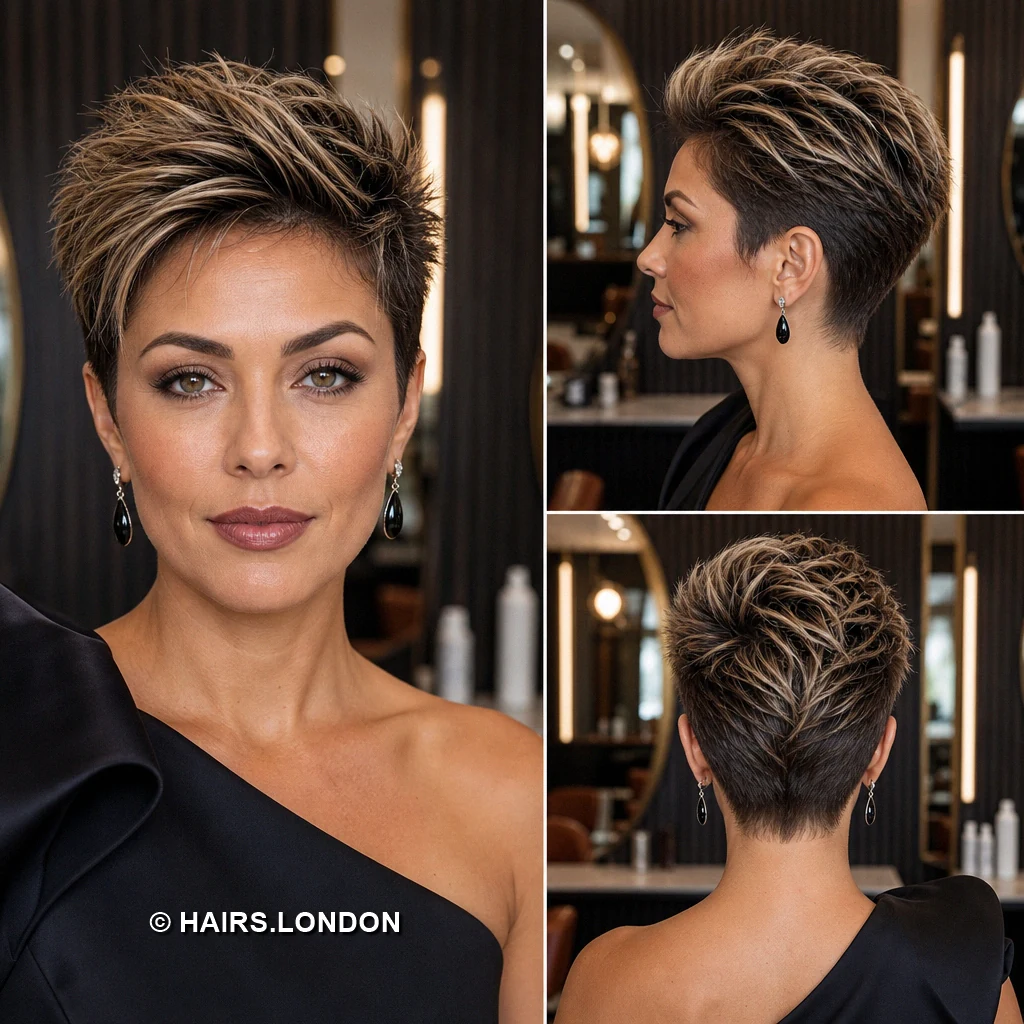
Deep brown strands form a tall, pointed front section. Subtle lighter ribbons catch the lift across the upper layers. Closely tapered sides leave the ears exposed and reduce bulk. The crown remains textured, flowing back from the upright fringe. Behind, graduated hair narrows into a tidy, close nape. Request enough front length to build height with your fingers. Dry roots upward before shaping the tips into loose points. Choose flexible hold so the front can move naturally. Keep dense product away from the shorter sides and neckline. Maintain the taper to keep the raised front visually prominent as it grows.
18. Champagne-Highlighted Pixie with a Long Side Drape
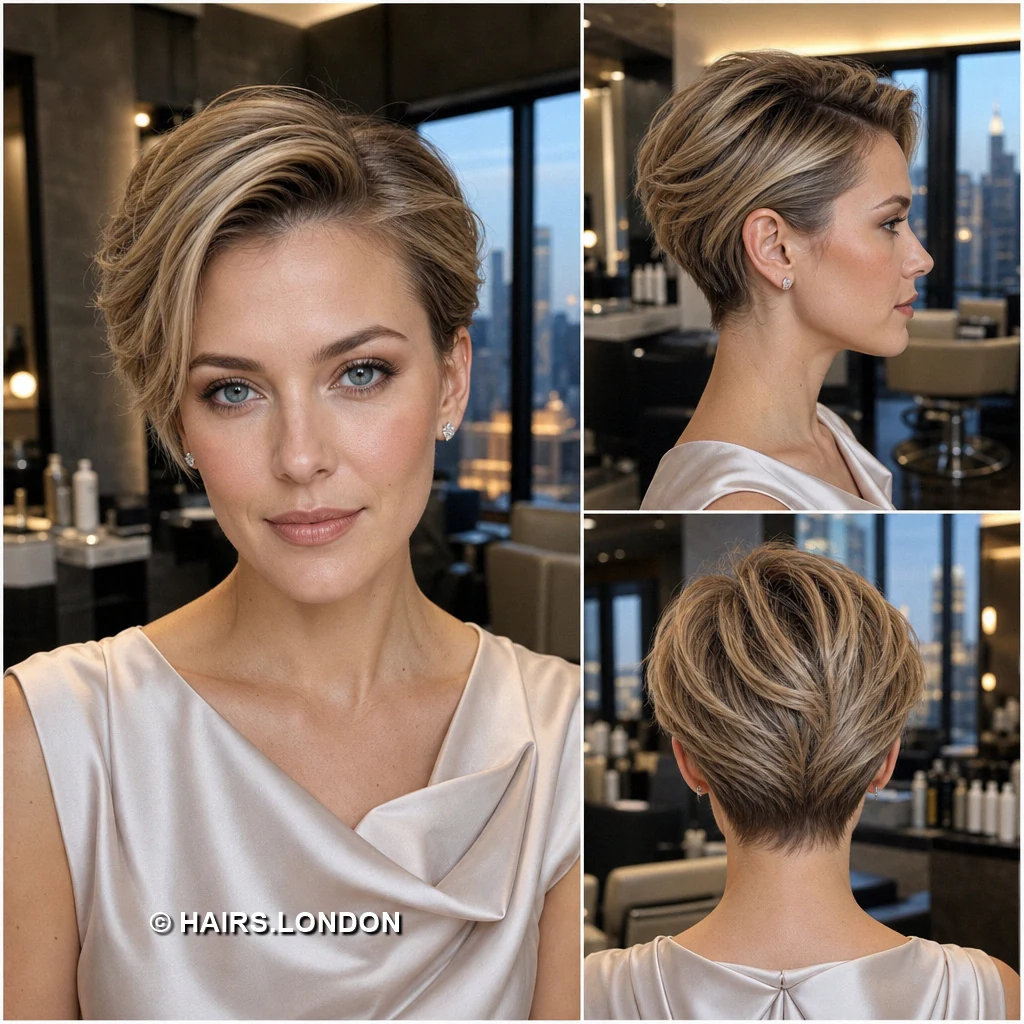
Champagne highlights brighten the long section swept across forehead. That fringe dips beside one eye before curving inward. The opposite side is closely tapered above the exposed ear. Smooth upper layers roll backward into a full, rounded crown. A short nape keeps the longer top from appearing heavy. Discuss where the fringe should end when worn completely dry. Blow dry from the deeper side part for controlled movement. Use light smoothing cream along the draped section’s ends. Avoid excess product at the roots to retain gentle lift. Trim the close side regularly to preserve its clear contrast between salon visits.
19. Caramel-Brown Pixie with a Gentle Side Fringe
Caramel brown highlights weave through a softly layered crown. A gentle side fringe crosses the forehead in tapered pieces. The fuller top rounds smoothly over closely cut sides. Around the ears, short hair follows a clean, natural line. Rear layers converge toward a slim, neatly finished nape. Ask for soft internal texture without removing the crown’s fullness. Dry from the roots, sweeping the fringe to one side. Finish by separating a few lighter strands with your fingers. Use minimal paste to avoid weighing down this softer shape. Trim the perimeter when the sides begin looking less defined between scheduled appointments.
How to Choose a Highlighted Pixie Haircut
Start with the silhouette you want to see from the front and side. A long fringe offers more coverage and styling options, while an elevated quiff opens the forehead and needs enough top length to hold its shape. Compare the back views, too: a close, pointed nape looks different as it grows out from a softer, fuller one. Your natural growth patterns, density, and willingness to style the front each morning matter more than copying every detail of a photograph.
Styling Different Hair Textures
For fine hair, start with a light mousse at the roots and dry the top in the direction you want it to sit; too much paste can collapse the lift. Dense hair may benefit from carefully placed internal layering so the crown moves without widening. If your hair has a wave, work with its bends using a small amount of flexible cream and your fingers. For straighter hair, a brush and directional blow-drying can create the curved fronts and sweeps shown here. Let your stylist demonstrate the technique on your own texture.
Keeping Highlighted Color Fresh
These looks rely on contrast between darker bases and lighter ribbons, so ask your colorist whether subtle highlights or a more noticeable front section suits your starting color. Wash with products appropriate for color-treated hair, protect it from excessive heat, and follow your colorist’s advice on toning if lighter pieces shift warmer than you prefer. A gloss or selective highlight refresh may be enough between larger color appointments; the right schedule depends on your shade and how much regrowth you are comfortable seeing.
Maintaining the Pixie Shape
Watch the areas that define the cut rather than following a fixed calendar alone. If hair begins covering the ears, the nape loses its taper, or the fringe falls differently, it may be time for a trim. Shorter, closely tapered sides generally show growth sooner than a soft, longer top. Between appointments, keep styling products light, clean buildup from the roots, and dry the hair into its intended direction before adding hold.
What to Discuss with Your Stylist
Bring the front, side, and back view of your favorite cut. Point out the exact fringe endpoint, how close you want the sides, and whether you prefer a pointed or softer nape. Explain how much time you can spend blow-drying and whether you want to expose an ear or keep some coverage. For color, discuss the brightness, placement, and upkeep of the highlights alongside your hair’s current condition. Ask your stylist to show you how to recreate the finish before you leave.
Frequently Asked Questions
What makes a pixie haircut look more textured?
Visible differences in layer length, separated ends, and directional styling create texture. Ask your stylist to tailor the layering to your density rather than simply thinning the entire top.
Can I keep a long fringe with short pixie sides?
Yes. Several cuts here pair a sweeping fringe with close sides. Agree on the fringe’s dry length so it falls where you want it.
Which of these cuts needs the most daily styling?
Tall quiffs and upright spikes generally need more deliberate drying and product than softly rounded or forward-swept crops.
Will highlights show on very short hair?
They can, especially through a longer top or fringe. Placement is important because closely cropped sections offer less length for the color to show.
How do I keep a side-swept fringe in place?
Dry it in the intended direction first, then use a small amount of flexible product. Ask your stylist to check whether a growth pattern near the hairline affects the sweep.
What should I ask for if I dislike stiff spikes?
Request separated, movable ends and a flexible finish. Your stylist can leave softer layers on top and demonstrate styling with less product.
How often should I trim a tapered nape?
Trim it when the outline starts losing its shape. The interval varies with your growth rate and how crisp you want the neckline.
Can naturally wavy hair wear these pixie shapes?
Yes, although the finished shape may bend differently from the photographs. A stylist can adjust the top length and layers to make use of your wave.
What product works for a lifted pixie front?
Begin with light root support while drying, then add a small amount of flexible paste or spray if needed. Avoid applying heavy product directly at the roots.
Can I make the highlights less noticeable?
Ask for narrower pieces and less contrast against your base color. Bring a photograph and identify which lighter sections you want to soften.
Why does a pixie look different from the side?
The side view reveals the relationship between crown height, fringe length, and the close area around the ear. Review that profile before deciding on a cut.
Should I choose the haircut or the color first?
Plan them together. The final top and fringe lengths determine where highlights will remain visible after cutting.
Conclusion
The most useful detail in a pixie reference is often its proportion: where the length sits, how the fringe moves, and how closely the sides and nape are cut. Choose the highlighted pixie haircut whose shape appeals to you from every angle, then work with your stylist to adapt its texture, color contrast, and upkeep to your hair.