


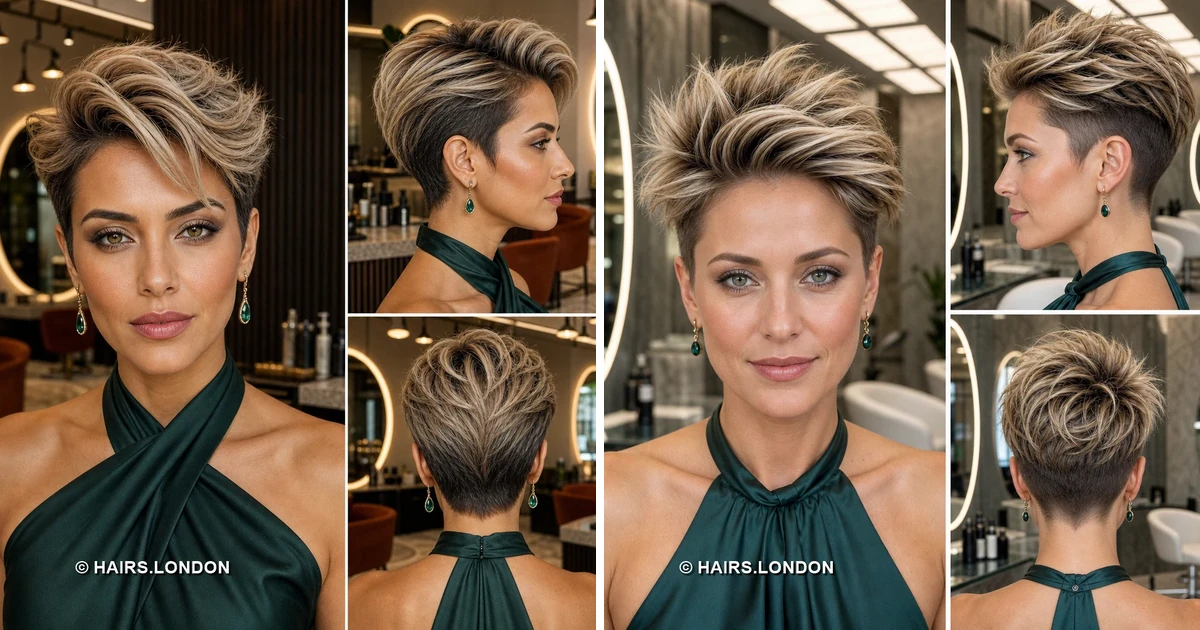
11. Sandy Long Fringe Pixie
Sandy blonde highlights draw attention to an extended side fringe. It falls across one eyebrow toward the cheekbone below it. The opposite side is closely cropped, sharpening the asymmetric outline. Textured crown layers add height behind the smooth diagonal front. The rear narrows cleanly beneath its fuller, rounded upper section. Ask your stylist to preserve the fringe’s longest face framing point. Remove weight internally so that section moves without looking heavy. Blow dry diagonally, then separate just a few ends. Keep the short side trimmed for a crisp length contrast. Check how the fringe falls naturally before committing to length.
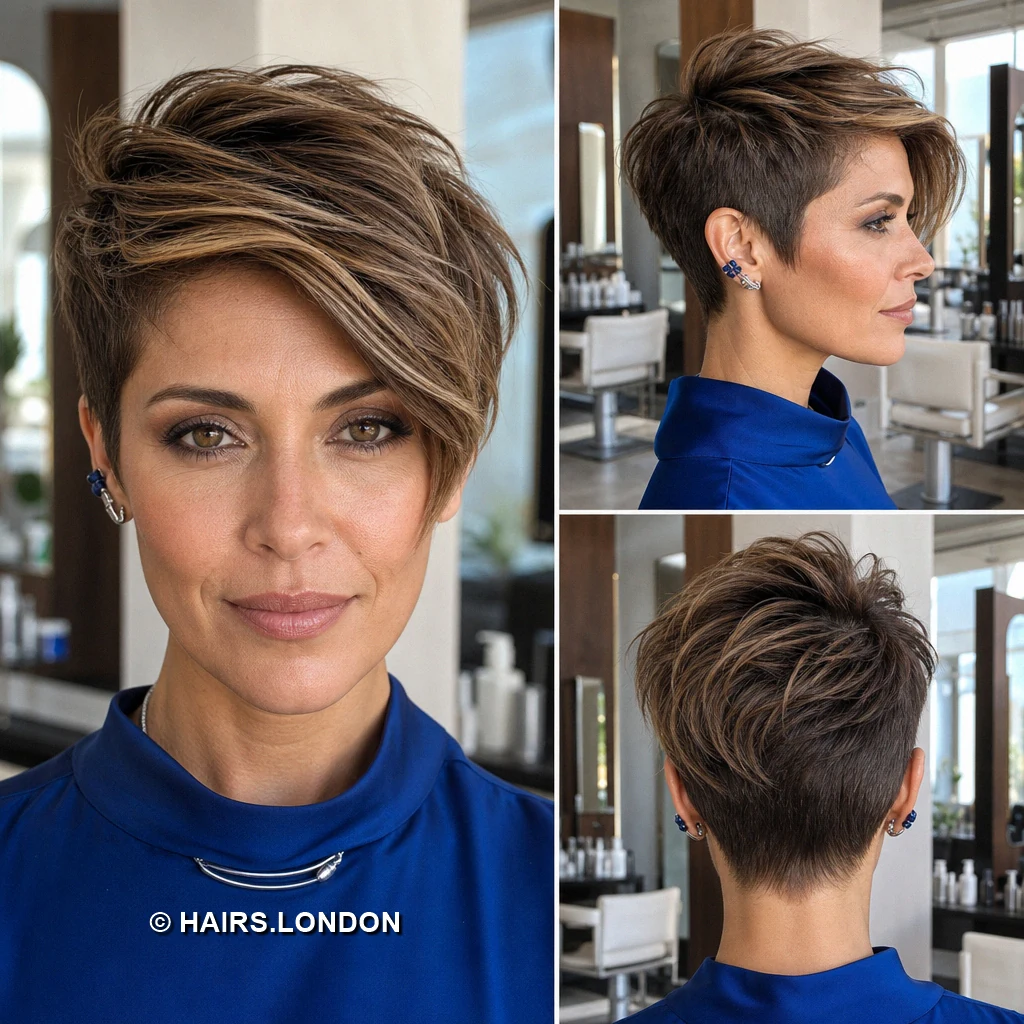
12. Mushroom Brown Piecey Pixie
Muted brown highlights give this compact pixie gentle dimension. Short fringe pieces break unevenly across the upper forehead here. The crown looks lightly tousled rather than heavily lifted upward. Sides fit closely above the ears for a neat profile. From behind, small layered pieces taper into a pointed nape. Request soft, piecey cutting through the top and front. Keep enough density to avoid an overly thin looking crown. Rough dry with fingers, then define selected ends with paste. Leave some strands unstyled to maintain the relaxed finish shown. Arrange a trim once the fringe starts losing its separation and movement.
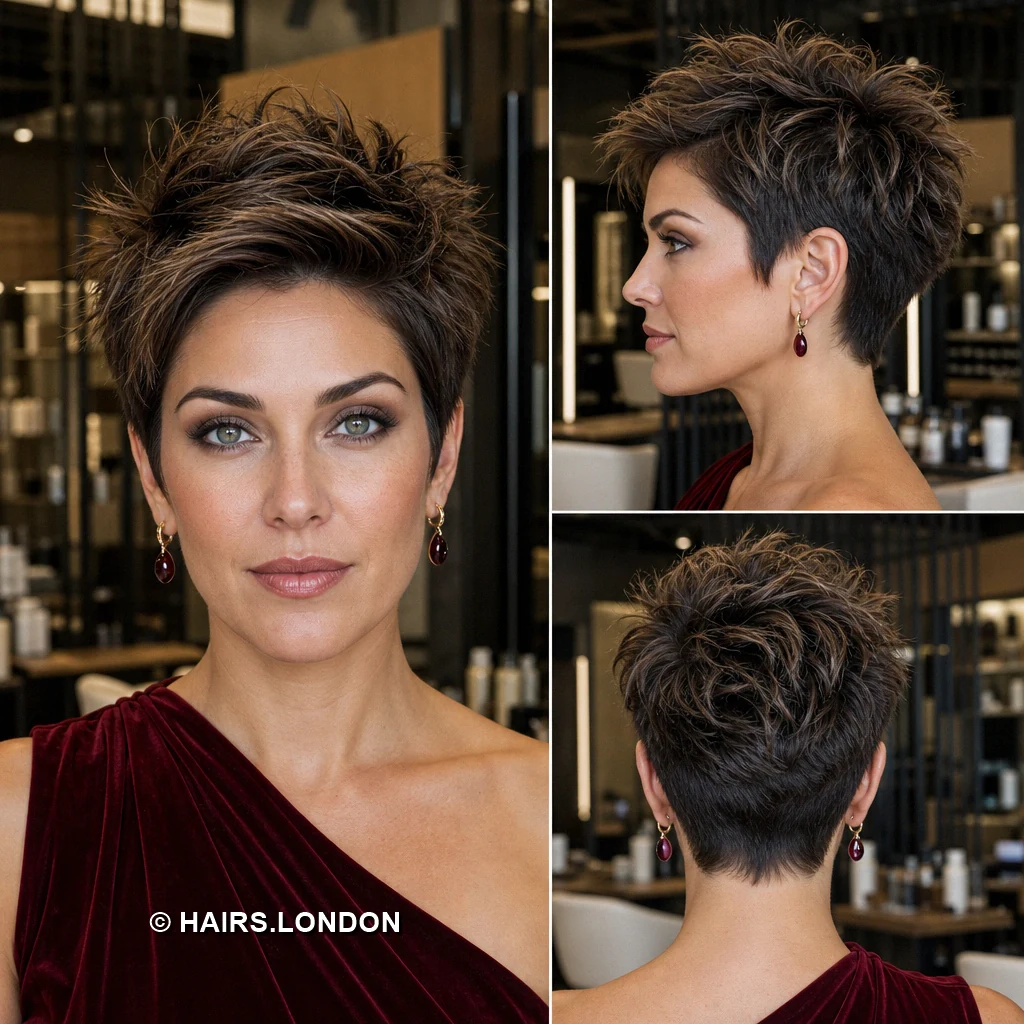
13. Brown Blonde Spiky Crop
Blonde tipped pieces stand out against a dark brown base. The fringe is short, broken, and directed slightly forward. Across the crown, spiky layers create considerable height and separation. Close sides and a tapered nape ground the energetic top. The back shows texture continuing above the shorter lower section. Ask for enough variation between crown lengths to form points. Blow dry upward, moving your fingers against the natural growth. Work firm matte paste into the ends, not the scalp. Pinch a few sections apart instead of lifting everything equally. Maintain the cropped sides before they soften the defined cropped outline.
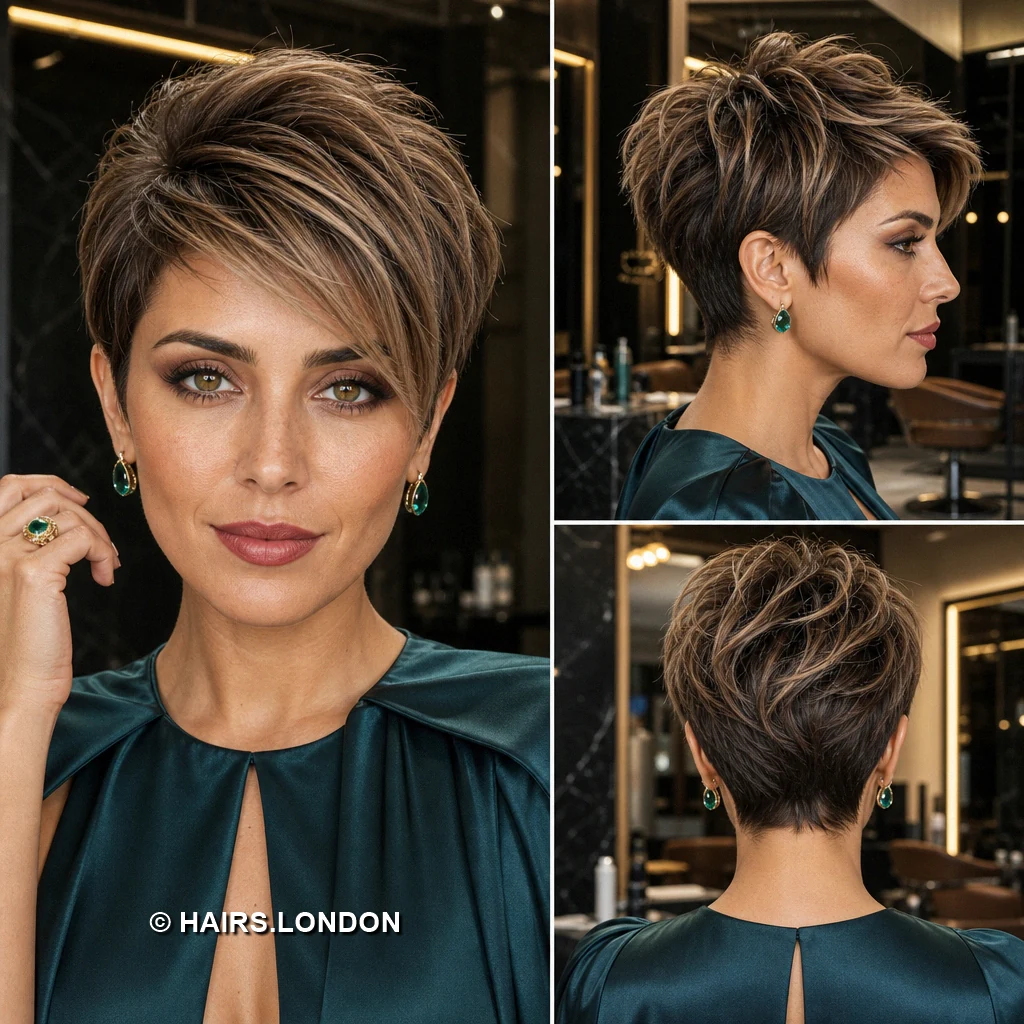
14. Golden Feathered Crown Pixie
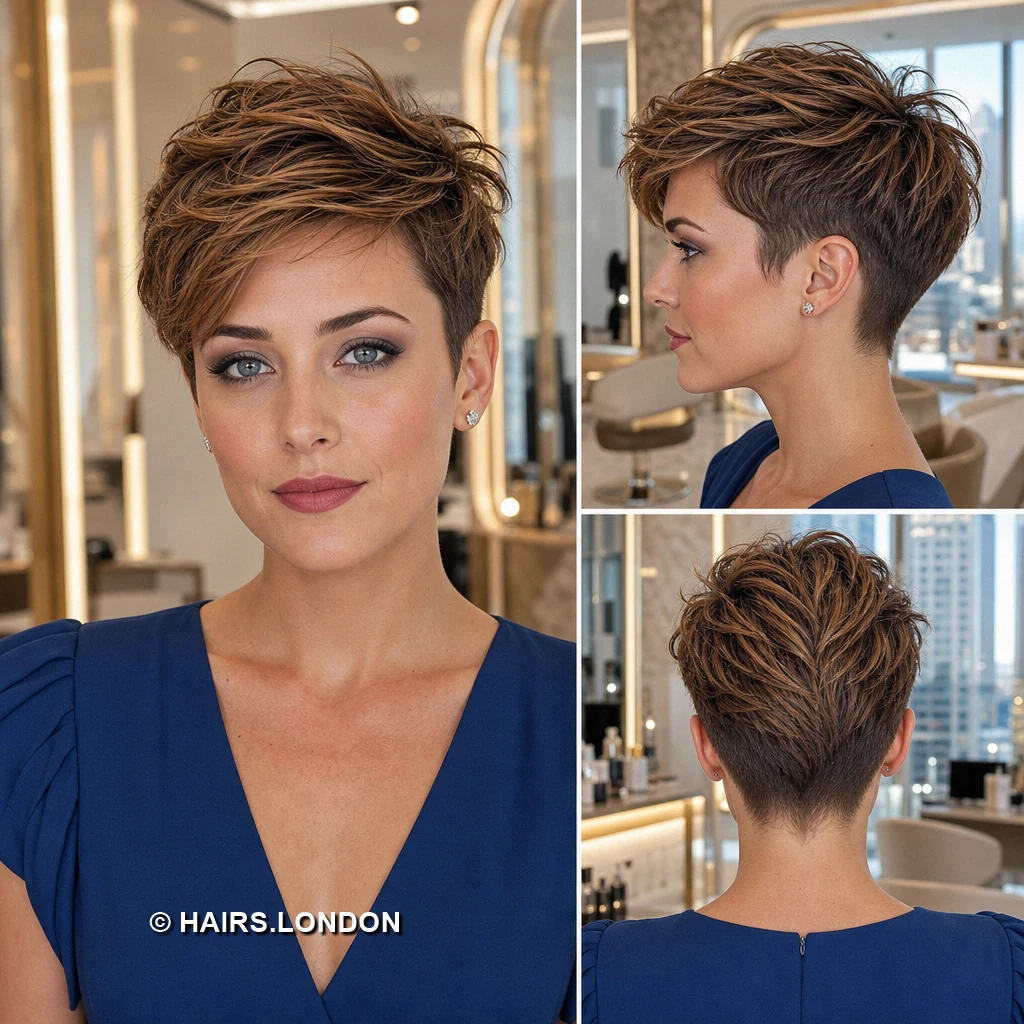
Golden blonde highlights fan through the feathered upper layers. A short, airy fringe leaves much of the forehead visible. The crown carries lift, while the sides hug the head. Small points at the top give the shape extra texture. Behind, the fuller layers taper into a narrow neckline shape. Request feathered ends without removing too much overall crown weight. Blow dry upward, then sweep the top slightly to one side. Use a light styling paste to separate its highlighted strands. Smooth the temple area so the profile remains neatly balanced. Trim the fringe and nape as soon as they overgrow.
15. Chestnut Brushed Back Pixie
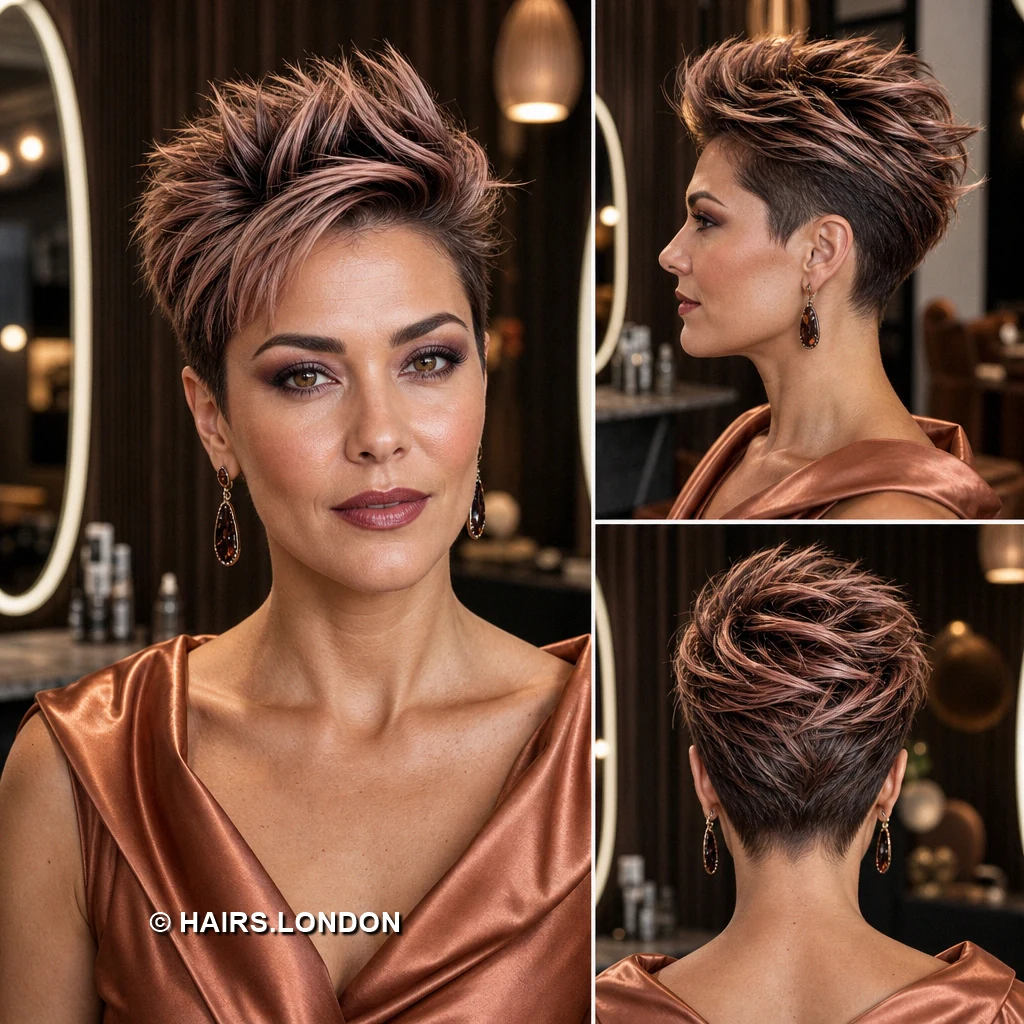
Subtle chestnut ribbons follow the backward flow of this pixie. The front rises gently, leaving an open, uncluttered forehead. Longer top layers lie in smooth waves rather than spikes. Sides are cropped close, with a clean outline around ears. The rounded back settles into a short, softly tapered nape. Ask for connected layers that support the visible backward movement. Blow dry the front away from the face using fingers. Apply a little cream for definition without a rigid finish. Keep product light near the crown to protect its lift. Trim the sides when their extra length noticeably changes the profile.
16. Mocha Soft Crop
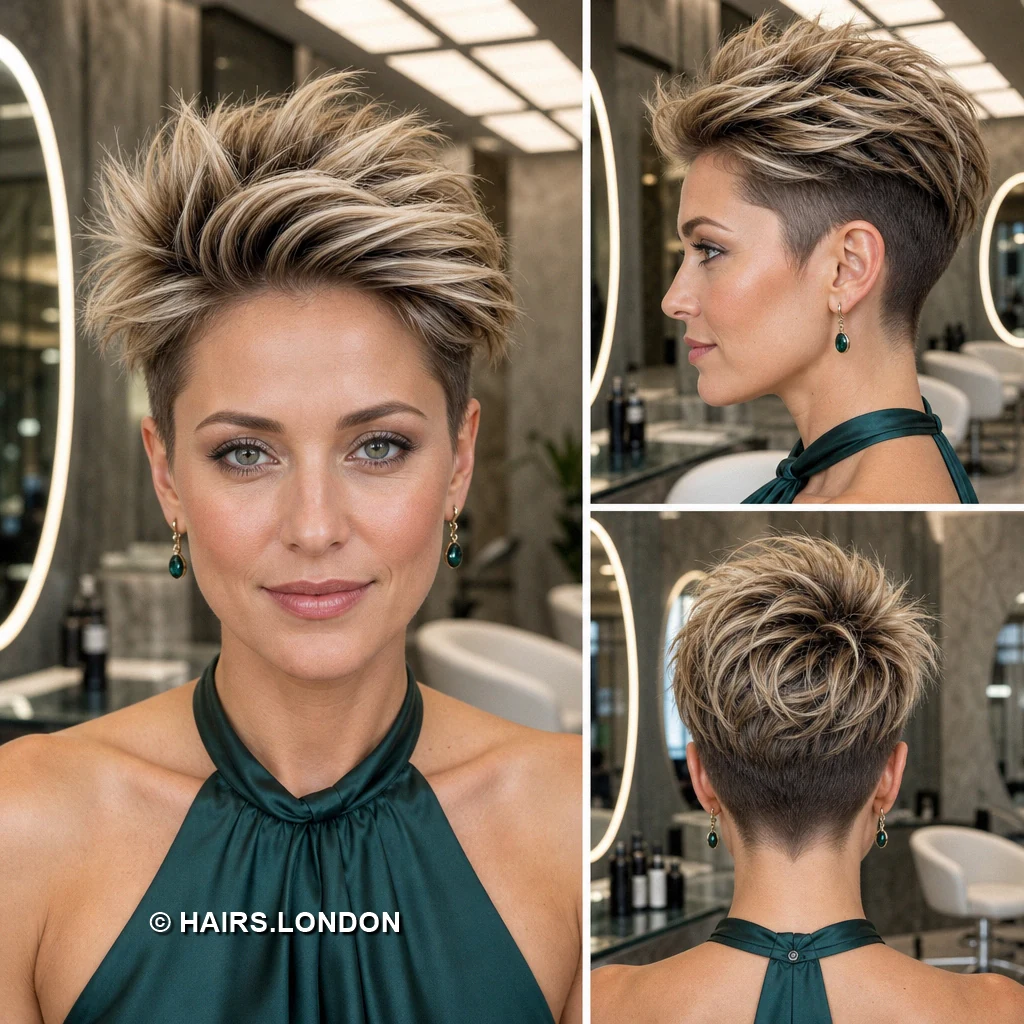
Mocha brown strands mix with restrained caramel toned highlights. The fringe is short and softly swept across the forehead. Rounded crown layers create fullness without pronounced height or spikes. Short sides tuck closely around the ears and temples. At the back, layered texture narrows toward a tidy nape. Request a softly graduated shape that follows your natural growth. Ask for light texturing rather than substantial removal of weight. Dry with fingers, guiding the fringe sideways as it sets. Use minimal paste to pick out the lighter top strands. A regular perimeter trim keeps the softly rounded shape from gradually spreading.
17. Walnut Tousled Fringe Pixie
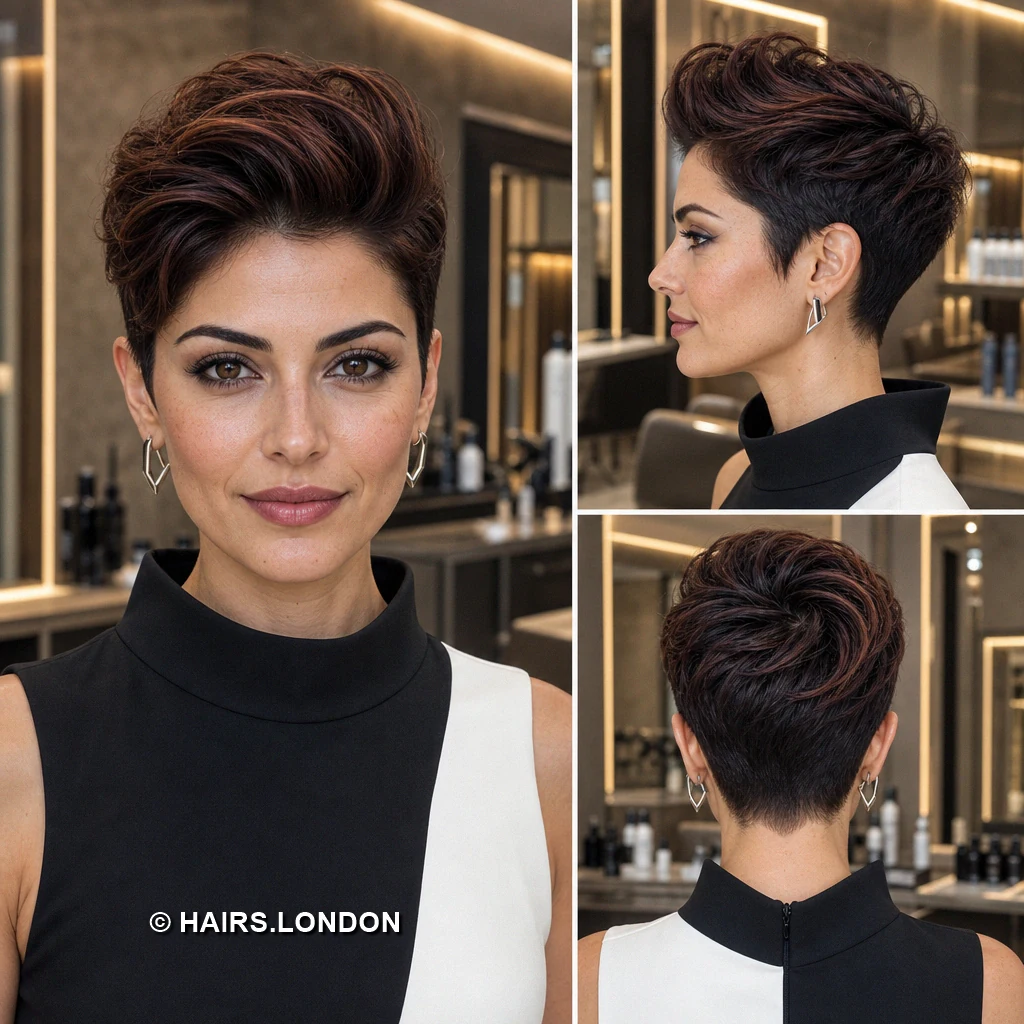
Walnut brown color carries fine, lighter ribbons through the top. The fringe breaks into wispy points above the eyebrows here. Tousled crown layers rise softly, giving this pixie casual height. Short sides frame the ears without exposing a harsh undercut. The back stays textured until its narrow, neatly tapered nape. Ask for movable layers that can fall naturally or lift. Dry against the roots with fingers for a little volume. Twist selected ends with paste while leaving others comfortably loose. Keep the fringe light enough to avoid a solid block. Trim once the sides start losing their original close silhouette.
18. Bronde Deep Sweep Pixie
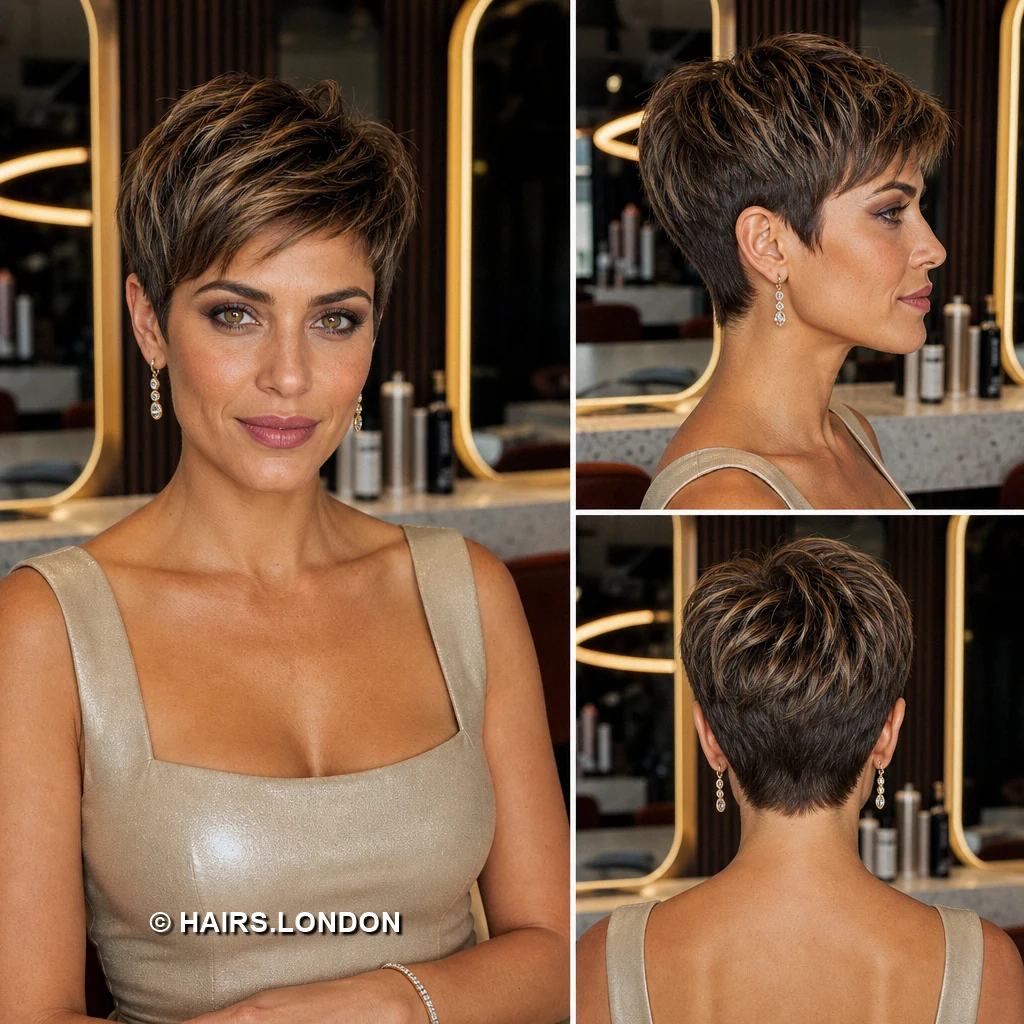
Bronde highlights follow the dramatic sweep across this pixie. Its long fringe crosses one eyebrow and approaches the cheek. The closely cut opposite side reinforces the strong diagonal shape. Fuller layers at the crown curve toward a tapered back. From behind, lighter strands remain visible above the dark nape. Ask to retain enough front weight for this deep sweep. Have your stylist remove bulk carefully above the shorter side. Blow dry across the forehead, lifting lightly at the roots. Finish with flexible spray rather than a stiff setting product. Plan fringe trims if it begins interfering with your everyday vision.
19. Copper Brown Textured Pixie
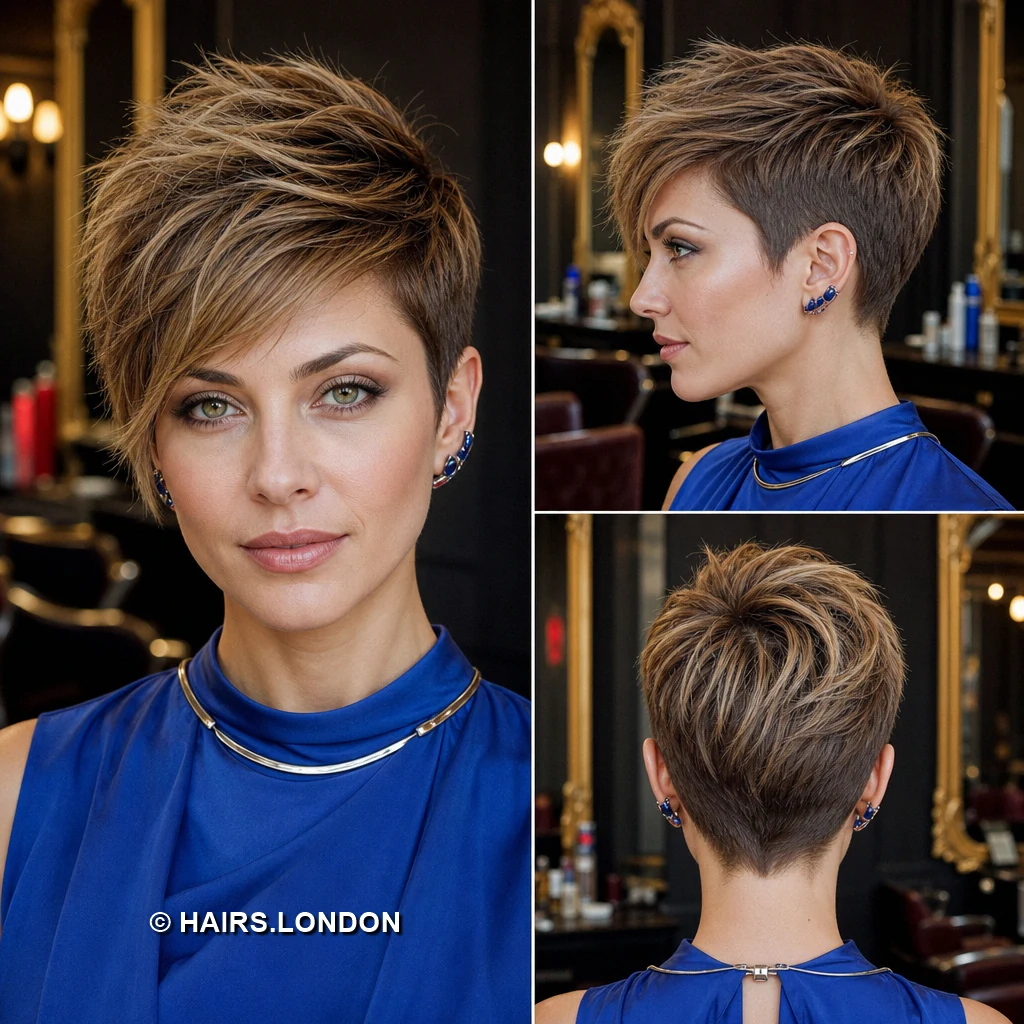
Copper brown highlights bring warmth to this short, textured pixie. The fringe is brief, uneven, and open across the forehead. Spiky crown pieces add lift without forming one solid crest. Close sides create a tidy shape around both visible ears. Behind, scattered texture settles into a narrow tapered nape. Request point cut layers that support this separated top finish. Dry upward with fingers before applying a small amount of paste. Define individual tips while keeping the sides relatively smooth throughout. Choose a flexible hold if you prefer softer everyday movement. Refresh the cut when the crown becomes difficult to separate.
How to Choose a Highlighted Textured Pixie Cut
Start with the amount of styling you want to do. A soft, short fringe and rounded crown need less directional work than a high, spiky top or a long diagonal sweep. Consider how your hair grows around the front hairline, crown, and nape; those patterns affect where lift and separation will hold. If you want a strong contrast between lengths, use the side and back views to decide how close the perimeter should be.
Styling Different Hair Textures
Fine hair generally benefits from lightweight products applied sparingly, with root lift created during blow drying. Dense hair may need internal weight removal so the top moves instead of sitting as one heavy section. On naturally wavy hair, encourage the existing bend with a small amount of styling cream and gentle drying. For straighter hair, establish the fringe direction or crown lift while damp, then define a few ends with paste. Work with your natural growth pattern rather than forcing every strand into place.
Keeping Highlighted Pixie Color Fresh
Highlights are especially visible on short, separated layers. Use color-safe cleansing products and protect the hair from excessive heat when blow drying. The ash, champagne, and golden tones shown here may need different toning approaches, so ask your colorist what suits your chosen shade. Discuss how often the highlighted top should be refreshed as the close-cut sides grow.
Maintaining the Pixie Shape
A pixie’s outline changes quickly when the sides, fringe, and nape grow. Arrange cuts according to the shape you choose: close sides and a precise neckline usually call for more frequent attention than a deliberately soft perimeter. If the top starts to collapse, ask whether it needs reshaping before removing more length. Between appointments, a quick fringe or neckline tidy may be enough.
What to Discuss with Your Stylist
Bring the image that best matches your preferred front, side, and back shapes, and point out the details you do not want. Discuss how long the fringe should remain when dry, how close the sides should sit around your ears, and whether you prefer a rounded or pointed nape. Show your usual parting and any crown growth patterns. Finally, agree on the highlight placement, daily styling time, and maintenance schedule before cutting.
Frequently Asked Questions
What makes a pixie cut look textured?
Varied layers and separated ends create visible movement. Styling product can define selected pieces, but the cut needs enough length variation to support the effect.
Do highlights work on a very short pixie?
Yes. Placement matters: highlights through the longer top or fringe remain more visible than color confined to closely cropped areas.
Which pictured shapes have the longest fringes?
The caramel diagonal fringe, sandy long fringe, and bronde deep sweep leave the most visible length across the forehead.
How can I add height to a pixie crown?
Blow dry the crown upward from the roots, then define a few ends with lightweight paste. The cut must leave enough length on top to lift.
Can a textured pixie be styled smoothly?
Often, yes. Direct the longer layers with a brush and dryer, then use a small amount of cream to smooth the surface.
Will a long side fringe need extra upkeep?
It may. A fringe that approaches the eye or cheek can need tidying between full cuts, especially if you want to keep its original diagonal line.
What product suits fine hair in these styles?
Start with a lightweight styling cream or a very small amount of matte paste. Heavy wax can weigh down fine crown layers.
What should I request if my hair is dense?
Ask your stylist to assess where internal weight can be removed while keeping enough hair to support your chosen fringe and crown shape.
How often should I trim the nape?
Trim it when the tapered outline begins to lose its shape. The timing depends on your growth rate and how precise you want the neckline.
Can I keep my natural hair color with one of these cuts?
Yes. The shapes do not depend on highlights, although lighter strands make the layers and styling direction easier to see.
How do I keep a spiky pixie from looking stiff?
Apply product in small amounts and define only selected tips. Leave space and movement between the lifted sections.
What photos should I bring to a pixie consultation?
Bring front, side, and back views. They help you discuss fringe length, crown volume, ear coverage, and the nape separately.
Conclusion
The most useful detail in these highlighted textured pixie cuts is how each longer top connects to its sides and nape. Choose the fringe direction and crown height you like, then use the multiple views to plan a shape that works with your hair’s growth pattern and your preferred upkeep.