


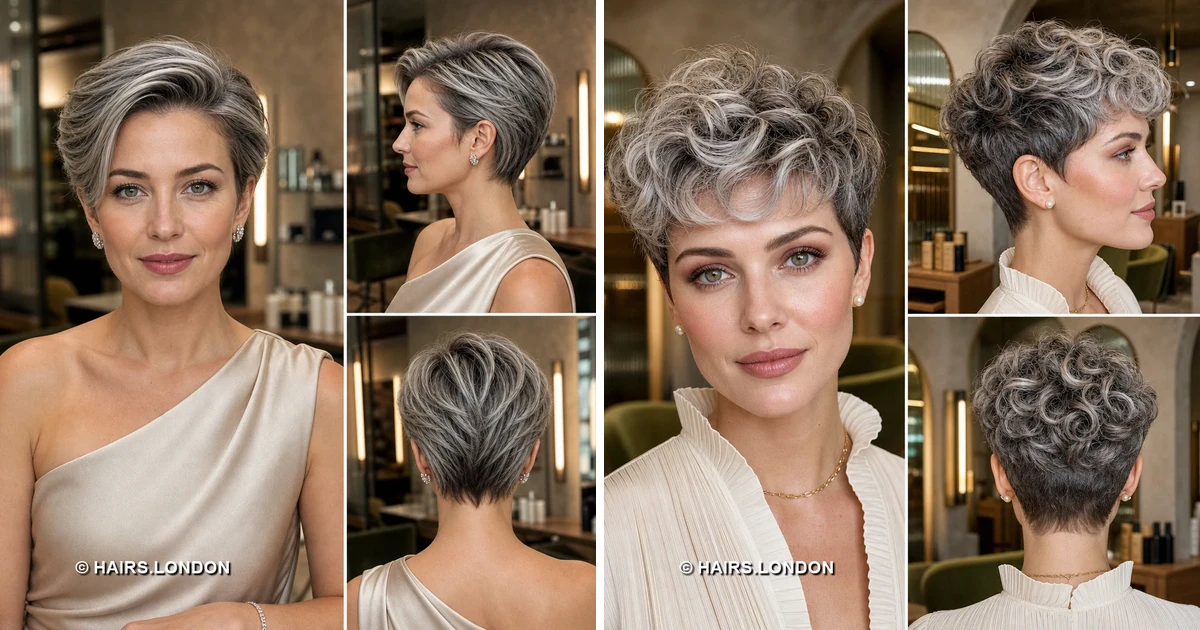
11. Silver Ringlet Pixie with a Close Taper
Distinct ringlets fill the crown of this silver highlighted pixie. Pale curls sit over a darker, closely cut foundation. Smaller curls form a soft fringe near the forehead. The sides narrow around the ears without flattening the top. From behind, dense curls contrast with the tapered lower nape. Ask your stylist to assess curl shrinkage before cutting length. Apply curl cream while damp, then diffuse without disturbing sections. Lift individual ringlets gently once the hair has dried. Avoid thinning curls indiscriminately if you want this rounded volume. Schedule trims around the shape of your natural curl pattern as it grows.
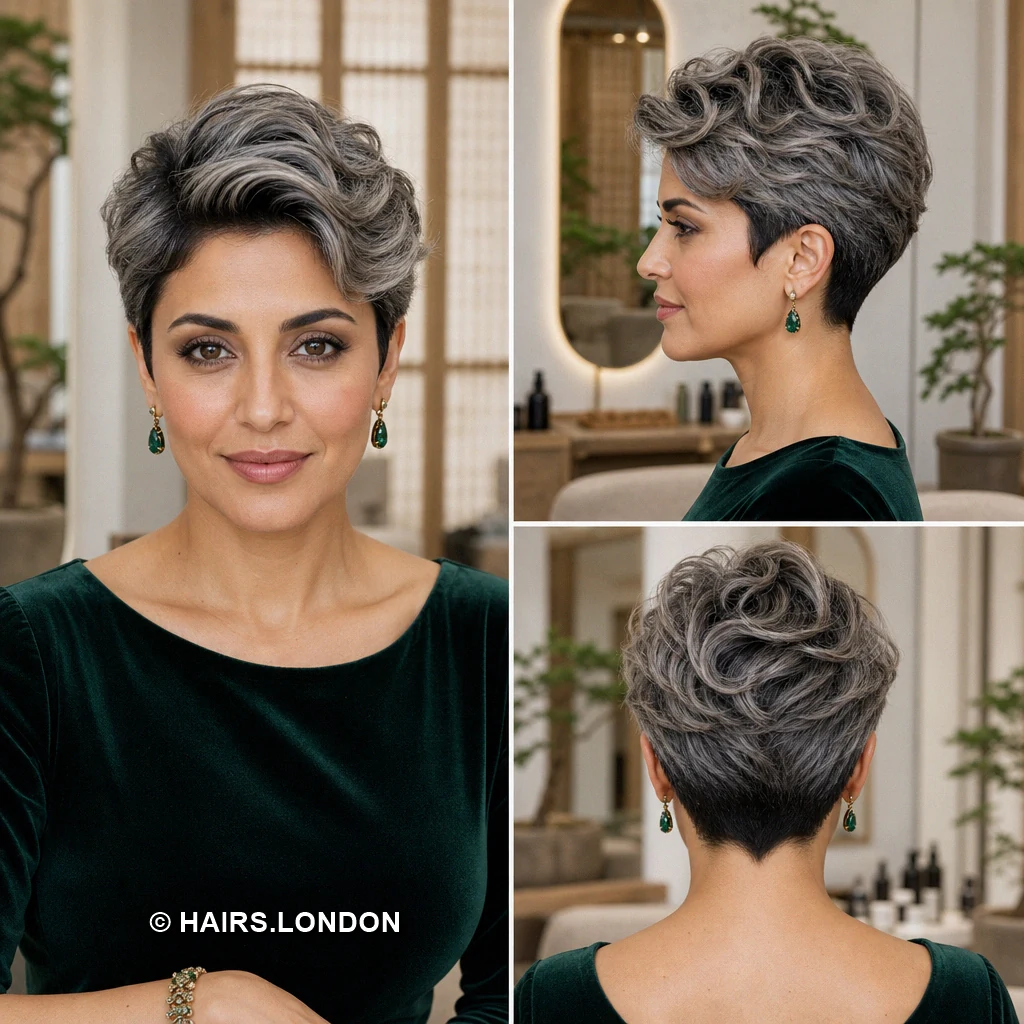
12. Brushed Back Silver Pixie with Tapered Sides
Long top layers brush backward into a gently raised front. Pale silver blends with deeper ash strands across the crown. The forehead stays open, without a fringe falling forward. Closely shaped sides emphasize the lift above each ear. Back layers taper smoothly toward a narrow neckline. Ask for enough top length to brush back without spikes. Direct warm airflow backward at home while lifting roots with your fingers. Smooth the surface lightly, leaving the ends free to move. Discuss how much darker depth you want beneath the silver. Refresh the taper regularly before the side profile loses its neat definition.
13. Polished Charcoal Pixie with Silver Top Layers
Silver top layers sweep back over this deep charcoal pixie. The raised front curves neatly away from the forehead. Shorter sides fit closely above the ears and temples. A rounded crown leads into a softly tapered, dark nape. The contrast makes each curved section easy to see. Request soft layering that maintains height without a hard part. Blow dry backward, guiding the front with a narrow brush. Finish with pliable cream rather than a rigid hold product. Ask your colorist to show exactly where the lighter ribbons will sit. Maintain the side taper to preserve this balanced, lifted overall outline.
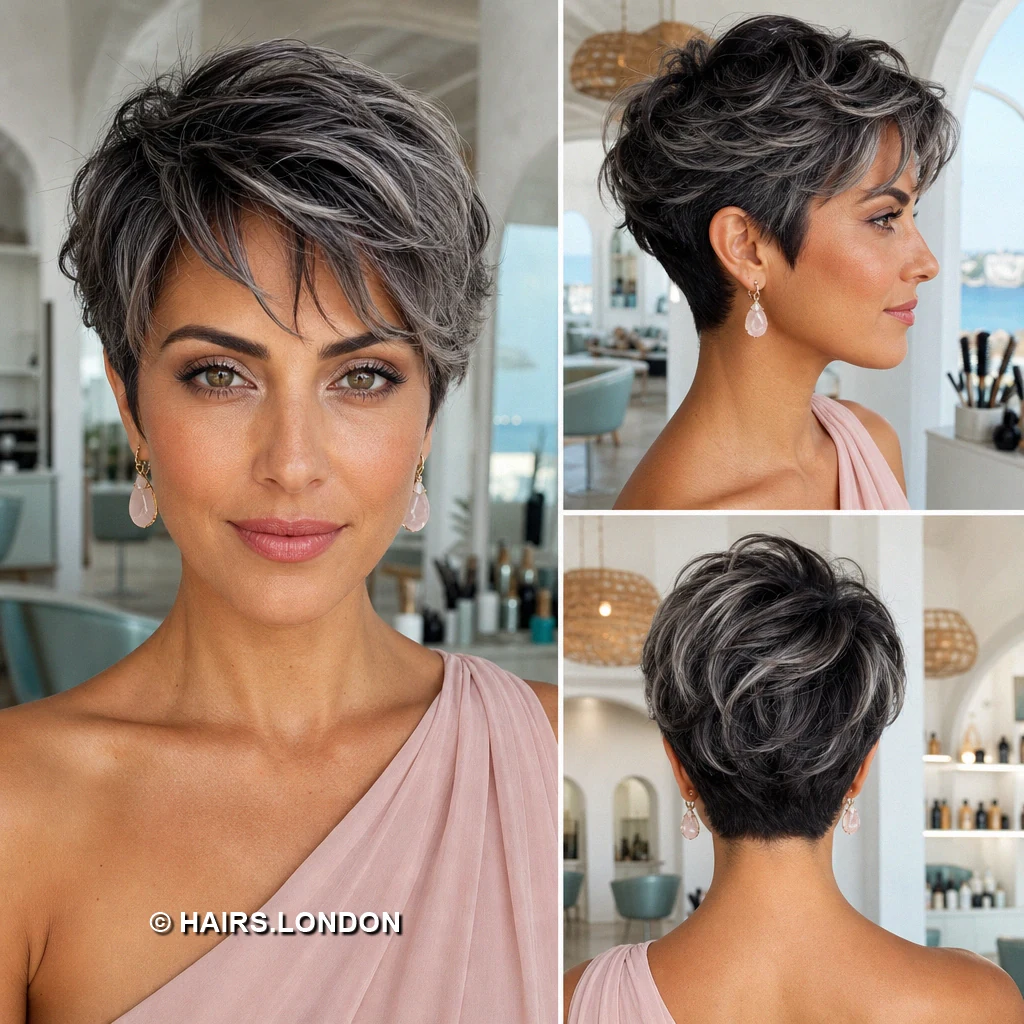
14. Tousled Pepper Pixie with Angled Fringe
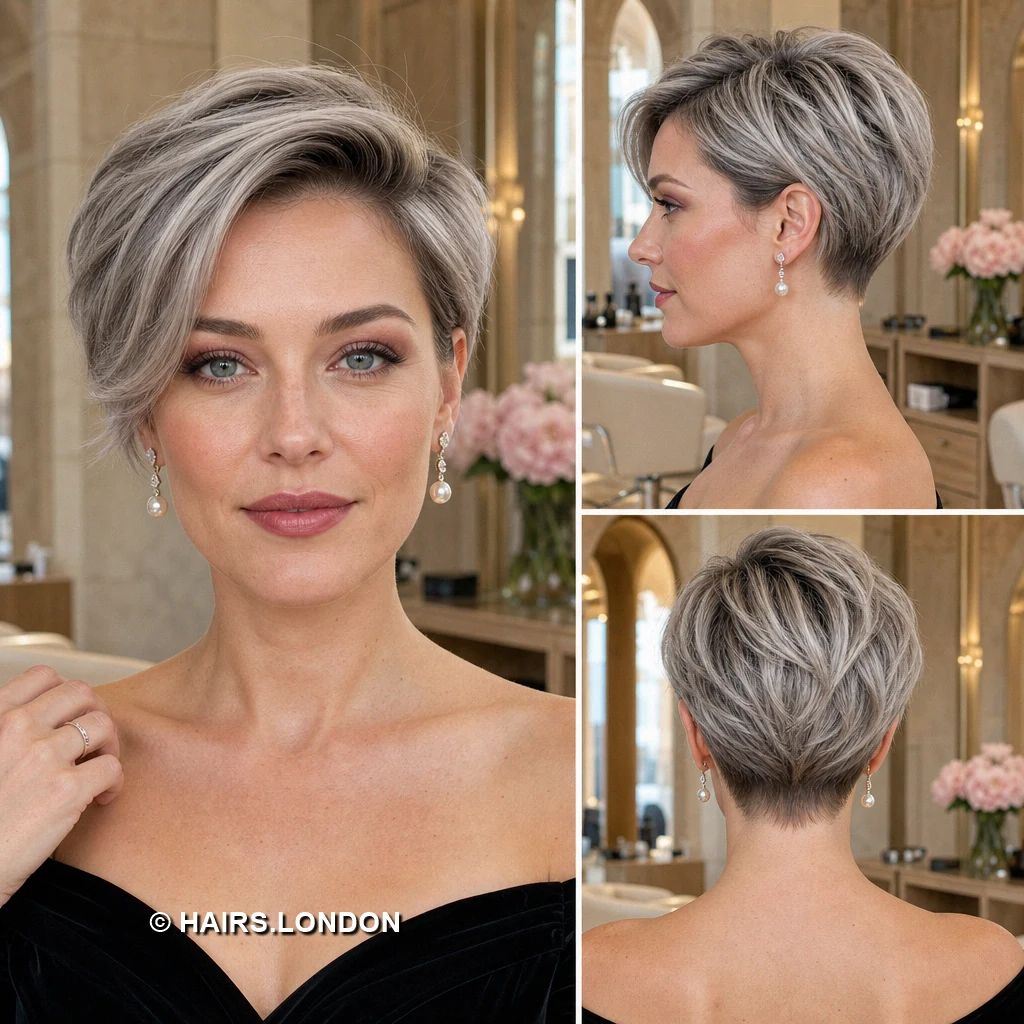
An angled fringe cuts across the forehead in separated pieces. Thin silver ribbons run through the darker, tousled crown. The top has gentle height instead of a smooth finish. Short sides tuck close around the ears and temples. Back layers gradually narrow into a neat tapered point. Ask for textured ends while keeping sufficient weight underneath. Finger dry in different directions to encourage casual separation. Touch the fringe with minimal paste to define its angle. Discuss whether the silver should brighten the fringe or crown. Trim overgrown sides between visits before they soften the intended compact profile and fringe outline.
15. Icy Silver Crop with a Light Straight Fringe
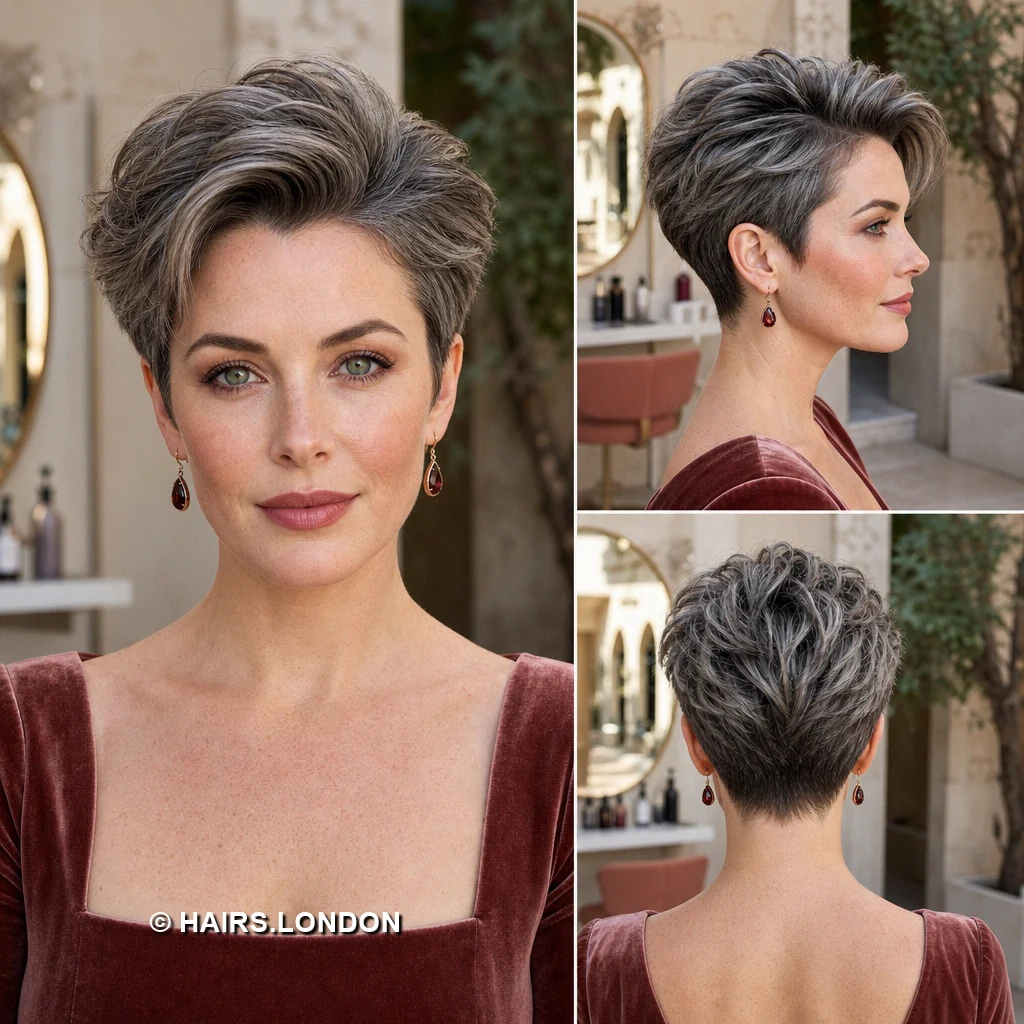
An icy silver surface gives this short crop brightness. Fine fringe pieces fall lightly across the upper forehead. The crown stays rounded, with visible separation between layers. Close sides expose the ears without a harsh outline. At the back, darker tones gather toward a narrow nape. Request soft cutting through the fringe rather than blunt edges. Blow dry forward, lifting the crown before settling the front. Use a tiny amount of cream to calm stray ends. Ask how often the pale shade may need toning. Maintain fringe length alongside neckline trims for a balanced shape that stays easy to style.
16. Spiked Ash Pixie with Dark Tapered Sides
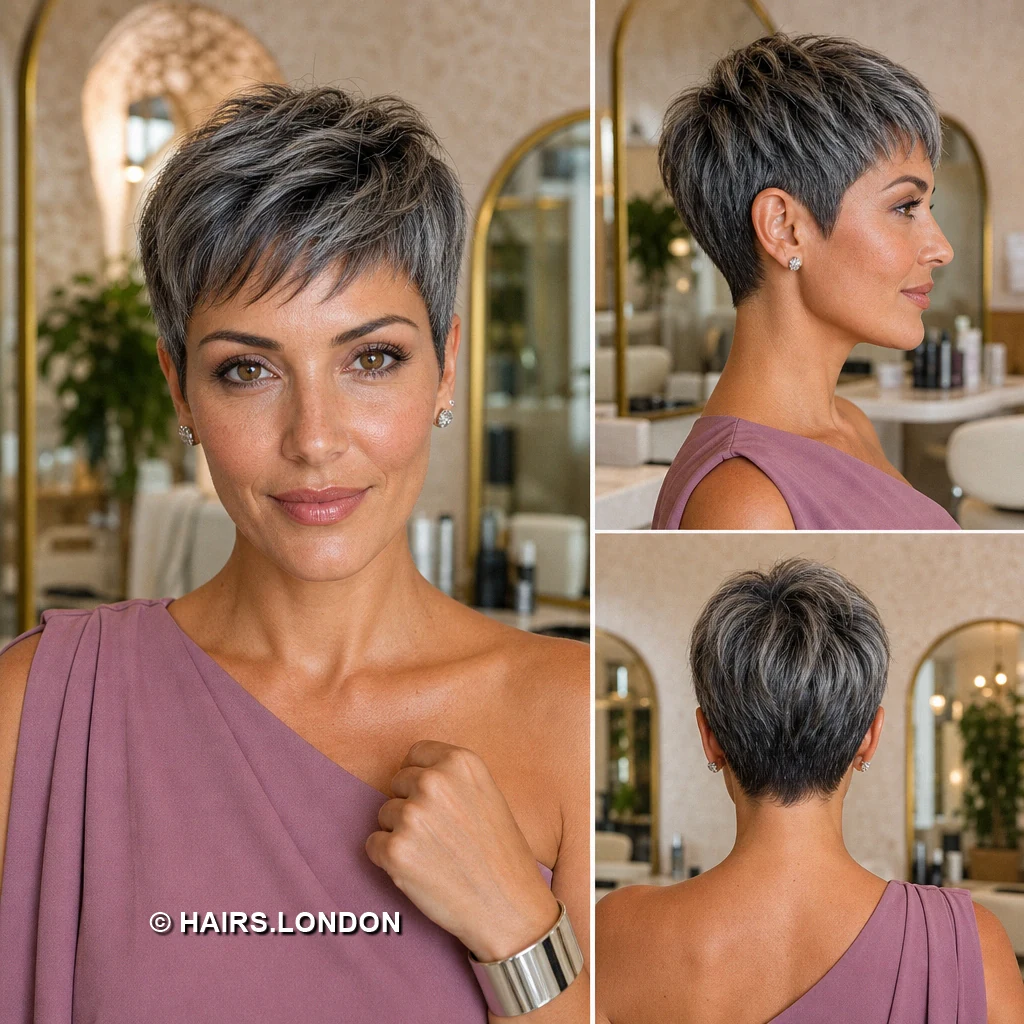
Short, lifted points give this ash pixie energetic texture. Silver tips catch light above the darker sides and roots. The front rises slightly, leaving the forehead largely open. A compact crown keeps the spiky top from spreading widely. The back narrows smoothly into a close, dark nape. Request enough top length for separation without floppy ends. Blow dry upward with fingers, focusing on the front roots. Pinch selected tips using a small amount of matte paste. Discuss how pale the tips should look between color visits. Trim the sides before their growth changes the sharp silhouette and closely tapered nape.
17. Rounded Ash Pixie with a Long Silver Fringe
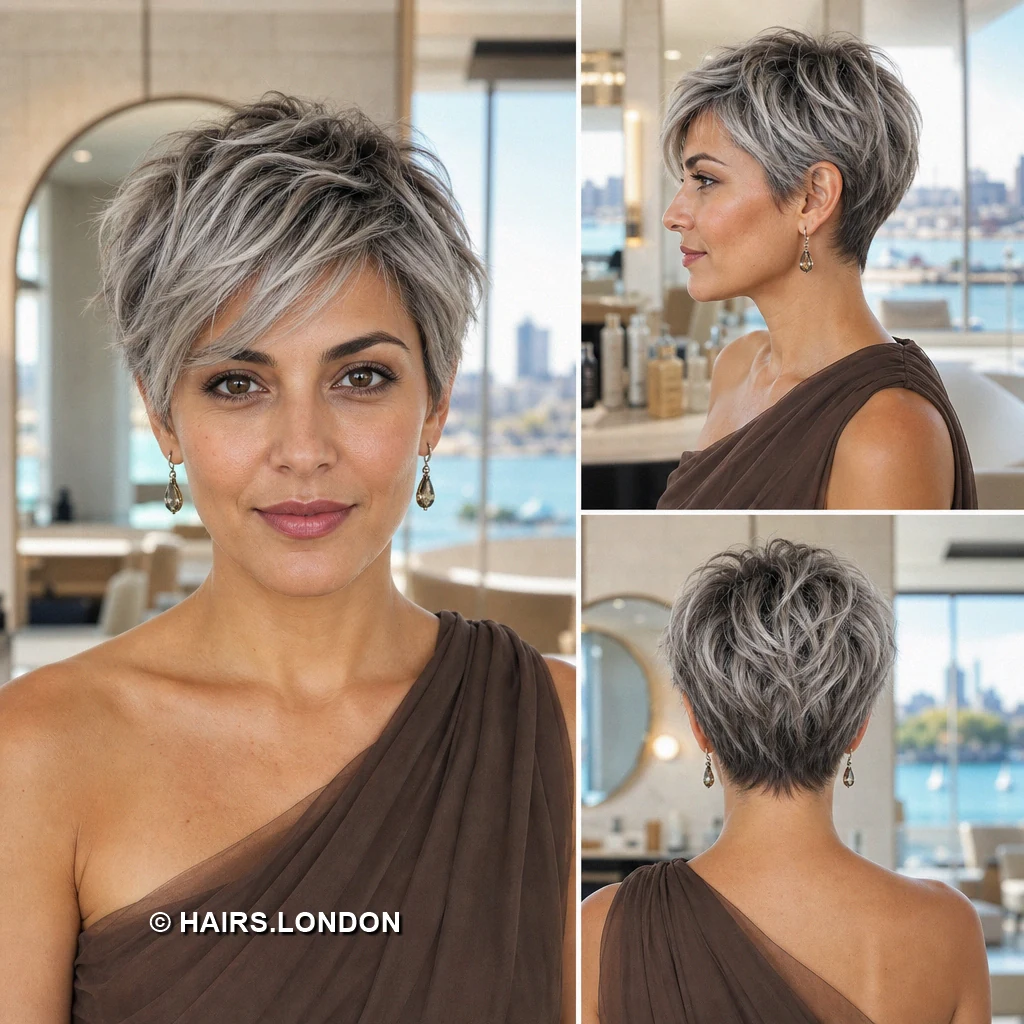
This rounded pixie combines crown fullness with close sides. A longer silver threaded fringe sweeps diagonally across the forehead. Darker ash roots give the pale strands visible depth. The back looks textured above its short, tapered nape. Hair around the ears remains slim and cleanly shaped. Ask for internal layering that preserves this generous rounded outline. Lift the roots while drying, then direct the fringe sideways. Use light paste only where individual sections need separation. Discuss keeping highlights visible from both front and side. Refresh the neckline without shortening the fringe at every appointment or flattening the naturally rounded crown.
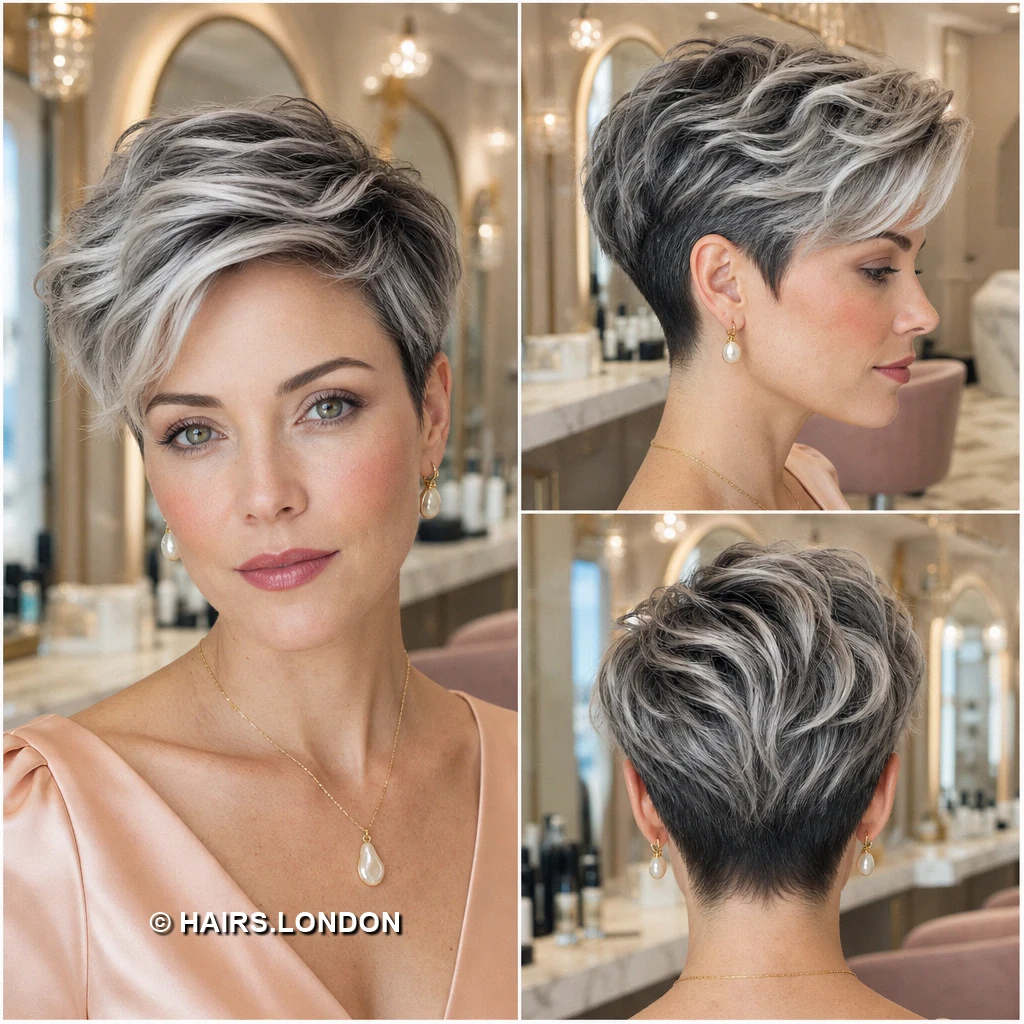
18. Silver Wave Pixie with a Swept Up Front
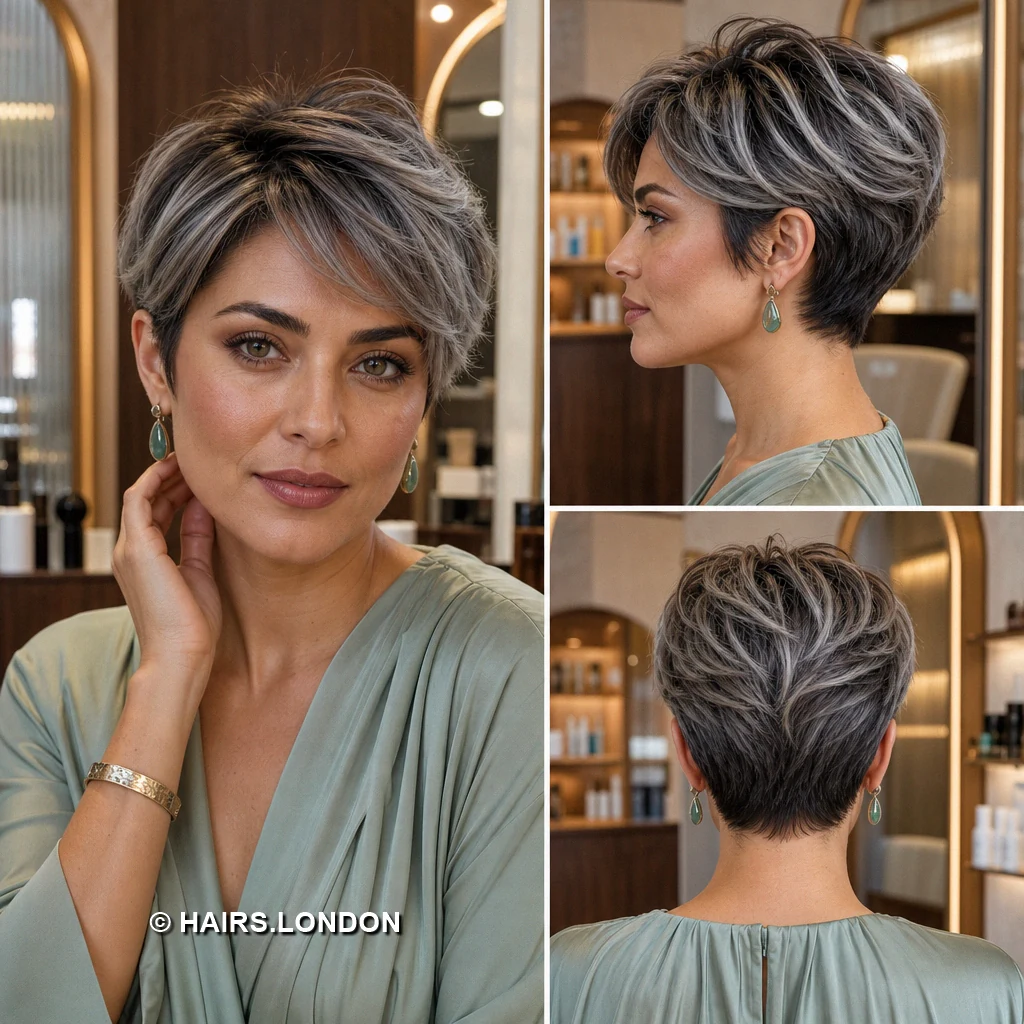
Broad silver waves roll back from the open forehead. Darker roots create contrast beneath the bright, curved top. The crown stays full, while shorter sides reveal the ears. Back waves tighten into a closely tapered lower section. The front needs length to form its noticeable rounded bend. Ask for layers shaped around your natural wave direction. Work mousse through damp hair, then diffuse or gently dry. Shape the front curve with fingers while warmth remains. Avoid heavy wax that could separate the waves unevenly. Keep the taper tidy without cutting into the upper waves that give this pixie its shape.
19. Pale Silver Pixie with Feathered Side Movement
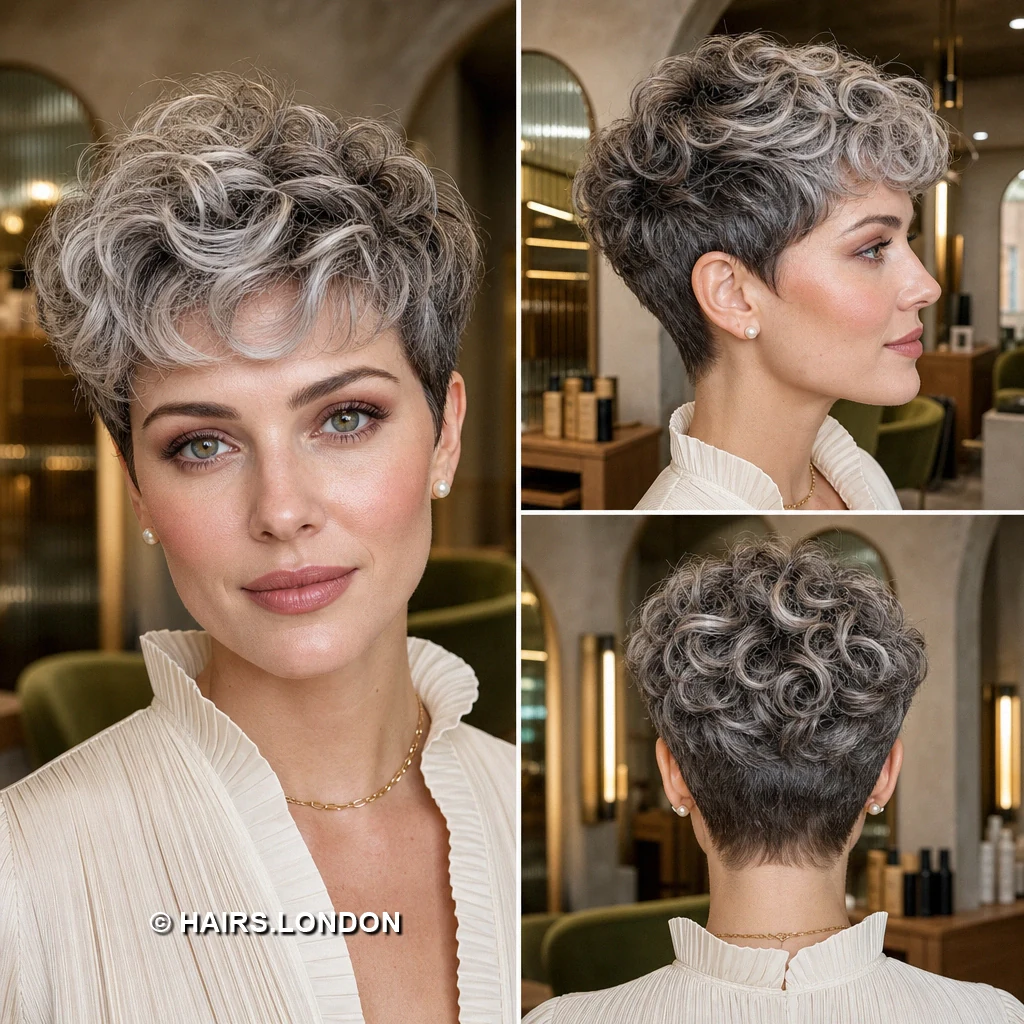
Pale silver layers sweep sideways across this softly textured pixie. The front lifts before falling into a loose, feathered fringe. Fine darker strands add depth near the roots and sides. Crown movement continues around the back instead of ending abruptly. A narrow taper keeps the nape light and tidy. Ask for airy ends while preserving enough top for styling. Blow dry upward at roots, then guide lengths across. Separate a few front pieces with lightweight finishing cream. Discuss whether you prefer this pale result against darker roots. Book trims before the sides lose their close outline as they grow longer.
How to Choose Your Pixie Shape
Start with the profile you want to see every day. A close taper and short fringe make a compact shape, while a longer side sweep leaves more hair to move around the face. If your hair forms waves or curls, look at the rounded examples and account for how much your texture springs up when dry. Compare the back views as carefully as the fronts: crown fullness and nape length can change the entire outline.
Styling Straight, Wavy, and Curly Textures
For straighter hair, apply a small amount of mousse to damp roots and dry against the direction of the sweep for lift. Guide the hair into place with your fingers or a small brush, then define only a few ends with paste. For waves, use gentle airflow and shape bends without brushing them flat. For curls, apply curl cream while damp and diffuse with minimal handling. Start with less product than you think you need; short layers show buildup quickly.
Keeping Silver Highlights Fresh
Ask your colorist whether the look relies on natural silver, added highlights, toning, or a combination. Pale pieces can show warmth over time, so follow their advice on when to use a toning product rather than applying it automatically at every wash. Use color appropriate shampoo, condition the lightened sections, and protect hair from excessive heat. A darker root or underlayer can be part of the intended contrast, but agree on how much regrowth you are comfortable seeing.
Maintaining the Pixie Shape
Short sides and napes change visibly as they grow. If a crisp taper matters most, arrange a neckline and side tidy up before the top needs a substantial cut. Longer fringes and curly crowns may need a different schedule so their movement is not repeatedly cut away. Note which area becomes difficult to style first and use that observation to plan trims. Bring front, side, and back photos to appointments so the shape stays consistent.
What to Discuss with Your Stylist
Show the image that best matches your preferred fringe, then point out the crown height, ear coverage, and nape finish you want. Explain your natural texture, usual part, daily styling time, and whether you will use a dryer. Ask how the proposed layers will behave when you let your hair air dry. For color, discuss starting shade, desired silver brightness, highlight placement, likely upkeep, and a realistic plan for preserving hair condition.
Frequently Asked Questions
What makes a silver highlighted pixie different from an allover silver pixie?
Highlights leave some of the deeper base visible, creating contrast and helping the layers stand out. An allover silver result is more uniform.
Which of these cuts offers the longest fringe?
The extended side sweep in image 6 and the longer sweeping fronts in images 5 and 17 leave noticeably more length around the face.
Can fine hair wear a lifted pixie?
Yes, provided the cut retains enough weight through the top. A little mousse at the roots and careful blow drying can help create lift without heavy product.
Which shape works well for natural curls?
Image 11 shows curls kept full on top with shorter sides and nape. Ask for the shape to be assessed when your curls are dry or at their usual shrinkage.
How can I keep a short fringe from looking blunt?
Ask for softly textured ends like those visible in images 8 and 15. Dry the fringe with your fingers and avoid loading it with paste.
Do I need to blow dry a sweeping pixie?
Not necessarily, but blow drying gives more control over root lift and the direction of a long fringe. Your natural growth pattern will affect how it falls when air dried.
How often should I trim a tapered nape?
Trim it when growth begins to blur the outline you prefer. A close nape may need attention sooner than a longer, softly layered top.
Will silver highlights be visible on dark hair?
Yes. The dark underlayers in several images make pale strands particularly distinct, especially at the fringe and crown.
How do I avoid making a textured pixie look greasy?
Apply a very small amount of lightweight product to dry ends, not the roots. Add more only where a strand needs definition.
Can I keep my natural darker roots?
Yes. Several pictured cuts show darker roots or underlayers beneath silver sections. Discuss the amount of contrast you want as the color grows.
What should I bring to a pixie consultation?
Bring front, side, and back references, plus a photo of how your own hair normally dries. Point out the fringe length, crown fullness, and nape shape that matter most.
Should the sides and top be cut at every visit?
Not always. Your stylist may tidy the sides and neckline while leaving a longer sweep, wave, or curl pattern to grow.
Conclusion
The most useful detail in these silver highlighted pixie cuts is how each top connects to its sides and nape. Choose the fringe and crown shape you like, then check the side and back views before committing. A conversation about your natural texture, styling routine, and preferred color contrast will help turn the reference into a cut you can maintain.
19 Highlighted Pixie Cuts with Swept Fringes and Tapered Napes
A few well-placed highlights can make the layers of a short cut easier to see. These highlighted pixie cuts share closely shaped sides and napes, but their fringes range from short and airy to long and dramatically swept. Use the front, profile and back views to compare how each silhouette works before choosing the details to discuss with your stylist.
1. Sandy Blonde Pixie with a Soft Diagonal Fringe
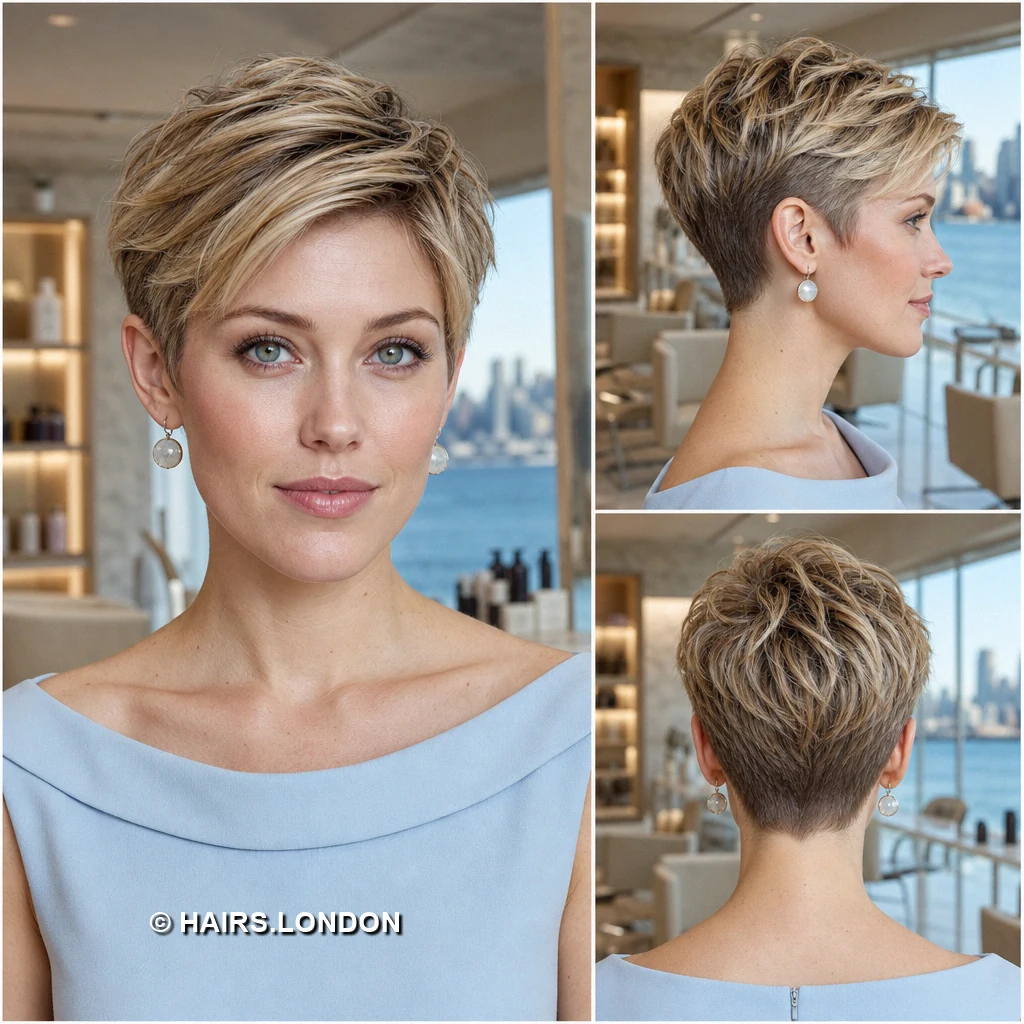
This pixie combines sandy blonde ribbons with deeper roots. Longer crown layers sweep diagonally across the upper forehead. The sides fit closely around ears without appearing shaved. A narrow tapered nape supports the fuller textured top. Feathery ends introduce movement without making the outline ragged. Lift the roots gently while keeping the fringe relaxed. Ask your stylist to preserve fullness above the crown area. Work lightweight paste through dry ends for flexible separation daily. Schedule regular trims to keep the silhouette crisp and balanced. Confirm your preferred coverage around ears. Show your stylist the profile and back views too first.
2. Curly Ash Blonde Pixie with a Sweeping Front
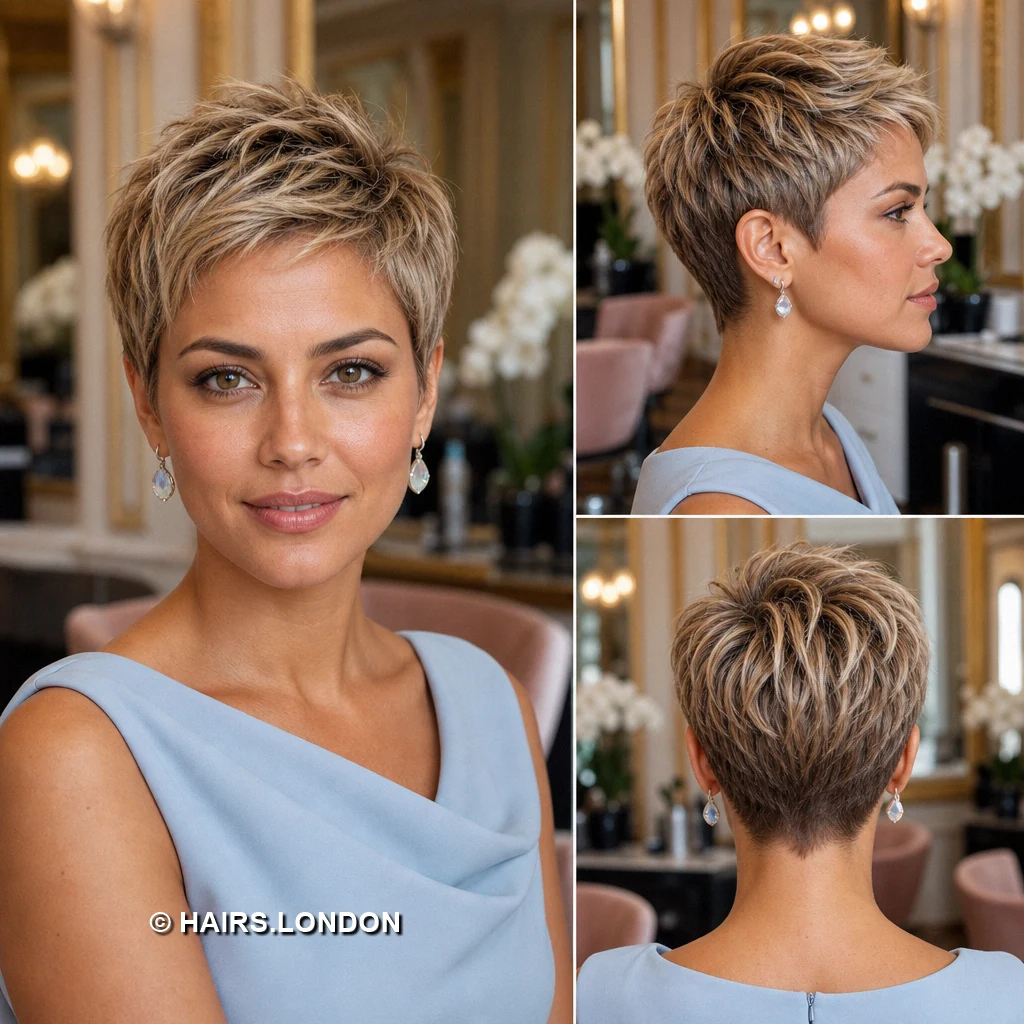
Loose bends give this ash blonde pixie its rounded height. A generous front section curves across one eyebrow softly. Darker hair beneath the highlights adds visible depth throughout. Closely shaped sides balance the lifted, loosely curled crown. The tapered back narrows gradually toward the neckline below. Encourage bends with scrunching instead of brushing them flat. Request fine internal layers instead of removing excessive bulk indiscriminately. Keep lighter strands conditioned to maintain their smooth appearance longer. Schedule regular trims to keep the silhouette crisp and balanced. Let curls set before separating. Show your stylist the profile and back views too first.
3. Champagne Pixie with a Feathered Side Fringe
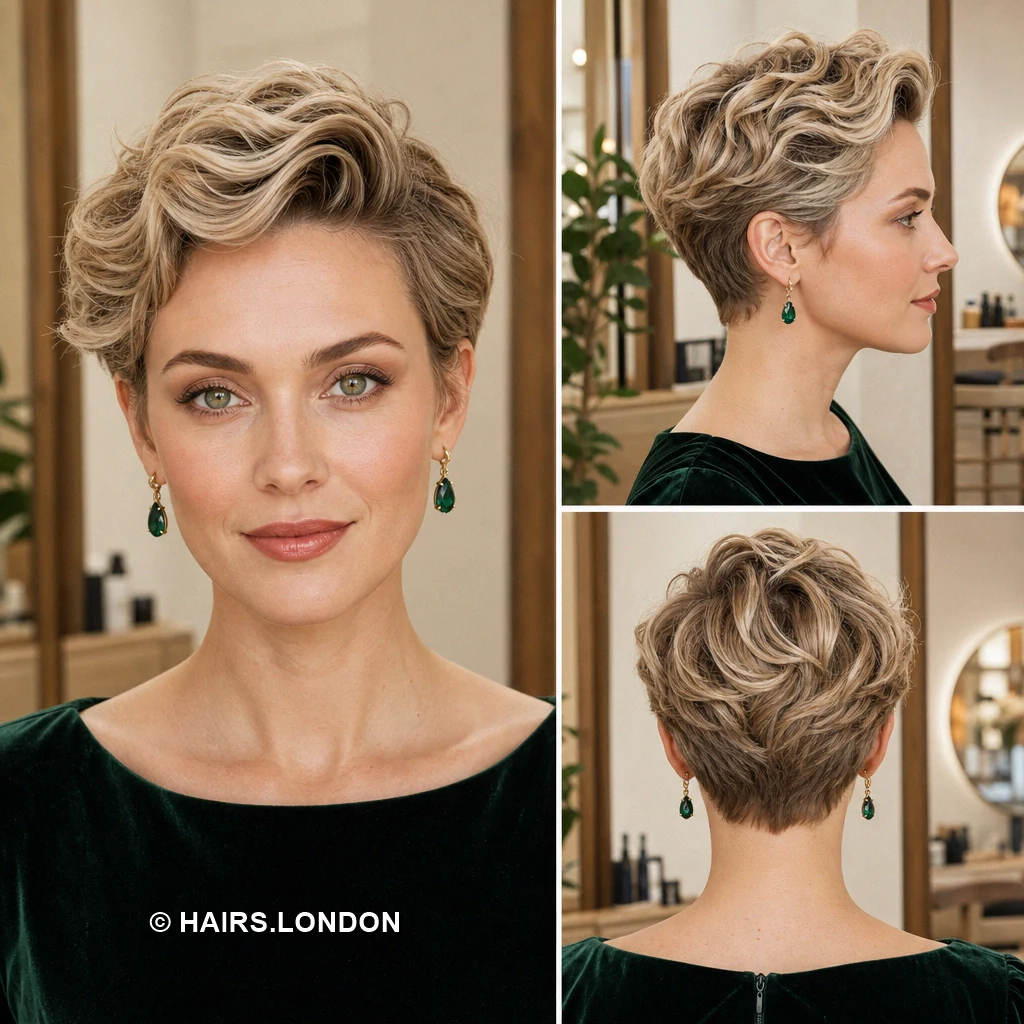
Champagne blonde highlights trace the direction of these airy layers. The side fringe skims across the forehead without covering eyes. Soft crown volume keeps the overall outline gently rounded. Short sides sit close while retaining visible feathery texture. The back tapers into a small, clean neckline point. Direct airflow sideways to reinforce the natural sweep gently. Request fine internal layers instead of removing excessive bulk indiscriminately. Work lightweight paste through dry ends for flexible separation daily. Keep lighter strands conditioned to maintain their smooth appearance longer. Avoid flattening the fringe. Schedule regular trims to keep the silhouette crisp and balanced.
4. Pale Blonde Pixie with a Sculpted Front Wave
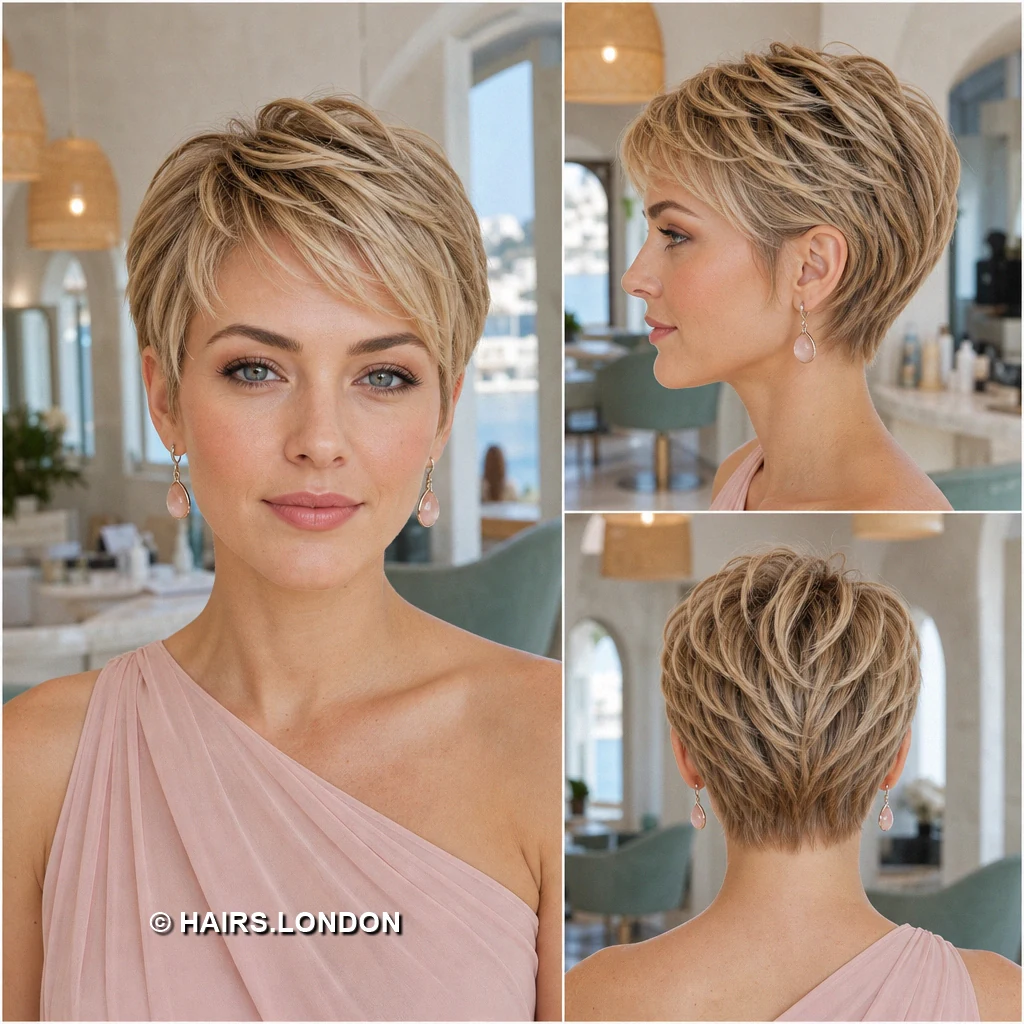
Pale blonde pieces emphasize the broad wave above the forehead. That longer front contrasts with neatly shaped, compact sides. The crown follows the wave before settling into layers. A softly tapered nape keeps the rear silhouette narrow. Light definition separates the wave without making it stiff. Dry the front upward, then guide it sideways gently. Ask your stylist to preserve fullness above the crown area. Keep lighter strands conditioned to maintain their smooth appearance longer. Schedule regular trims to keep the silhouette crisp and balanced. Discuss the wave’s height first. Show your stylist the profile and back views too first.
5. Honey Blonde Pixie with Fine, Piecey Layers
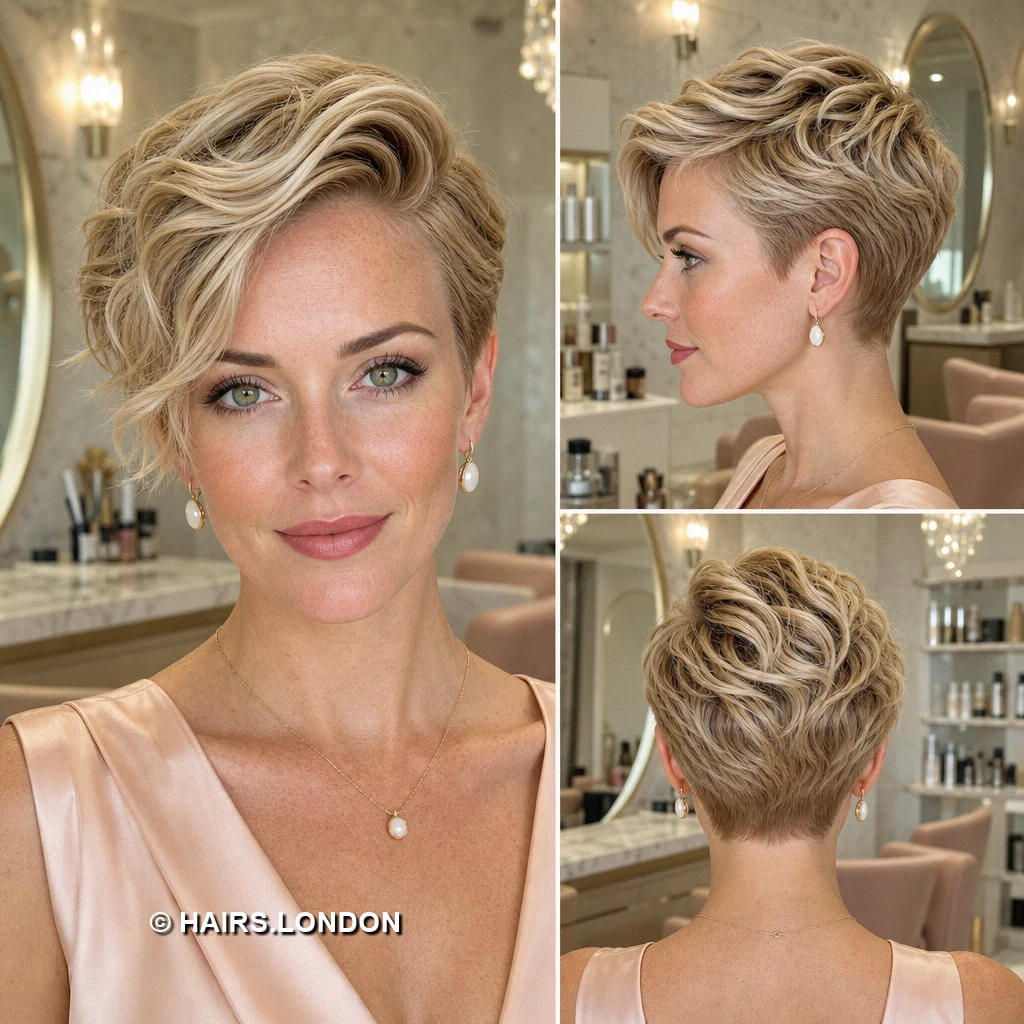
Honey blonde streaks brighten this closely layered, textured pixie. Its diagonal fringe sits lightly over the upper forehead. Short sides follow the head without looking severely cropped. Fine separated pieces give the crown an airy finish. The narrow nape echoes the tidy shape around ears. Rake a little paste through the top using fingertips. Request fine internal layers instead of removing excessive bulk indiscriminately. Work lightweight paste through dry ends for flexible separation daily. Keep product away from the roots. Schedule regular trims to keep the silhouette crisp and balanced. Show your stylist the profile and back views too first.
6. Ash Blonde Pixie with a Deep Side Sweep
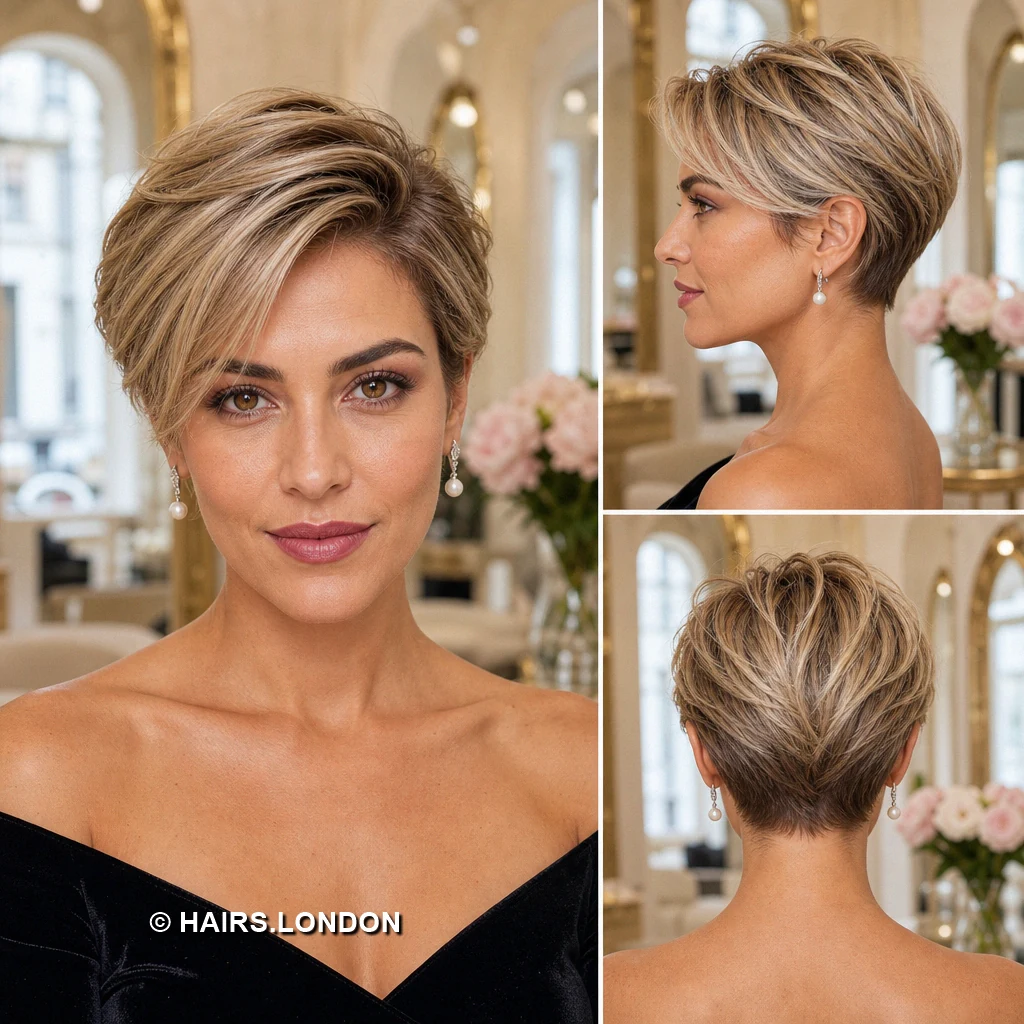
Ash blonde highlights run through a pronounced sideways fringe. The longer front falls diagonally toward one eyebrow softly. Height at the crown contrasts with the closer sides. Layered texture remains visible across the rounded back section. The nape finishes short, narrow, and softly pointed below. Style from the roots for lift without flattening ends. Ask your stylist to preserve fullness above the crown area. Work lightweight paste through dry ends for flexible separation daily. Schedule regular trims to keep the silhouette crisp and balanced. Check how the fringe falls naturally. Show your stylist the profile and back views too first.
7. Beige Blonde Pixie with a Spiky Crown
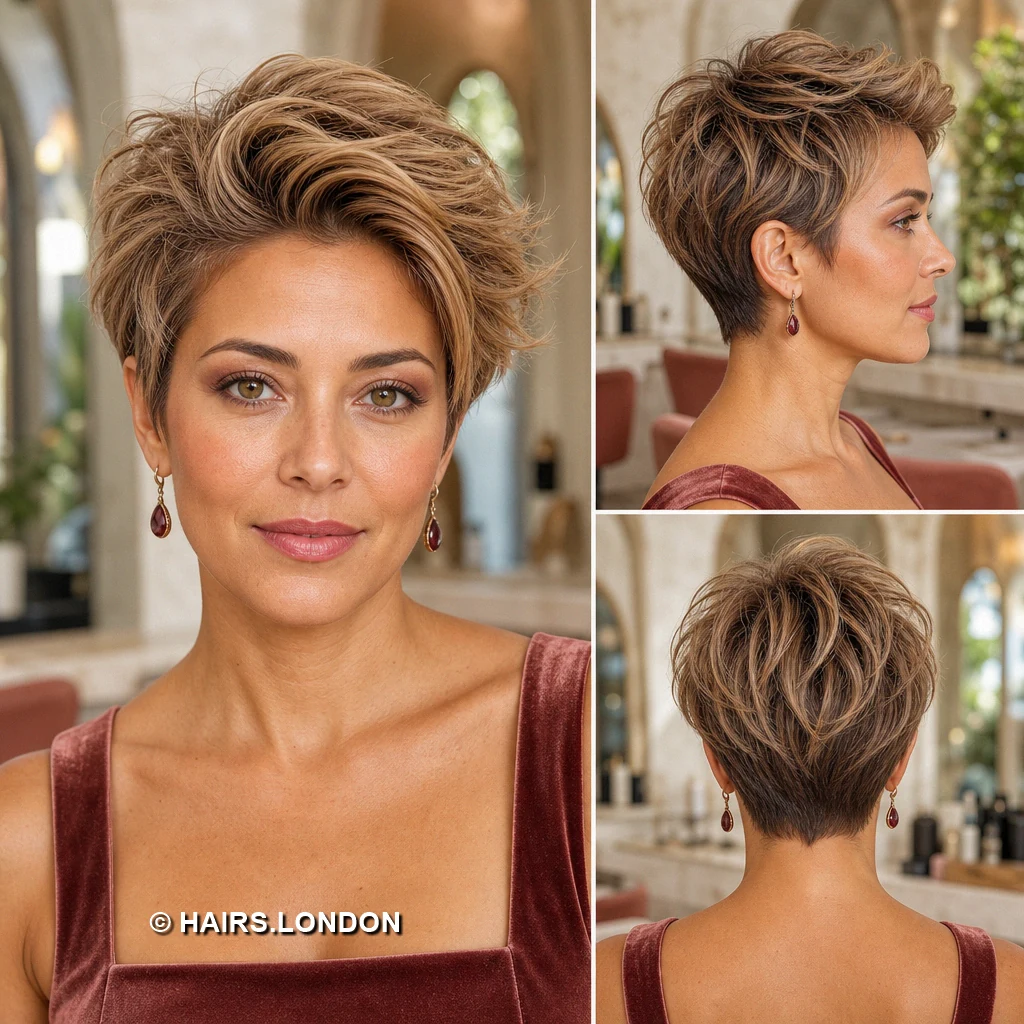
Short upright pieces create noticeable texture across this crown. Beige blonde highlights pick out individual layers against darker hair. The small side fringe sweeps away from the forehead. Close sides keep the intentionally tousled top in proportion. A fine taper cleans up the hairline behind ears. Pinch dry ends sparingly to maintain their separate direction. Request fine internal layers instead of removing excessive bulk indiscriminately. Work lightweight paste through dry ends for flexible separation daily. Keep texture above the temples. Schedule regular trims to keep the silhouette crisp and balanced. Show your stylist the profile and back views too first.
8. Golden Blonde Pixie with a Long Arched Fringe
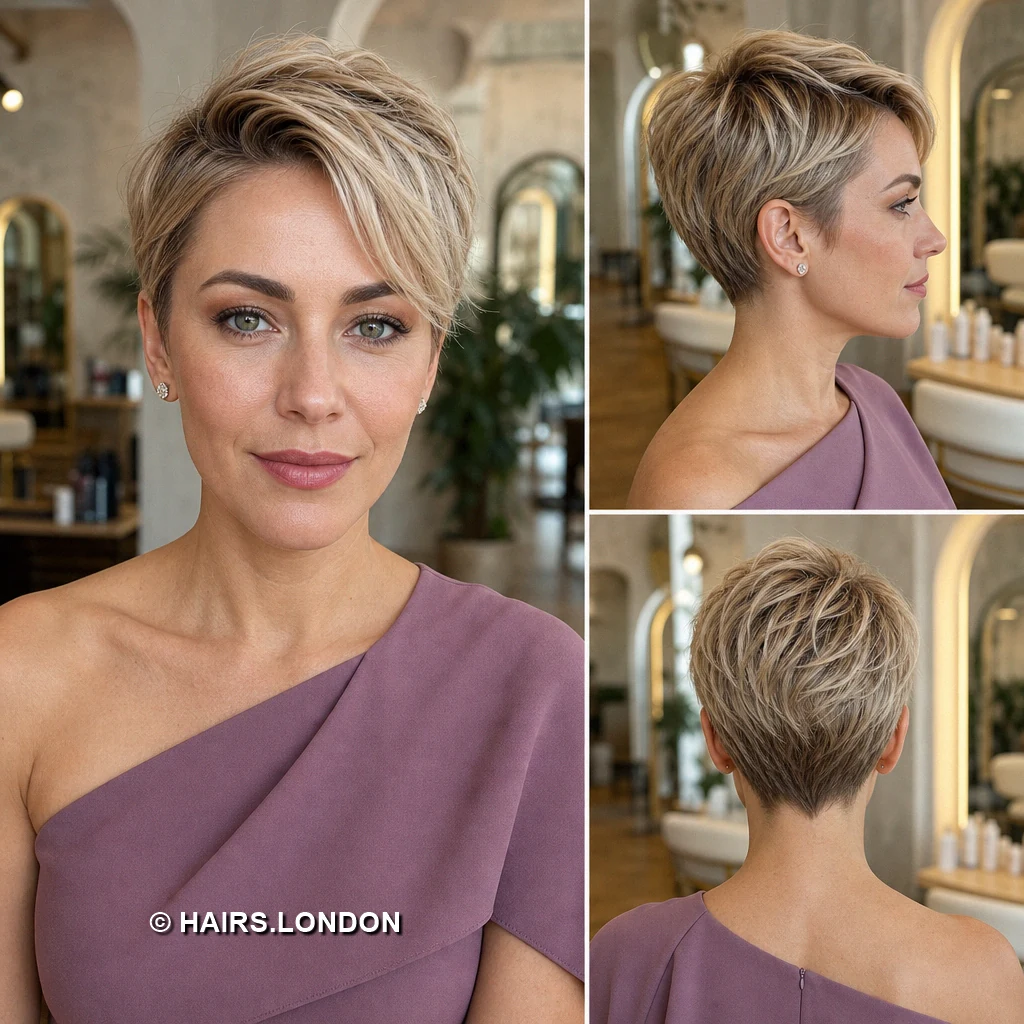
A long golden blonde fringe arches across the forehead. Darker roots lend dimension to its smooth highlighted surface. The rounded crown leads into shorter, closely fitted sides. At the back, layers narrow toward a tidy nape. The front retains movement rather than forming blunt bangs. Sweep damp hair sideways with a brush and dryer. Ask your stylist to preserve fullness above the crown area. Keep lighter strands conditioned to maintain their smooth appearance longer. Schedule regular trims to keep the silhouette crisp and balanced. Check fringe placement near your eyes. Show your stylist the profile and back views too first.
9. Mushroom Blonde Pixie with a Low Side Fringe
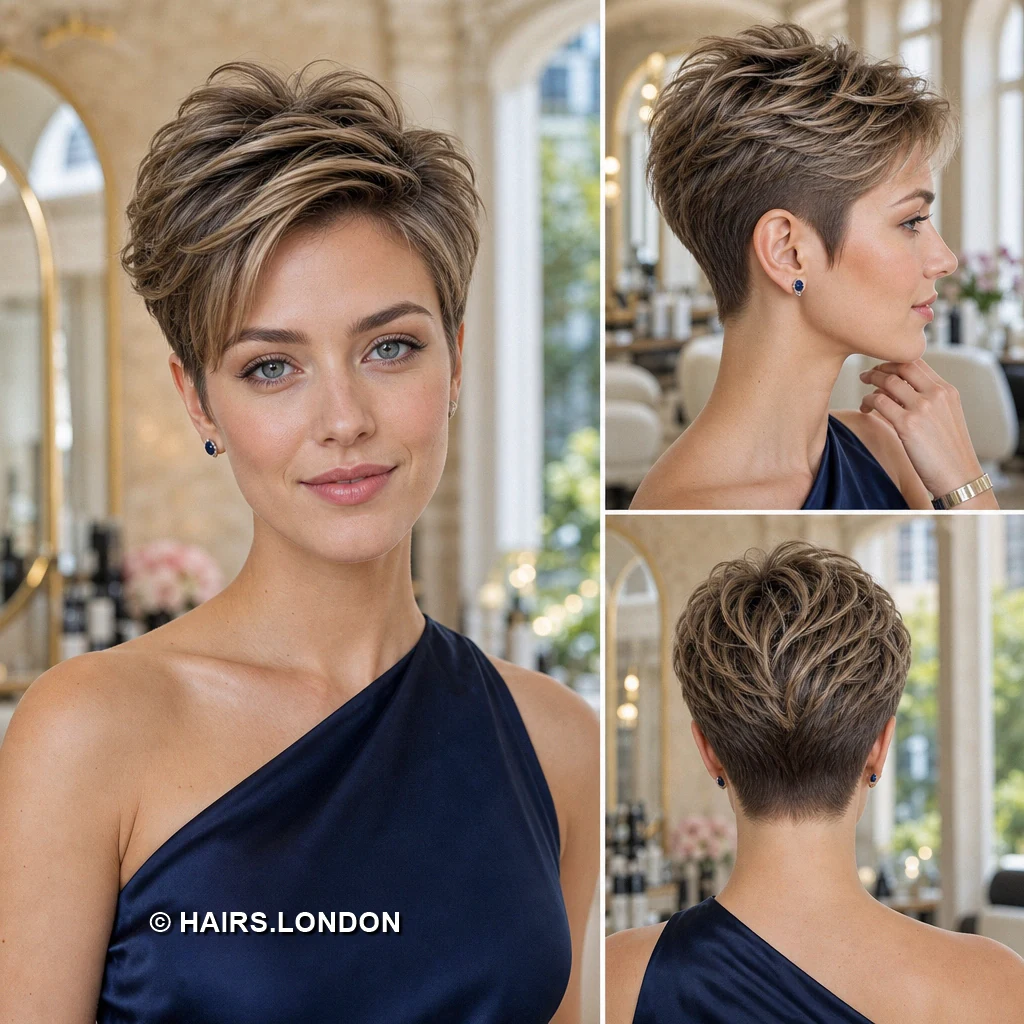
Cool mushroom blonde strands define this softly rounded cut. Its side fringe lies low across the upper forehead. The crown has lift without strongly separated or spiky ends. Sides taper closely around ears into a slender nape. Darker underlying hair makes the lighter layers more visible. Use gentle airflow to keep the finish smooth overall. Request fine internal layers instead of removing excessive bulk indiscriminately. Keep lighter strands conditioned to maintain their smooth appearance longer. Avoid heavy wax at roots. Schedule regular trims to keep the silhouette crisp and balanced. Show your stylist the profile and back views too first.
10. Cream Blonde Pixie with a Rolling Front
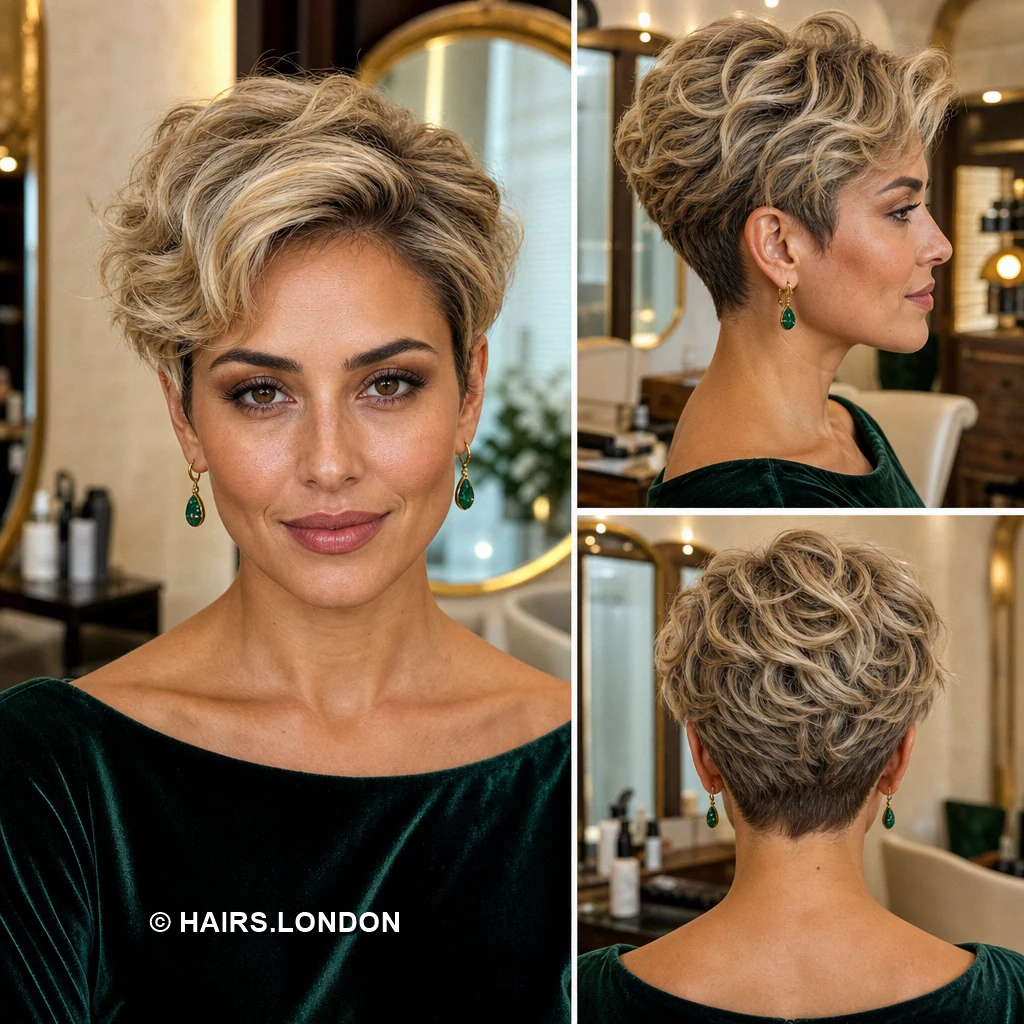
A rolling cream blonde front gives this pixie height. Longer layers travel sideways above one eye before tapering. The sides remain smooth and close beside the ears. Softly overlapping pieces create a rounded shape behind the crown. Its neckline is short but not sharply outlined underneath. Lift damp roots, then brush the front sideways gently. Ask your stylist to preserve fullness above the crown area. Keep lighter strands conditioned to maintain their smooth appearance longer. Schedule regular trims to keep the silhouette crisp and balanced. Keep brush tension light throughout. Show your stylist the profile and back views too first.
11. Bronde Pixie with a Raised Curved Fringe
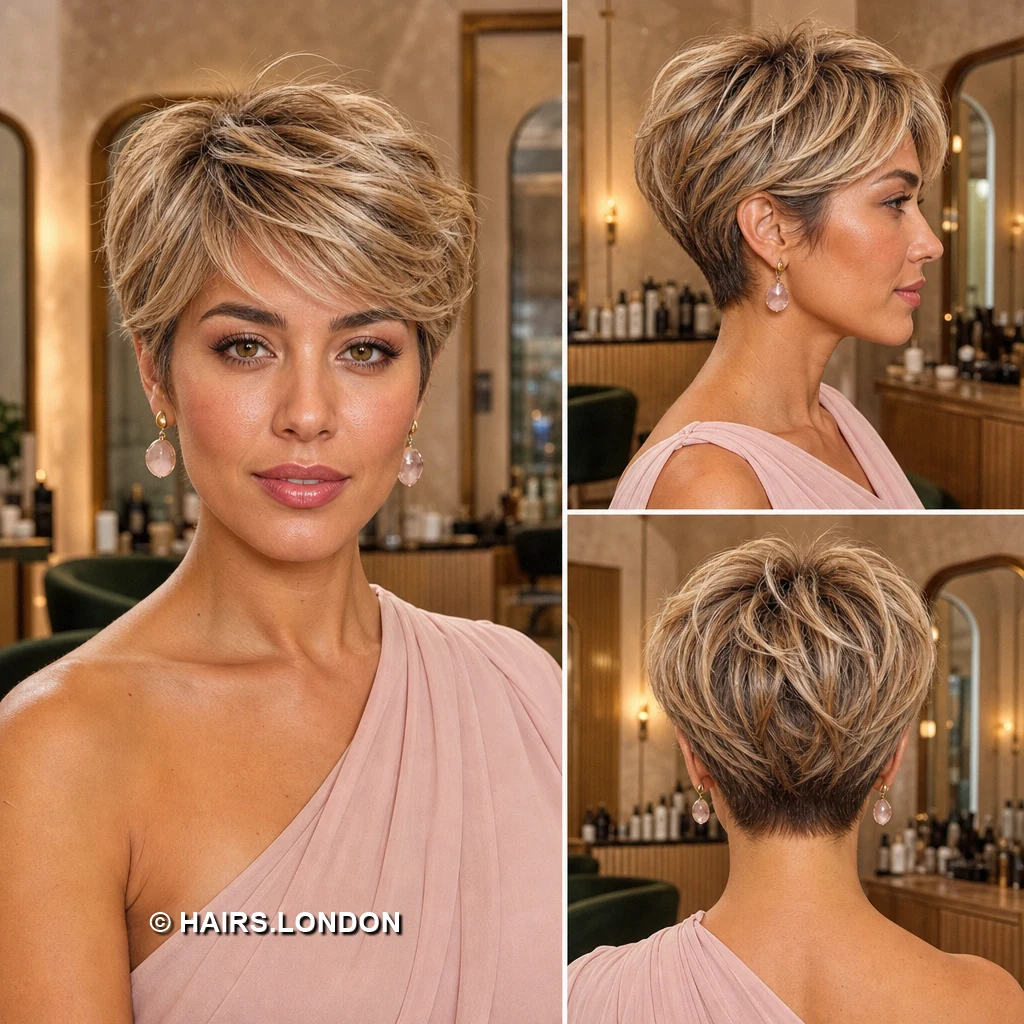
Bronde ribbons follow the raised curve of this fringe. Darker roots show clearly between the lighter top layers. The front opens the forehead while retaining generous length. Neatly clipped sides support a fuller crown and back. At the nape, the cut narrows into soft points. Brush upward first to build the visible front curve. Request fine internal layers instead of removing excessive bulk indiscriminately. Work lightweight paste through dry ends for flexible separation daily. Schedule regular trims to keep the silhouette crisp and balanced. Discuss how much temple coverage remains. Show your stylist the profile and back views too first.
12. Taupe Blonde Pixie with a Short Textured Fringe
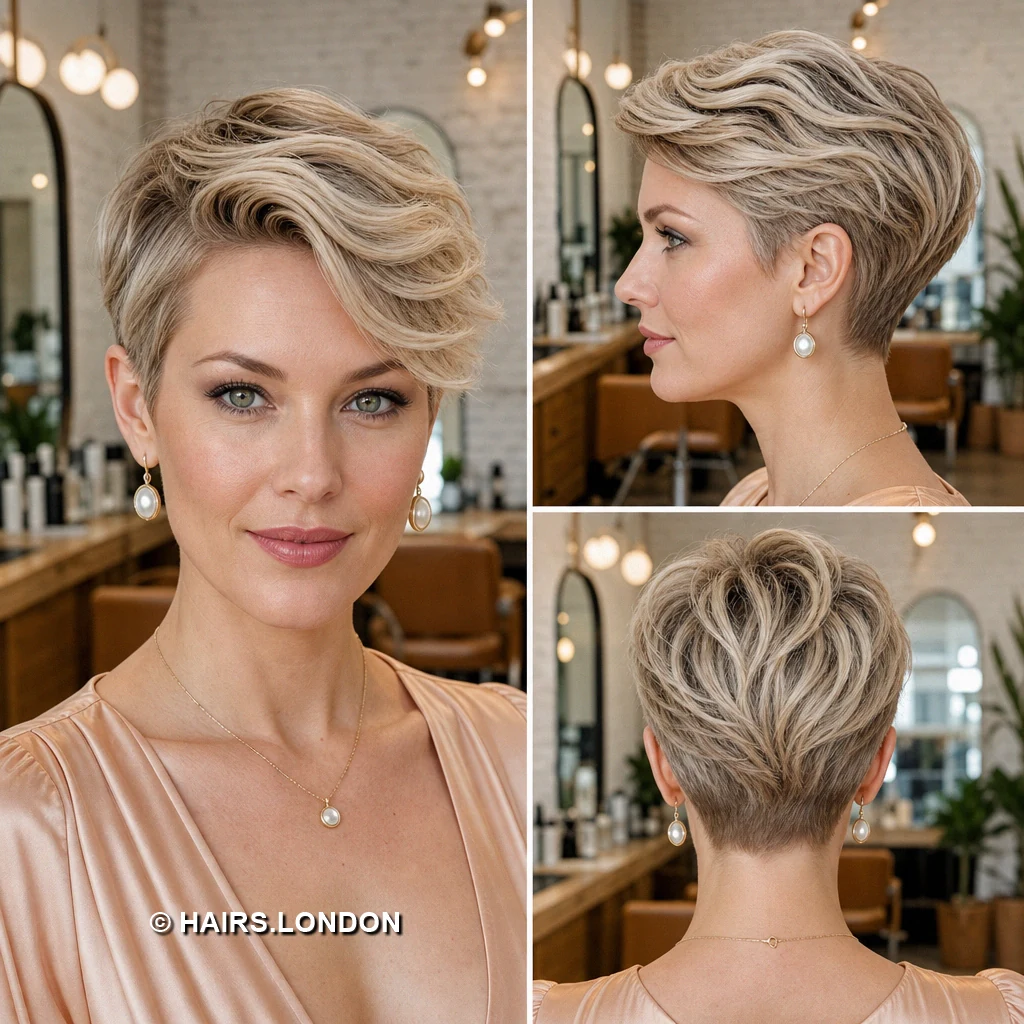
Short wisps cross the forehead in this textured pixie. Taupe blonde highlights brighten the top without hiding depth. The crown rises softly before curving toward the back. Snug sides and a narrow nape keep edges controlled. Separate the front lightly rather than pressing it flat. A small amount of styling cream maintains flexible texture. Request fine internal layers instead of removing excessive bulk indiscriminately. Keep lighter strands conditioned to maintain their smooth appearance longer. Keep the fringe soft between appointments. Schedule regular trims to keep the silhouette crisp and balanced. Show your stylist the profile and back views too first.
13. Vanilla Blonde Pixie with Soft Crown Waves
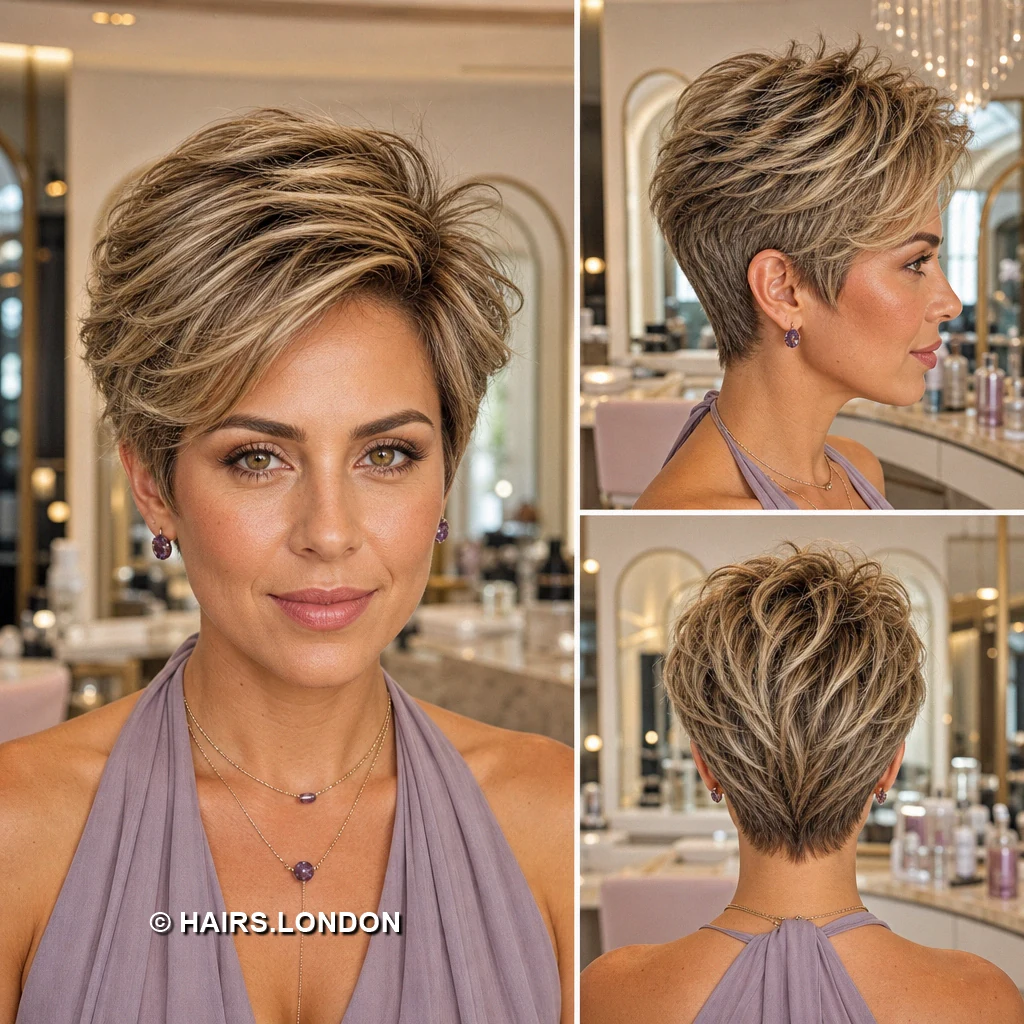
Vanilla blonde highlights outline broad waves across the crown. The lifted fringe curves back, leaving the forehead open. Shorter sides provide contrast without an obvious shaved section. Rounded back layers settle into a slim tapered nape. Visible bends give this pixie a soft, buoyant texture. Shape the waves with fingers while drying from roots. Ask your stylist to preserve fullness above the crown area. Keep lighter strands conditioned to maintain their smooth appearance longer. Avoid flattening waves with heavy wax. Schedule regular trims to keep the silhouette crisp and balanced. Show your stylist the profile and back views too first.
14. Buttery Blonde Pixie with a Light Side Fringe
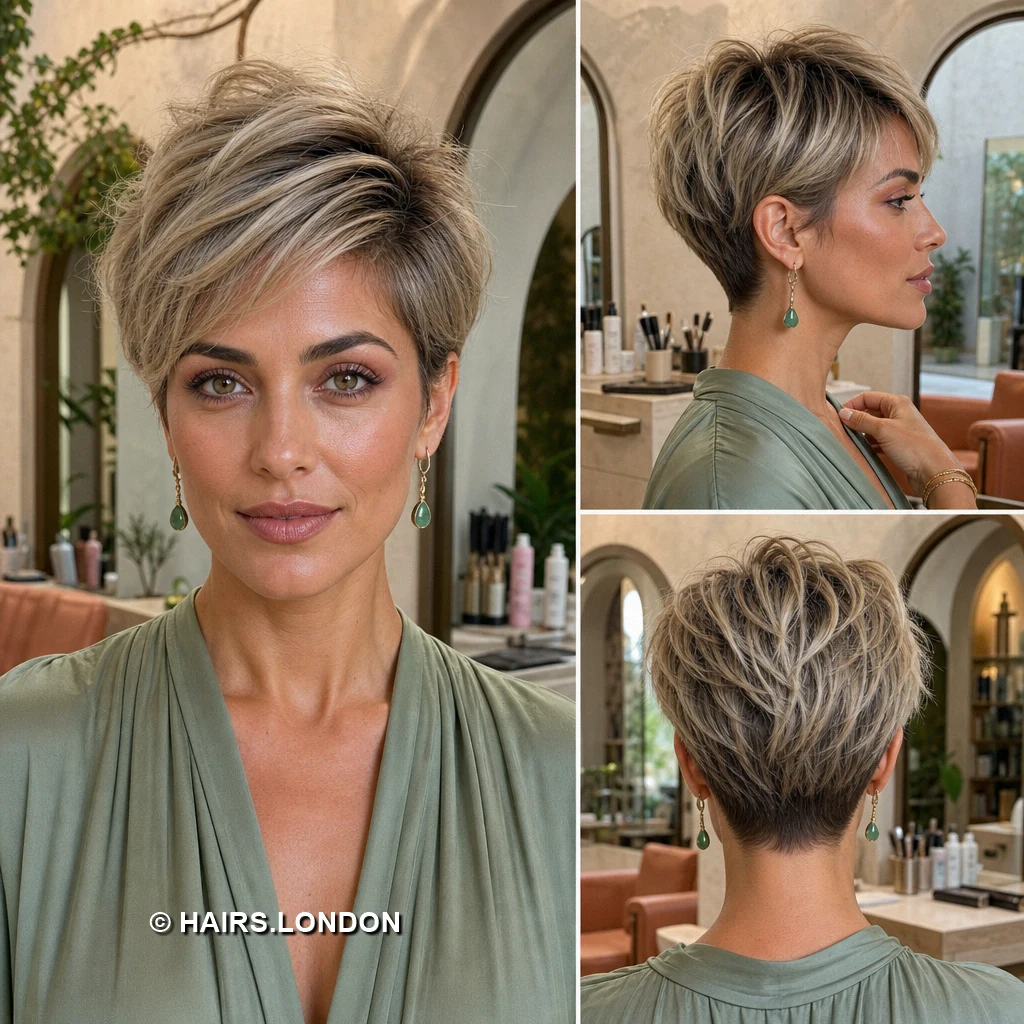
Buttery blonde pieces brighten this compact, softly layered pixie. A light fringe crosses the forehead without reaching eyes. The crown carries subtle lift rather than dramatic height. Sides remain close, with a gentle taper behind ears. At the back, feathery layers meet a neat nape. Direct the fringe sideways using fingers or gentle airflow. Request fine internal layers instead of removing excessive bulk indiscriminately. Work lightweight paste through dry ends for flexible separation daily. Check the fringe dry before shortening. Schedule regular trims to keep the silhouette crisp and balanced. Show your stylist the profile and back views too first.
15. Light Blonde Pixie with an Oversized Side Wave
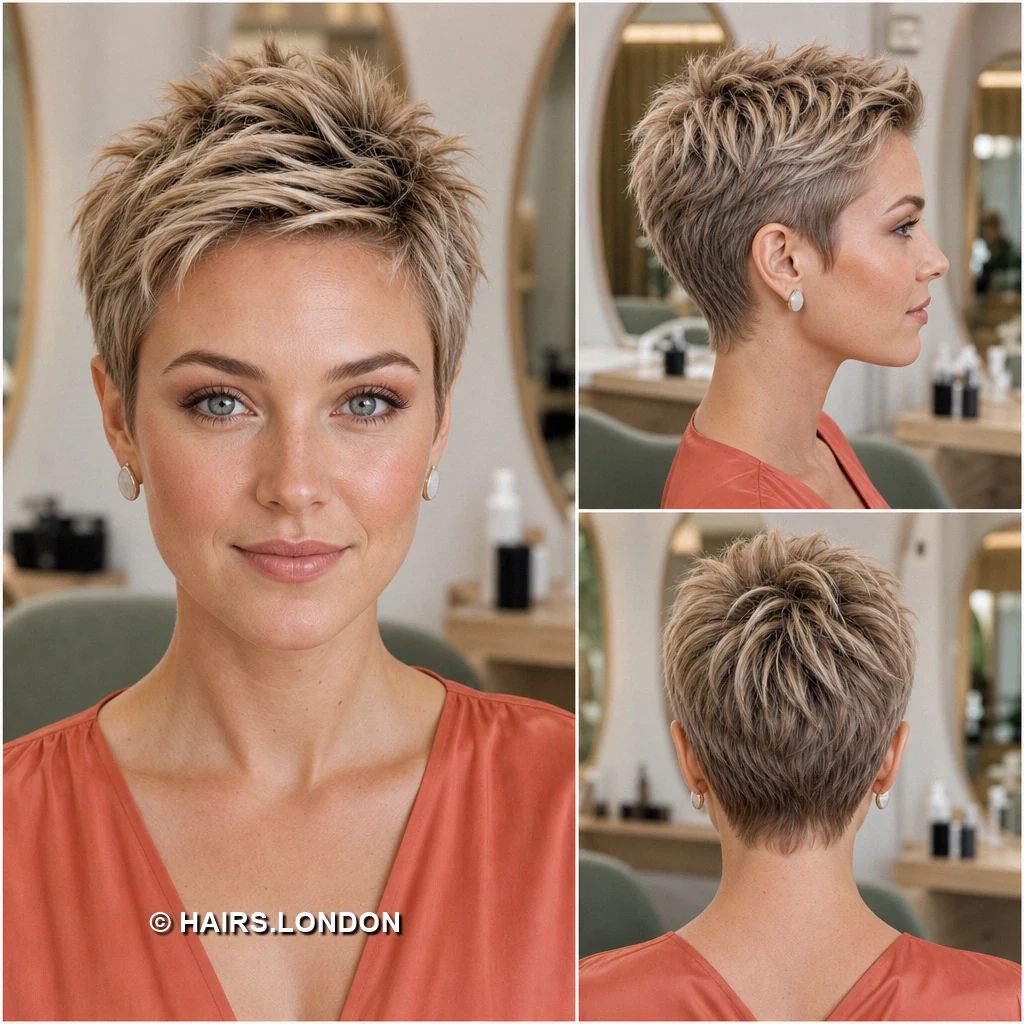
A large side wave gives this light blonde pixie volume. Its longer fringe extends outward before curving across forehead. Deeper roots emphasize the sculpted direction of each section. Close sides leave the dramatic front as the focal point. Loose waves continue through the crown above a tapered nape. Dry the front upward before smoothing individual bends sideways. Ask your stylist to preserve fullness above the crown area. Keep lighter strands conditioned to maintain their smooth appearance longer. Avoid heavy hairspray. Schedule regular trims to keep the silhouette crisp and balanced. Show your stylist the profile and back views too first.
16. Sandy Beige Pixie with a Smooth Extended Fringe
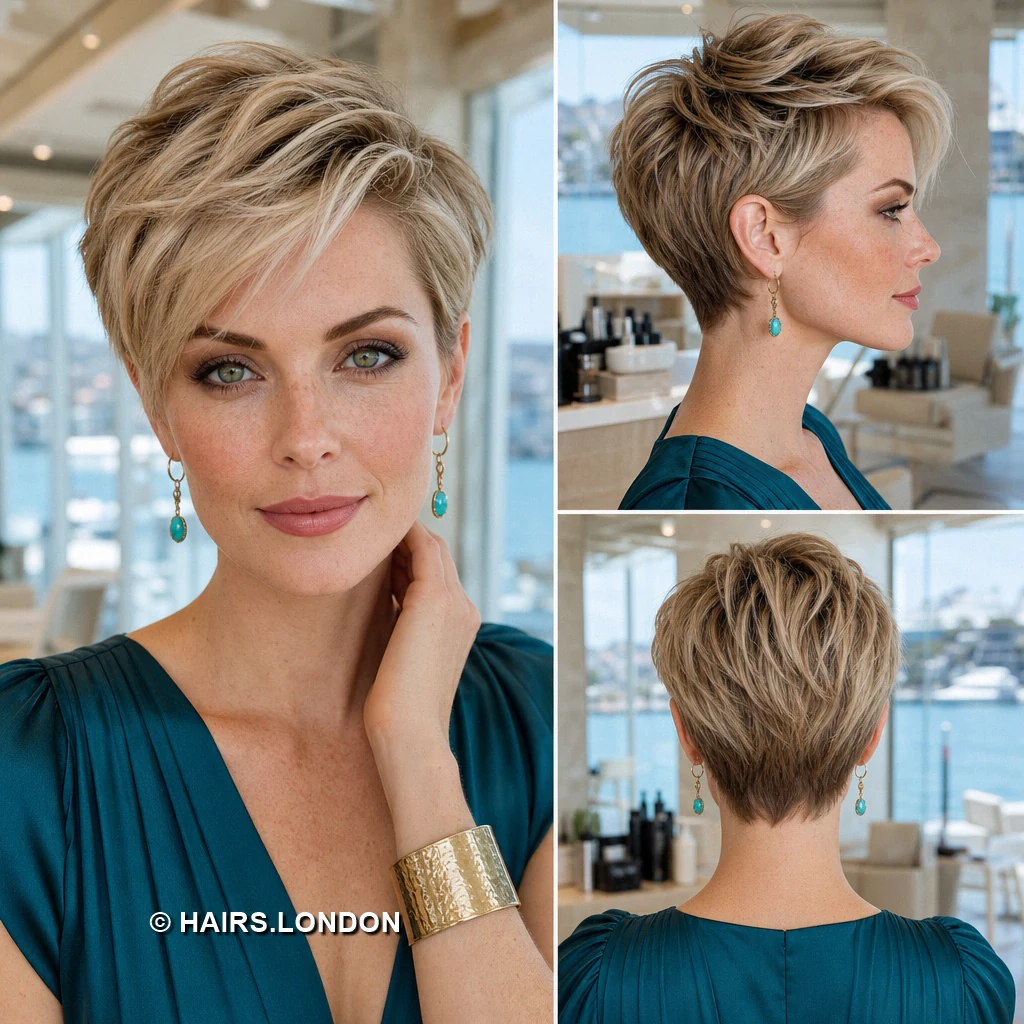
The extended fringe sweeps across this sandy beige pixie. Fine highlights show the direction of its smooth layers. Fuller hair above the ear gradually shortens toward nape. The crown keeps enough length for a gentle curve. One side looks especially close beside the long front. Use a small brush to guide the fringe diagonally. Request fine internal layers instead of removing excessive bulk indiscriminately. Keep lighter strands conditioned to maintain their smooth appearance longer. Schedule regular trims to keep the silhouette crisp and balanced. Confirm the shortest side length beforehand. Show your stylist the profile and back views too first.
17. Warm Bronde Pixie with a Tousled Front
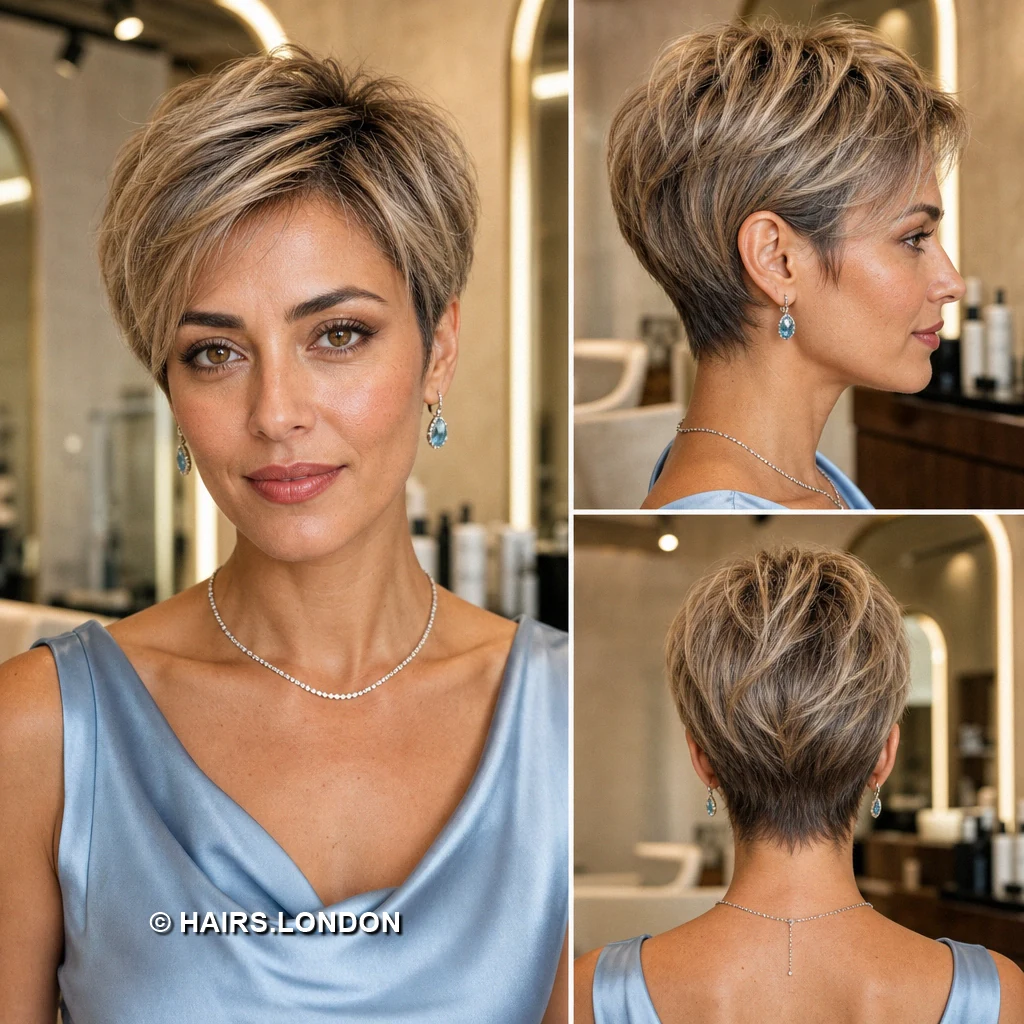
Warm bronde highlights weave through this loosely tousled crown. Its longer front lifts before sweeping toward one side. Shorter temple hair creates contrast without exposing the scalp. The rounded back gradually tapers into a narrow neckline. Individual ends flick outward, adding texture around the fringe. Scrunch a little styling cream through nearly dry hair. Ask your stylist to preserve fullness above the crown area. Work lightweight paste through dry ends for flexible separation daily. Leave enough length for natural movement. Schedule regular trims to keep the silhouette crisp and balanced. Show your stylist the profile and back views too first.
18. Pearl Blonde Pixie with an Asymmetric Fringe
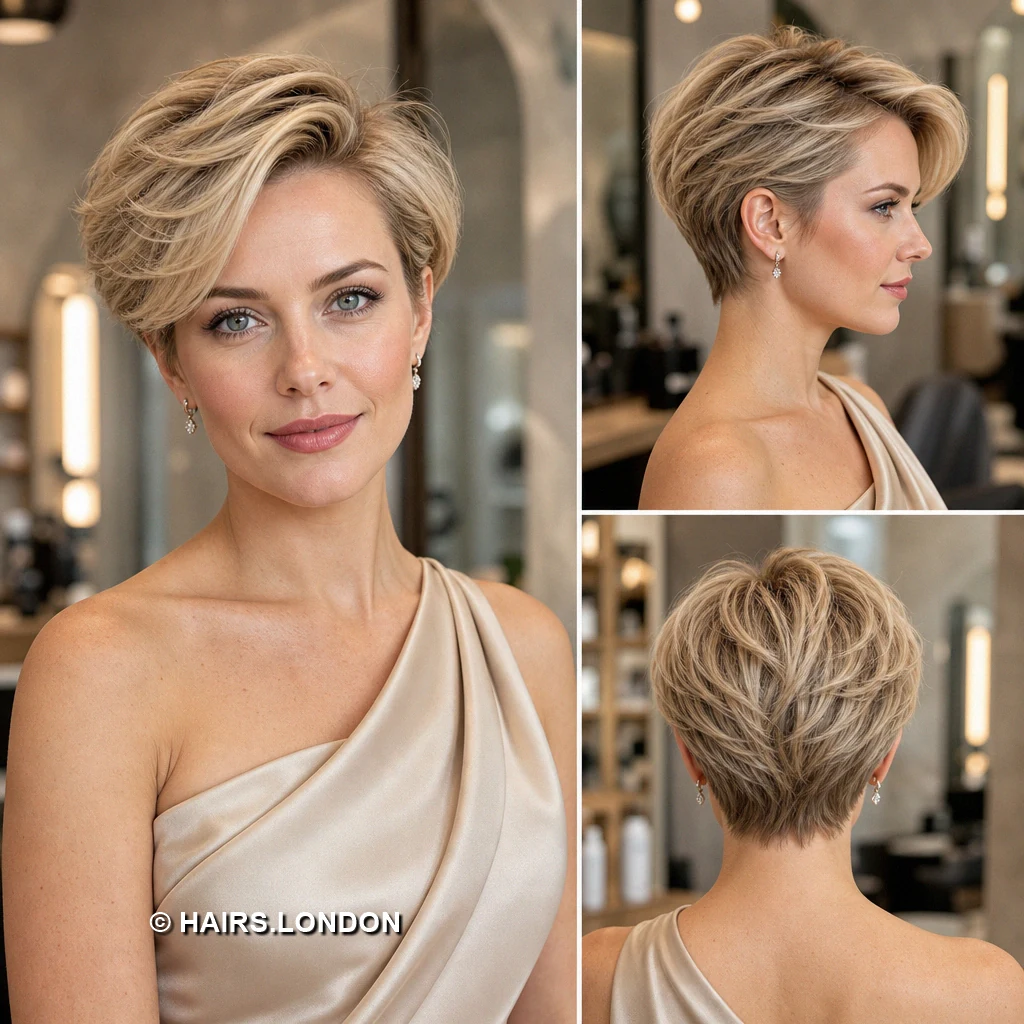
Pearl blonde strands brighten this notably long diagonal fringe. The front falls across one eyebrow in curved sections. A shorter opposite side makes the shape subtly asymmetric. Crown layers remain full above the closely tapered nape. Darker hair underneath gives the pale fringe extra definition. Smooth the front while lifting the roots behind it. Request fine internal layers instead of removing excessive bulk indiscriminately. Keep lighter strands conditioned to maintain their smooth appearance longer. Account for the fringe’s natural fall. Schedule regular trims to keep the silhouette crisp and balanced. Show your stylist the profile and back views too first.
19. Smoky Bronde Pixie with a Curved Fringe
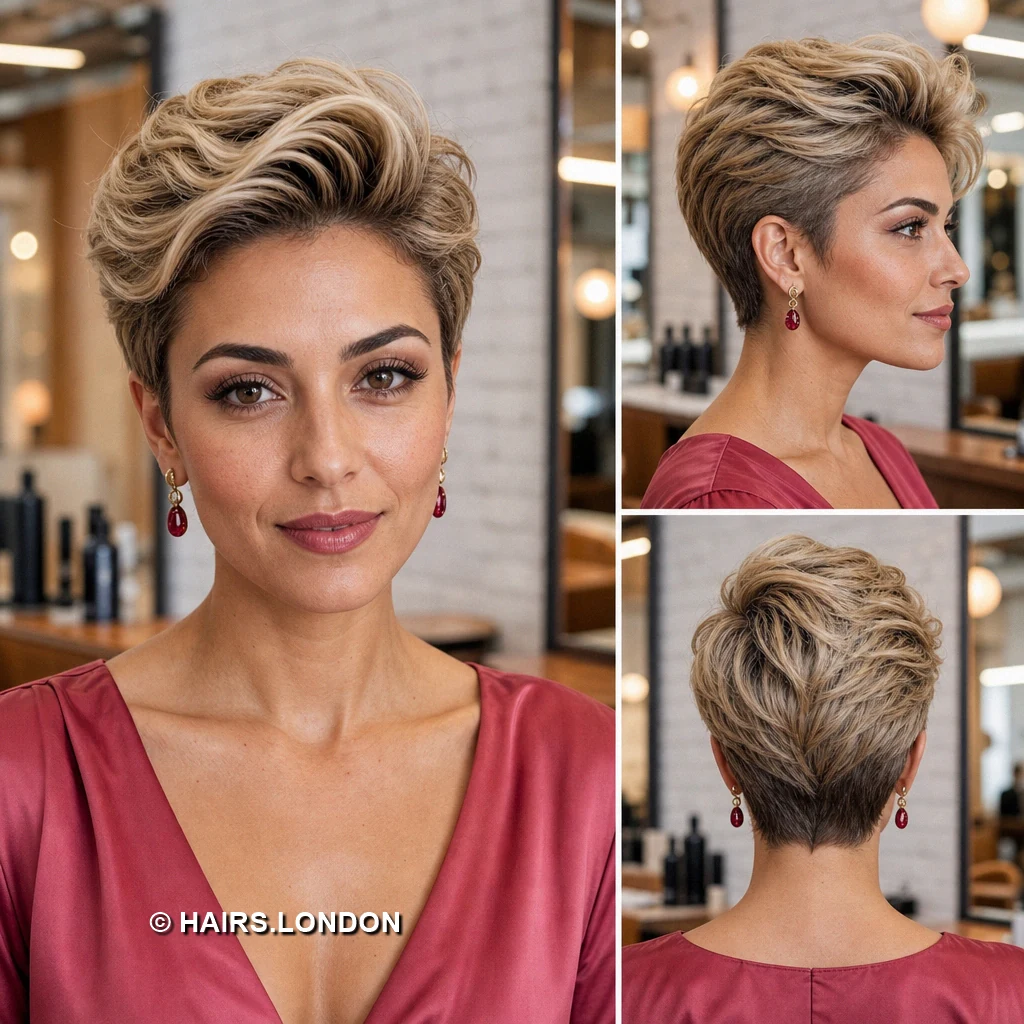
Smoky bronde highlights define the curved, sideward fringe here. The front stays longer than the fitted temple sections. Soft separation adds texture without making the crown spiky. Rear layers follow the head toward a tapered neckline. The darker base remains visible between lighter sweeping strands. Finger style the fringe to retain its gentle bend. Ask your stylist to preserve fullness above the crown area. Work lightweight paste through dry ends for flexible separation daily. Keep the side sections neatly aligned. Schedule regular trims to keep the silhouette crisp and balanced. Show your stylist the profile and back views too first.
How to Choose a Highlighted Pixie Cut
Start with the front length you would actually enjoy styling. A long fringe offers more sweeping options, while a short, piecey front stays away from the eyes. Compare the profile and back as carefully as the front: crown height, coverage around the ears and nape taper make a substantial difference to the shape. Ask for a version that works with your hair’s density and natural growth pattern.
Styling Pixies on Different Textures
For straight hair, lift damp roots with a dryer and use a small amount of paste to define selected ends. For naturally wavy hair, scrunch in lightweight cream and avoid brushing out the bends once dry. If your hair is curly, discuss how much length the top needs to retain after it springs up. Fine hair benefits from restrained product; dense hair may need carefully placed internal layers rather than excessive thinning.
Keeping Blonde Highlights Fresh
The lighter ribbons in these cuts are especially visible around the fringe and crown. Use a conditioner suited to color-treated hair, limit unnecessary heat and protect exposed hair from strong sun. If blonde pieces become warmer than you prefer, ask your colorist whether a toner is appropriate instead of repeatedly using toning shampoo without guidance. Root contrast can be intentional, so agree on the look you want as it grows.
Maintaining the Tapered Shape
Short sides and napes change proportion quickly as they grow. Book trims according to how precisely you want those areas shaped; many people find a visit roughly every four to six weeks useful. Between appointments, redirect the fringe while drying and refresh flattened crown layers with damp fingertips. Avoid cutting the nape or removing crown bulk yourself, since both affect the silhouette from several angles.
What to Discuss with Your Stylist
Bring front, side and back references, then identify the features you want from each: fringe length, crown fullness, coverage at the ears and neckline shape. Explain how much time you spend styling and whether your hair usually falls forward, separates or forms waves. For color, ask where highlights should sit, how much darker base should remain visible and what appointments will be needed to maintain the result.
Frequently Asked Questions
What makes highlights effective on a pixie cut?
They bring out the direction and separation of short layers, particularly through the fringe and crown.
Can I keep my fringe long with short sides?
Yes. Several of these cuts pair a sweeping front with closely fitted sides and a tapered nape.
Which option keeps hair away from the eyes?
Consider a raised front wave or a short, piecey fringe rather than a low, extended sweep.
Will these cuts work on naturally wavy hair?
They can. Ask your stylist to account for how much your waves shorten as they dry and to preserve enough length on top.
How should I style a straight-haired pixie for volume?
Dry the roots upward before directing the fringe sideways, then define a few ends with lightweight product.
What should I ask for if my hair is dense?
Ask your stylist to assess where internal layering would reduce weight while keeping the crown and fringe full enough.
Can a highlighted pixie have darker roots?
Yes. Darker roots are visible in many of these looks and add contrast beneath the lighter strands.
How often will the nape need trimming?
It depends on your growth rate and preferred outline, but roughly four to six weeks is a useful starting point.
Should the sides be shaved to achieve this shape?
No. The pictured sides are generally close and tapered, with visible hair remaining around the temples and ears.
How can I avoid a stiff front wave?
Build the shape with airflow first, then use a small amount of flexible product instead of coating the entire fringe.
What helps blonde highlights stay in good condition?
Condition regularly, use heat protection when styling and follow your colorist’s advice about toning and touch-ups.
Which photos should I bring to a consultation?
Bring front, profile and back views so your stylist can see the fringe, side length, crown shape and nape.
Conclusion
The most useful choice is not simply the lightest highlight or fullest crown. Pick the fringe length, side coverage and nape shape that suit your hair and daily routine, then work with your stylist to place the color where it will best show the cut’s layers.