


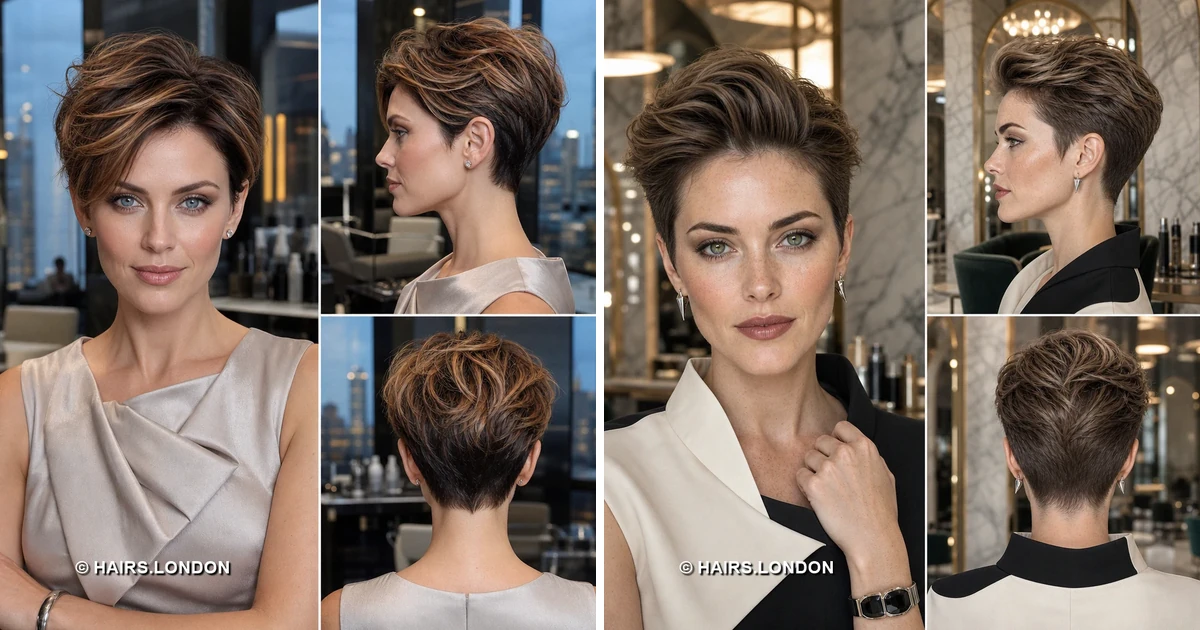
11. Toffee-Tipped Pixie with a Piecey Fringe
Dark brunette roots support fine toffee strands through the top. The short fringe separates into uneven pieces above the brows. Choppy crown layers add height without a single prominent crest. Both sides stay close, then blend into a narrow nape. The rear view shows the same separated texture above it. Request soft graduation around the ears rather than blunt edges. Dry the roots upward with fingers for flexible natural volume. Work lightweight paste through dry ends to define individual sections. Finger style between washes to maintain separation without extra heat. Book regular trims before the tapered neckline loses its definition.
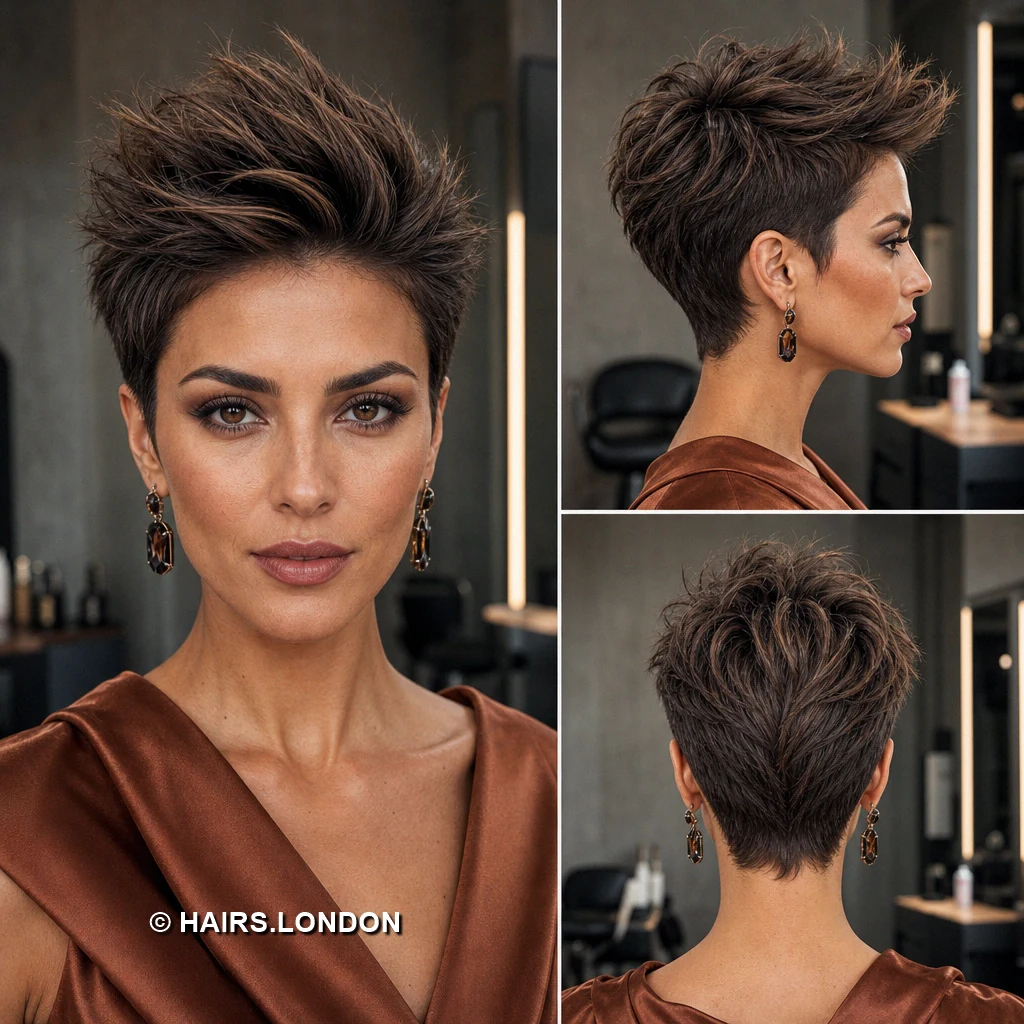
12. Hazelnut Pixie with a Fine Diagonal Fringe
Hazelnut highlights run through the longer top and crown layers. A fine diagonal fringe reaches toward one eyebrow without heaviness. The side beneath the fuller top is cut closely. Behind the ear, softly directed layers meet a short nape. The contrast between light strands and dark roots defines movement. Ask your stylist to preserve length through the upper layers. Use heat protection before blow drying the longer front pieces. Work lightweight paste through dry ends to define individual sections. Discuss your natural growth patterns before choosing the fringe direction. Book regular trims before the tapered neckline loses its neat definition.
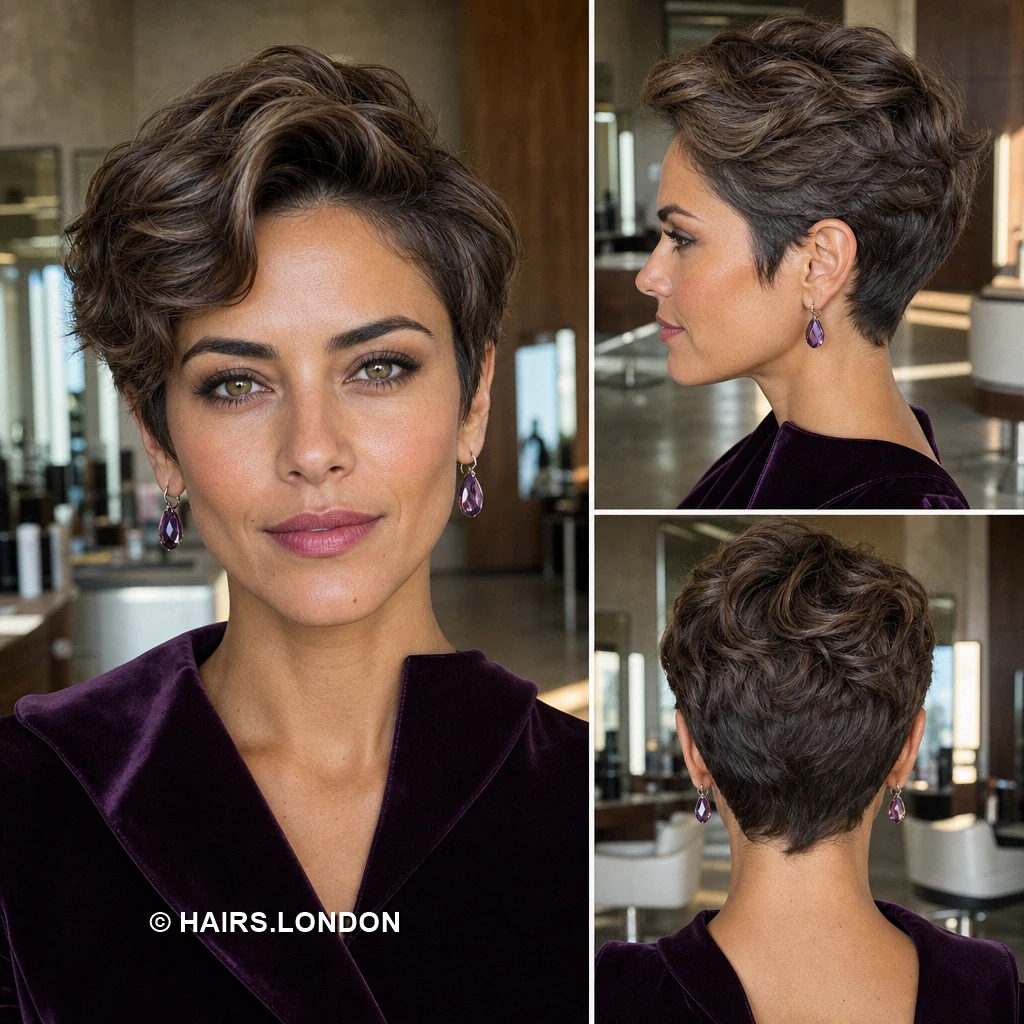
13. Umber Pixie with a Swept, Textured Top
Rich umber brown gives this side-swept pixie noticeable tonal depth. Narrow lighter strands cross the top in several directions. A short, uneven fringe brushes across the upper forehead. Close sides frame the ears beneath a more elevated crown. The back narrows cleanly while retaining soft, airy texture above the nape. Request soft graduation around the ears rather than blunt edges. Dry the roots upward with fingers for flexible natural volume. Work lightweight paste through dry ends to define individual sections. Finger style between washes to maintain separation without extra heat. Keep the shorter perimeter neat while leaving movement above intact.
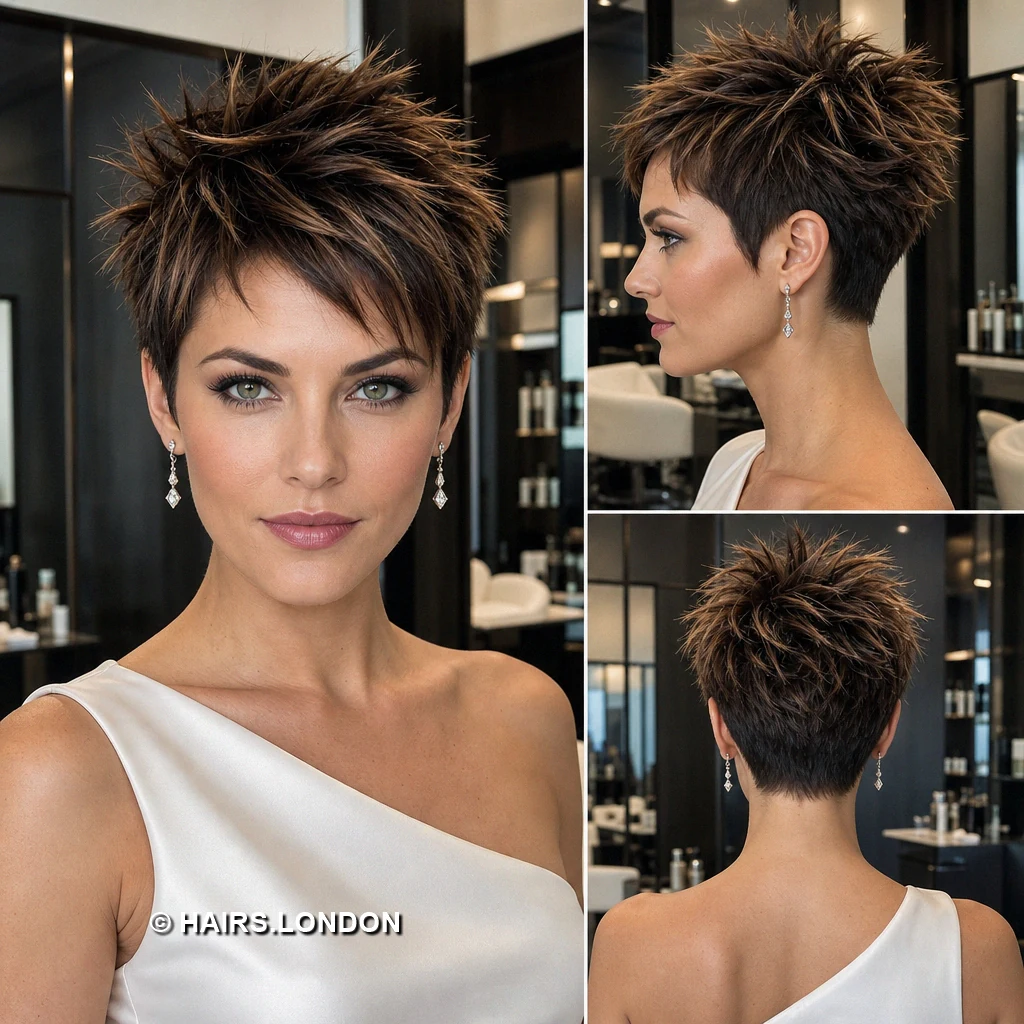
14. Copper-Brown Pixie with a Broken Fringe
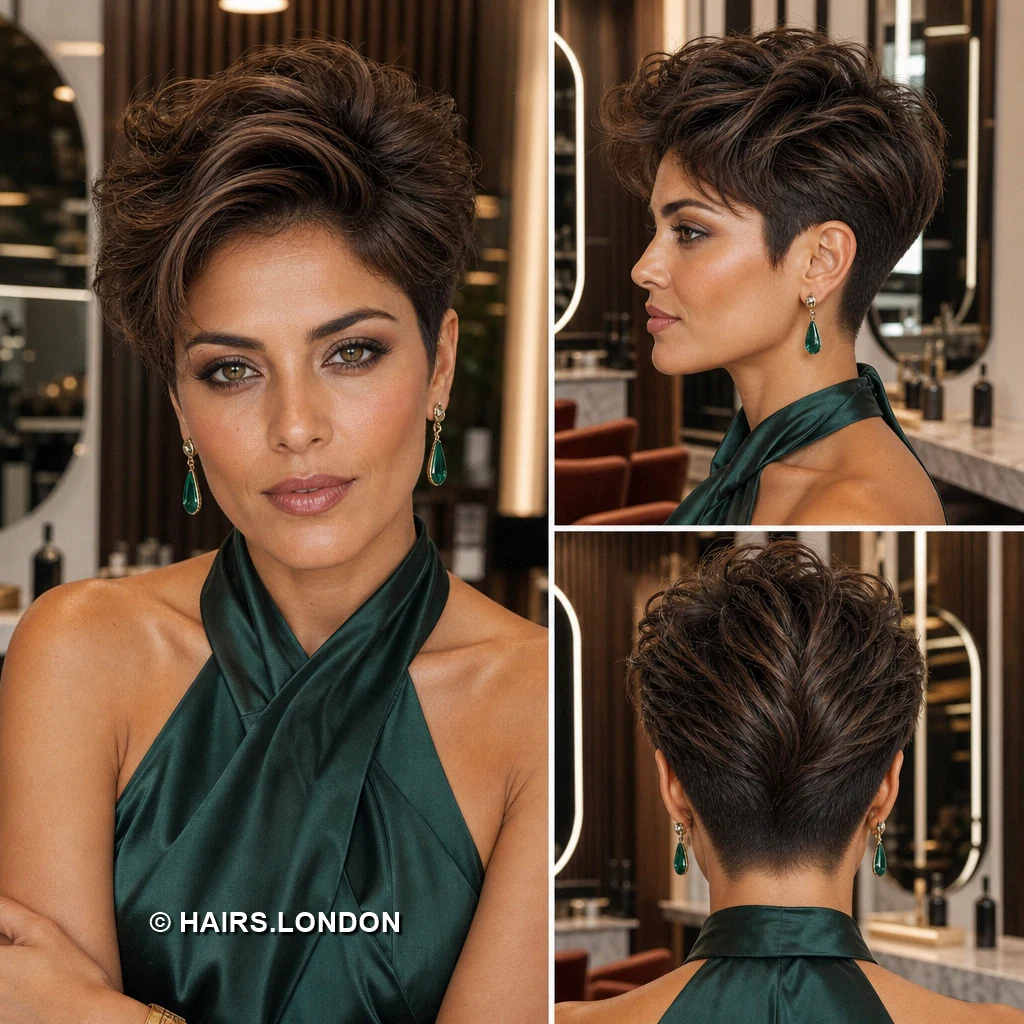
Copper brown highlights emphasize this pixie’s sharply separated upper layers. Short, angled fringe pieces break across the forehead unevenly. The crown lifts into loose, distinct points rather than rounded waves. Darker close-cut sides lead down to a tidy nape. From behind, the textured top contrasts with the smooth, dark perimeter. Dry the roots upward with fingers for flexible natural volume. Work lightweight paste through dry ends to define individual sections. Keep heavier creams away from roots to avoid flattening height. Keep the shorter perimeter neat while leaving movement above intact. Book regular trims before the tapered neckline loses its definition.
15. Ash-Brown Pixie with a Soft Side Fringe
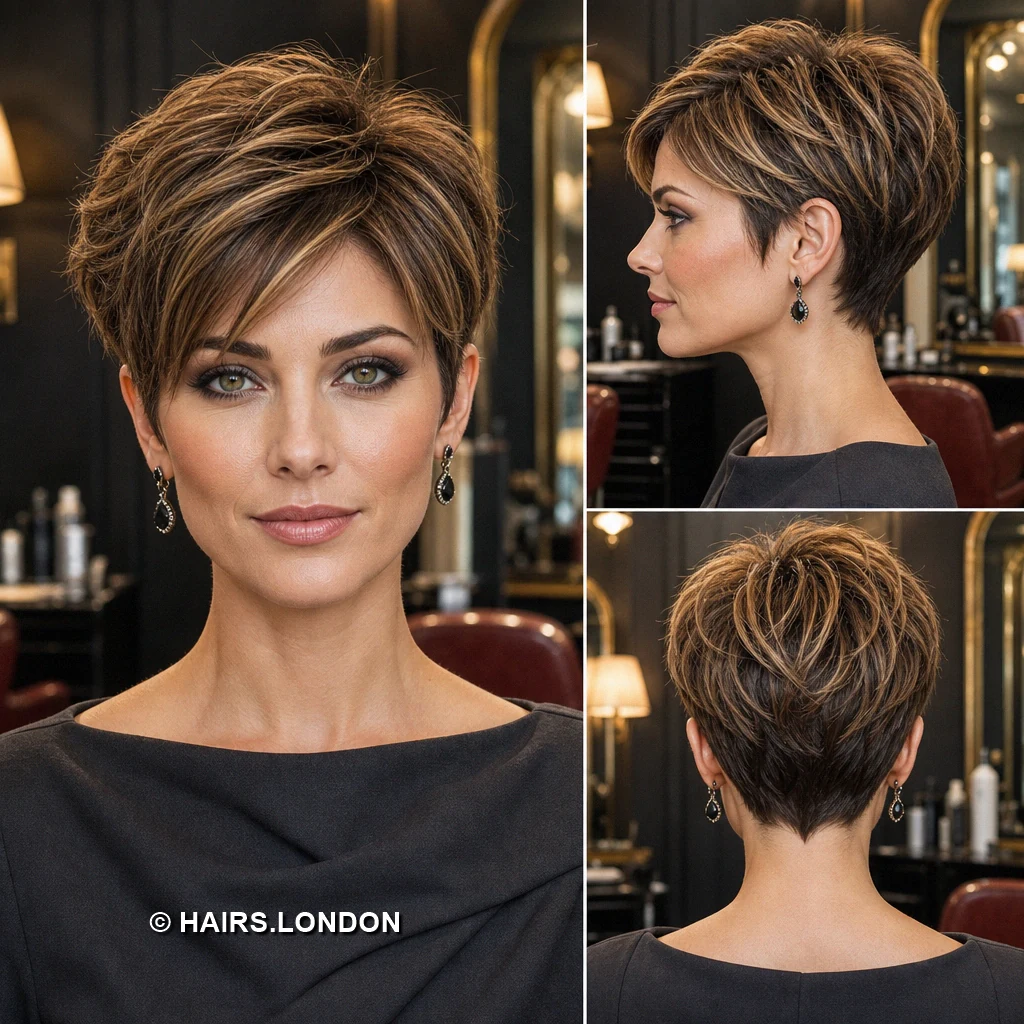
Ash brown layers create a soft sweep across one eye. Muted lighter pieces follow the curve through the crown. The exposed side stays close and clean around the ear. Behind the fuller top, the hair narrows into the nape. Light separation keeps the soft rounded silhouette from looking too solid. Ask your stylist to preserve length through the upper layers. Use heat protection before blow drying the longer front pieces. Finger style between washes to maintain separation without extra heat. Discuss your natural growth patterns before choosing the fringe direction. Book regular trims before the tapered neckline loses its definition.
16. Honey-Streaked Pixie with a Rolled Front
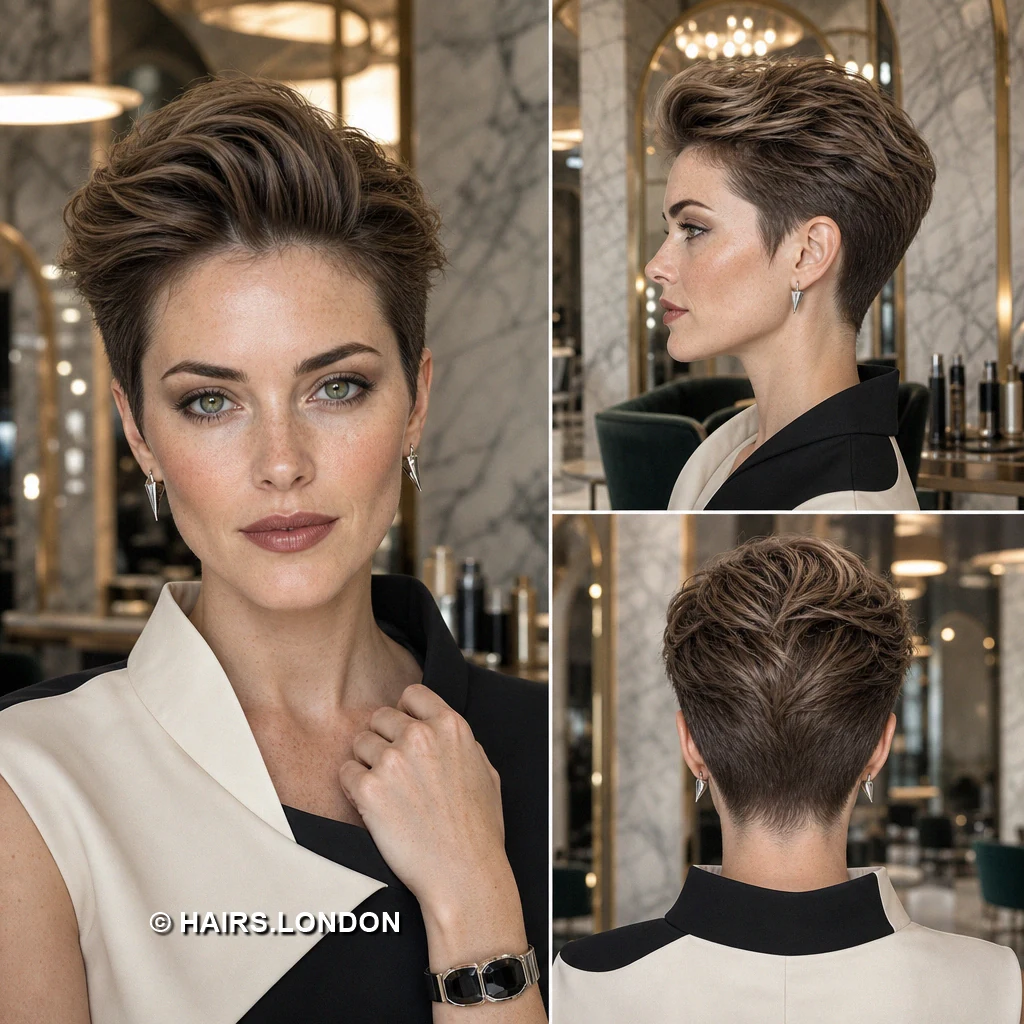
Honey brown streaks trace a rolled section above the forehead. The raised front bends sideways into longer, textured top layers. One closely fitted side provides contrast beneath the prominent sweep. At the back, darker hair tapers into a short nape. The highlighted ends give the front wave extra visible definition. Ask your stylist to preserve length through the upper layers. Dry the roots upward with fingers for flexible natural volume. Use heat protection before blow drying the longer front pieces. Keep heavier creams away from roots to avoid flattening height. Book regular trims before the tapered neckline loses its definition.
17. Taupe-Brown Pixie with a Lifted Crest
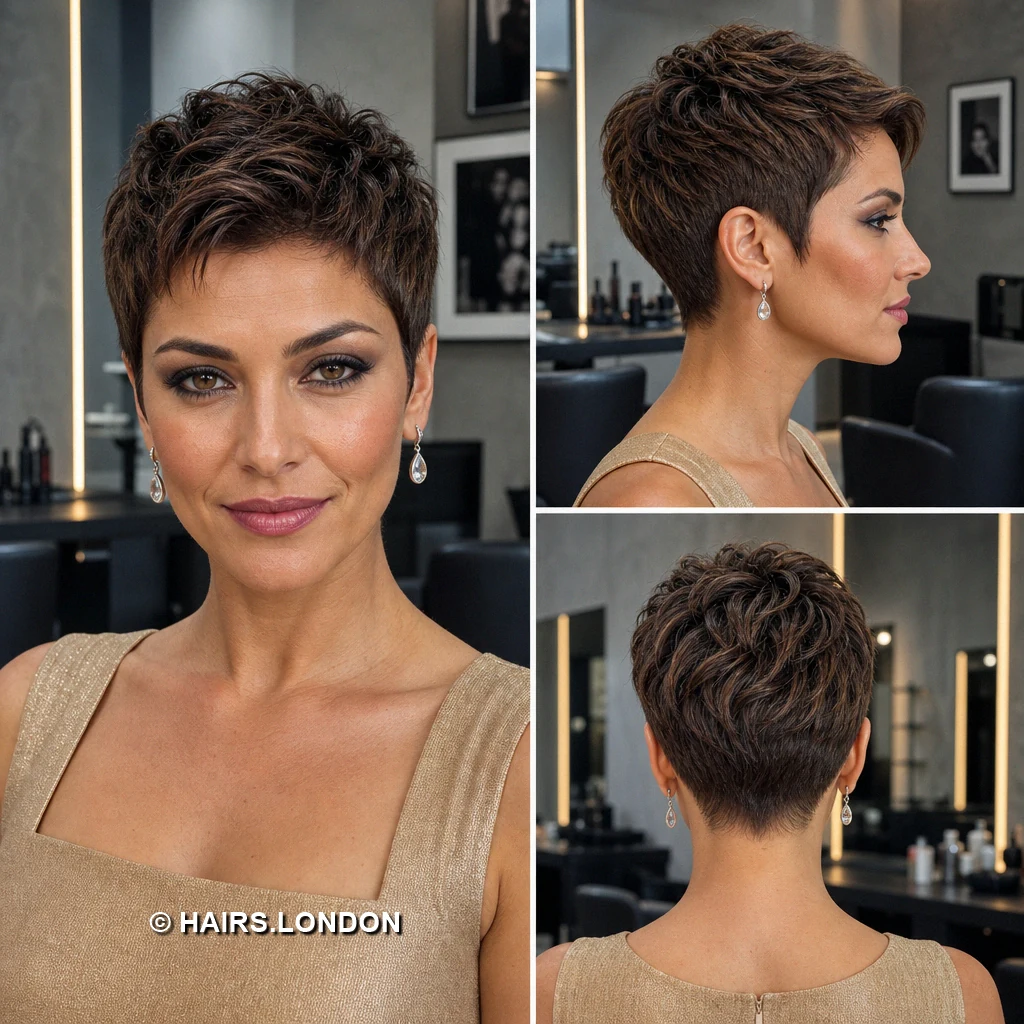
Taupe brown strands rise into a high, feathered front crest. Darker roots strengthen the contrast beneath those lighter individual tips. The sides remain closely shaped while the crown stays long. Individual points angle upward and backward across the top. The rear tapers below a noticeably textured, softly graduated upper section. Dry the roots upward with fingers for flexible natural volume. Work lightweight paste through dry ends to define individual sections. Keep heavier creams away from roots to avoid flattening height. Keep the shorter perimeter neat while leaving movement above intact. Book regular trims before the tapered neckline loses its definition.
18. Mushroom-Brown Pixie with a Sweeping Wave
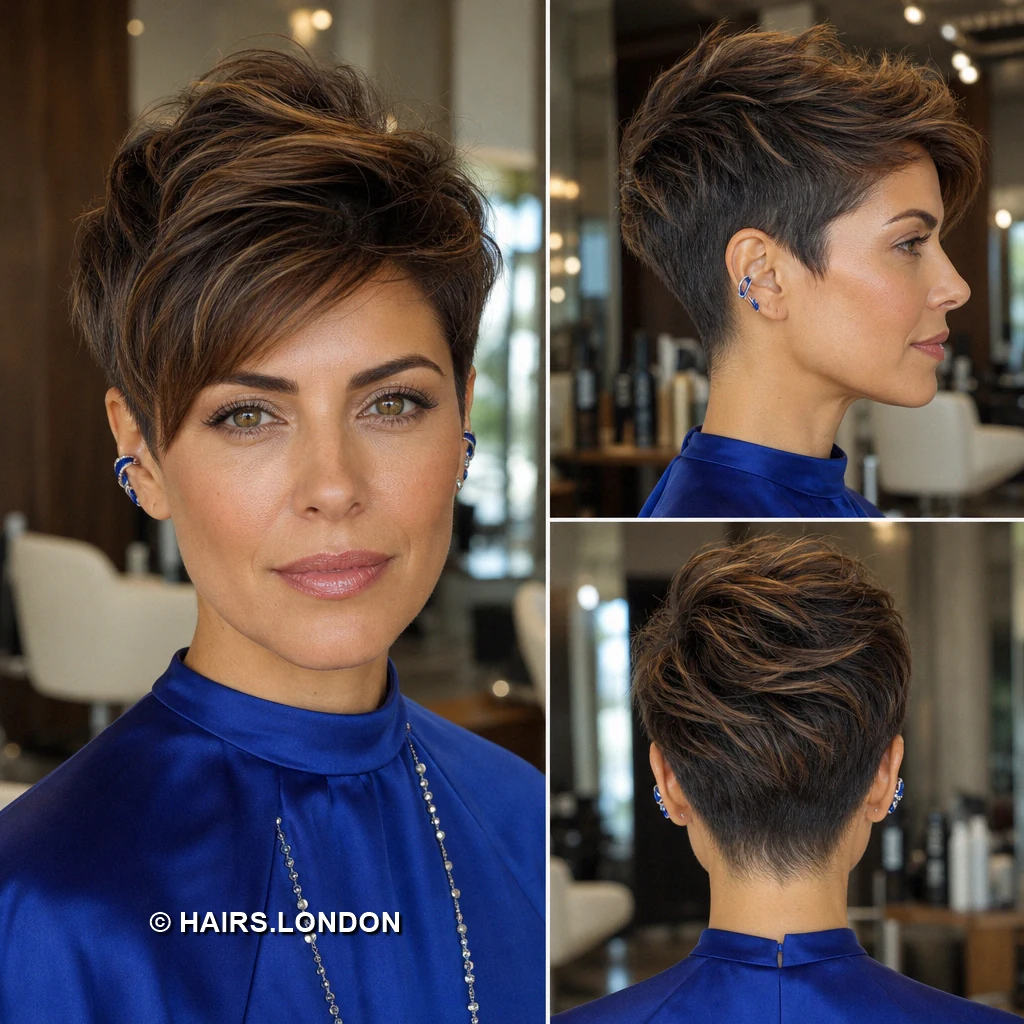
Mushroom brown layers form a broad wave across the front. Fine lighter strands emphasize the bend without overpowering dark roots. The side above the ear is short and closely fitted. Crown layers follow the wave before narrowing toward the back. A precise nape balances the fullness visible from the front. Ask your stylist to preserve length through the upper layers. Use heat protection before blow drying the longer front pieces. Work lightweight paste through dry ends to define individual sections. Discuss your natural growth patterns before choosing the fringe direction. Book regular trims before the tapered neckline loses its definition.
19. Sandy-Brown Pixie with Defined Spikes
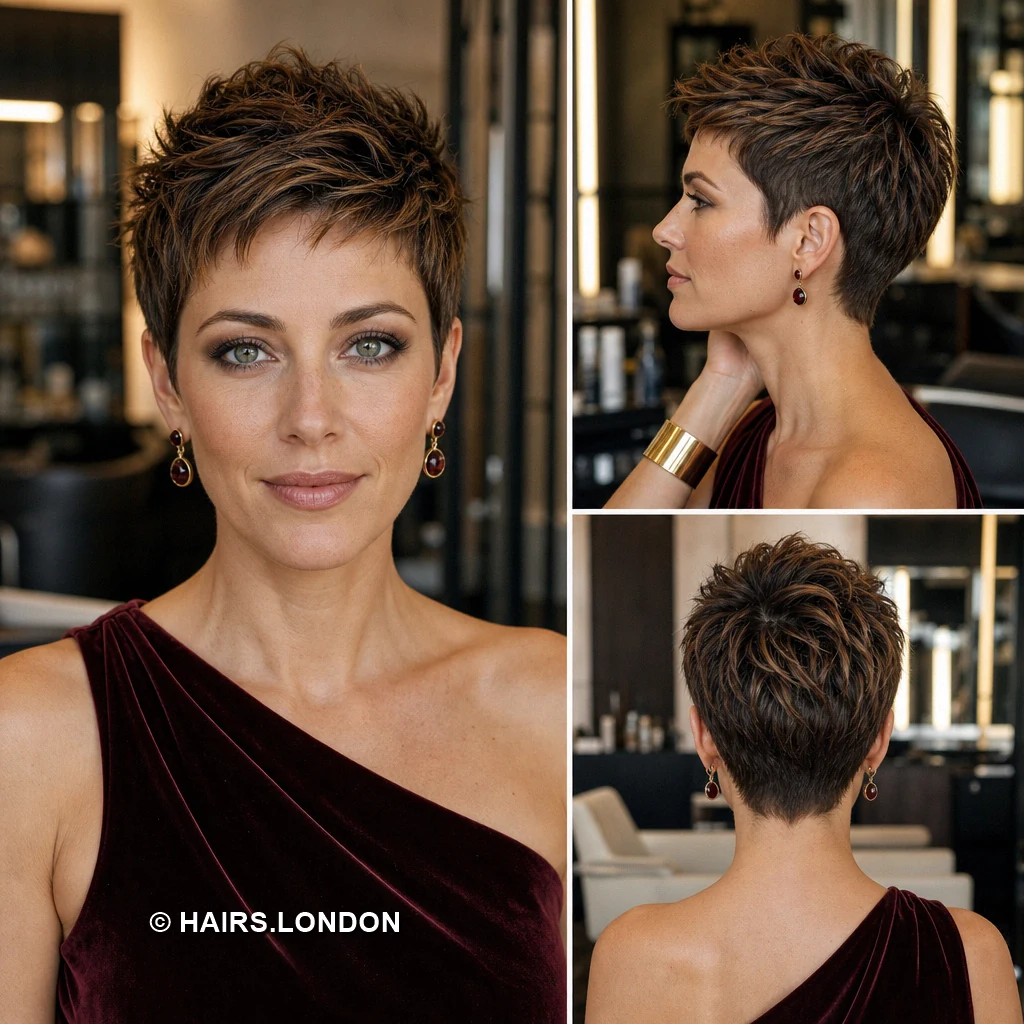
Sandy brown tips give the tall, clearly separated spikes definition. Shorter fringe pieces point forward beneath the raised crown. Darker fitted sides prevent the textured top from appearing bulky. From behind, the spikes spread above a compact, closely tapered nape. The shape depends on separation more than a smooth finish. Dry the roots upward with fingers for flexible natural volume. Work lightweight paste through dry ends to define individual sections. Keep heavier creams away from roots to avoid flattening height. Keep the shorter perimeter neat while leaving movement above intact. Book regular trims before the tapered neckline loses its definition.
How to Choose Your Pixie Shape
Start with the front length you want to live with: a longer side sweep offers more styling options, while a short broken fringe puts the textured crown in focus. Then compare the profiles and back views. Some cuts have closely fitted sides beneath a pronounced, lifted top; others keep a softer, rounder outline. Consider your natural part, cowlicks, hair density, and whether you prefer a pointed or understated nape. Choose the shape you would enjoy even on a day when you do minimal styling.
Styling Different Hair Textures
On fine hair, begin with a small amount of lightweight root product and dry upward before adding anything to the ends. On thicker hair, ask for internal weight removal where needed, then direct the top into place while drying. Naturally wavy hair can use its bends for the softer sweeps; scrunch in a little light styling product and refine only the front. For straighter hair, use a brush or fingers to establish the fringe direction while damp. Finish spiky versions with a small amount of paste on dry tips rather than coating the roots.
Keeping Brunette Color Fresh
The visible color ranges from deep brown to brunette with caramel, honey, ash, or sandy accents. If you want lighter ribbons, ask for their placement through the fringe and crown, where they will show in the finished style. Use a shampoo and conditioner suited to color-treated hair, and protect highlighted sections before heat styling. Ask your colorist how often your chosen tone and placement will need refreshing; subtle, darker accents and brighter front pieces may call for different schedules.
Maintaining the Tapered Shape
The short sides and napes make these cuts feel precise, but they also show growth sooner than the longer top. Arrange trims according to how quickly your perimeter loses its shape, and tell your stylist if you want to grow the fringe between visits. At home, direct damp roots before they dry flat, then use only enough product to separate the ends. Keep the nape and areas around the ears neat without sacrificing the crown length that gives the cut its movement.
What to Discuss with Your Stylist
Bring the front, side, and back view of your preferred cut, not just its front portrait. Point out the exact fringe length, the amount of height at the crown, how close the sides sit, and the nape finish. Show where your hair naturally parts or changes direction, and explain how much time you spend styling it. If you want highlights, discuss their tone and visibility separately from the haircut. Ask your stylist to show you how to recreate the finished shape with the tools and products you have.
Frequently Asked Questions
What makes these textured brunette pixie cuts different from a uniform short crop?
They keep more length and movement on top while shaping the sides and nape closer to the head.
Which pictured shape has the softest fringe?
The longer side sweeps, such as the first, seventh, and fifteenth looks, give the fringe a softer edge than the short, piecey versions.
Which looks have the most height?
The lifted styles in images 3, 8, 17, and 19 show particularly noticeable height through the front or crown.
Can I keep my natural part?
Yes. Show your stylist where your hair naturally separates so the fringe and top layers can be planned around it.
Do I need highlights to see the texture?
No. Highlights make individual sections more visible, but a well-cut shape and a little styling product can define dark hair too.
How do I keep a swept fringe in place?
Direct it toward the chosen side while it is damp, use heat protection if blow drying, and finish with a small amount of flexible product.
How should I style the spikier cuts?
Lift the roots while drying, then pinch a small amount of paste into the dry ends to separate selected sections.
Will a rounder pixie require the same styling as a spiky one?
No. A rounded shape benefits from controlled root lift and smooth direction, while spikes need more deliberate separation at the tips.
What should I ask for at the nape?
Use the back view of your chosen image to show whether you prefer a narrow pointed finish or a softer, less pronounced taper.
How often should I trim a tapered pixie?
Book a trim when the sides or neckline stop holding the shape you want. The right interval depends on your growth rate and preferred neatness.
Can I grow out the fringe without changing the whole cut?
Yes. Tell your stylist to maintain the sides and nape while leaving enough length at the front for the new fringe direction.
What color details should I discuss at a consultation?
Specify whether you want a deep brunette base, warm or cool lighter strands, and how visible those strands should be through the fringe and crown.
Conclusion
The most useful choice is not simply the pixie with the most volume or the brightest highlights. Look for the balance of fringe length, crown texture, fitted sides, and nape shape that suits your hair and your routine. Bring the corresponding views to your appointment, then ask your stylist to adapt those details to your natural growth pattern.